Ash's Adub

Want a thread dedicated to your car?
Got a seriously pimped-out ride? Building an extreme performance MR2? Post here!

Moderator: Moderators

Forum rules
This section of the forum is a great resource if you're looking for ideas, and it's a cool way of obtaining technical information that may otherwise not have been posted. (Members can use the Search functionality at top right of the forum to speed up finding things) Please respect others' contributions and don't diss anyone - keep comments helpful, factual, positive and polite. One thread per vehicle or owner please - don't start lots of threads about just one car. And if you need assistance with your car and want to host a spanner day, please use the appropriate section of the forum: http://mr2.org.nz/phpbb3/viewforum.php?f=35 Thank you.
User avatar
Ash Kelly Barr
Club Member - MR2OCNZ
Posts: 838
Joined: Sun Dec 29, 2013 10:12 am
Stomping Ground: Auckland
Prime Mover: AW11
First name: Ash

Ash's Adub

Post by Ash Kelly Barr »

So finally this is it!
Bought off good o'll trademe and driven home from dargaville a week before Christmas
Now the original owner of the car I didn't meet but delt with.. An affiliated party.. And apprently owned for 10 years and is a member of the club, witch is why my car already rides with the club window stickers :) I'm super stocked to finally have one yet alone one in such good nick!

So was told it was resprayed two years ago so paint and panels pretty tidy although was a closed door job but meh
Had the factory thin line sticker replaced after witch is awesome

210.000kms but seem sweet as, have had tighter engines before but she's to not bad and still got that omff
Handlings awesome but might need a bit more stick on the back with any more power in the future
Attachments
image.jpg
image.jpg
Last edited by Ash Kelly Barr on Mon Feb 24, 2014 12:22 am, edited 1 time in total.

User avatar
Ash Kelly Barr
Club Member - MR2OCNZ
Posts: 838
Joined: Sun Dec 29, 2013 10:12 am
Stomping Ground: Auckland
Prime Mover: AW11
First name: Ash

Re: Ash's Adub - yet to be named

Post by Ash Kelly Barr »

So while waiting a week for the auction to close I'd already spent a fair bit of coin on parts haha stupid I know but already had my heart set on it and wasn't going to miss on this one
Ended up with a hole lot of TRD bits (most with no performance value what so ever) from a (unfortunately fake) gear knob to oil cap, to sway bar bushings
Bought a 175mm crank pulley, new belts and loads more
Even spare ZE cam covers to clean and paint, will do and post photos when I have time

So day two of ownership I couldn't resist a bit of a tinkering
Started small as the shift boot was rather cracked and woren ( and looking rather crap next to my new fake trd knob so I decided to replace it, I removed the boot and undid all the stitching, placed it on some black leather hide I had from anouther project and traced it out, unfortunately I couldn't be bothered making a 4 panel as to hand stitch one side and the fit it over the wire fixing ring and stitch that took me hours but it still ended up looking mint! Unfortunately I forgot to get a photo of it all finished but will add one tomorrow

After that I looked at the shifter, I've always had or modded to have a really short throw on my shifters, just for driving preference and feel
So after a bit of a look I think I'll weld a bit of plate above the one already on the back of the shifter to move the arm up, shortening the throw a bit, not as much as I'd like due to room restrictions but hey it's an improvement and will keep me occupied for a bit

Unfortunately this will only shorten the up and down throw of the H pattern not the 1st-3rd-5th across movement but I will figure this out later
Attachments
image.jpg

User avatar
Ash Kelly Barr
Club Member - MR2OCNZ
Posts: 838
Joined: Sun Dec 29, 2013 10:12 am
Stomping Ground: Auckland
Prime Mover: AW11
First name: Ash

Re: Ash's Adub - yet to be named

Post by Ash Kelly Barr »

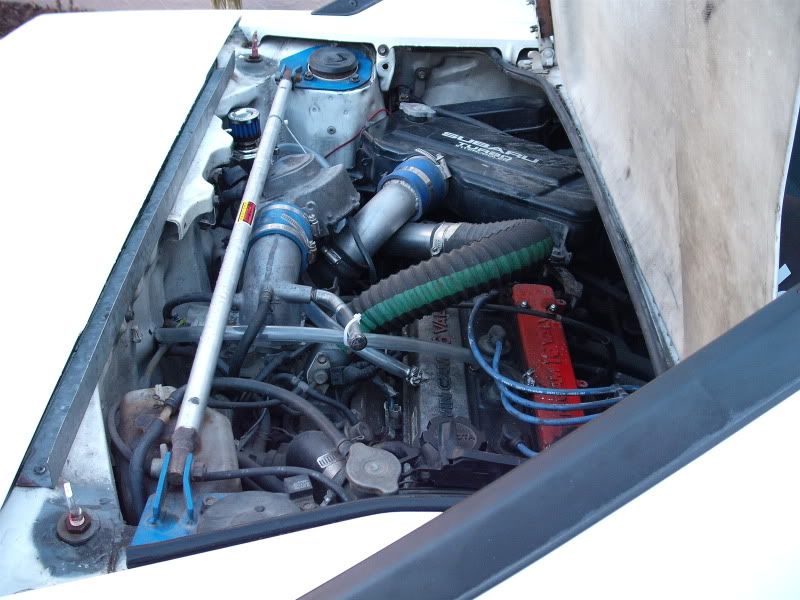
Next I had a boost gauge from an old project that was never used, I know what some of you are thinking, but in my defence, armed with some awesome info from you guys, I plan of playing with pulleys and chargers so would like to see what my chargers doing, and I'm 22 so boost gauges are cool as..

Any way I set about installing this starting by removing that "carpet thing" on the fire wall behind the seats. As you do you start with one idea and finish with 10 others
It turns out it's frecken heavy, made from felt glued onto so plasticky rubber stuff??
So decided to do away with that
Want to retain the interior but also improve as I go so will be looking into some black canvas cloth and ADOS spray glue some 10mm seat foam to the back of it as that'll be tons lighter and still look the part!
Will use the factory felt plastic rubber thing as a template again and go from there
Will post photos of this in a couple weeks

Then realised there's a ton of sound deadening on there
Will be doing away with that

And finally coming back to my boost gauge, got it all run in and fitted
Fitted it in the air vent to the right of the cluster, used the actual swivel bit so it still moves around haha turned out to be a perfect fit, yes I had to cut the fin out in the vent and I'm sacrificing an air vent, but hey that's what windows are for! I'll probably rip and A/C system out in a couple weeks any way! And I'm pretty proud of my swivelling boost gauge :)

Much to my dismay how ever, upon taking for a drive it turns out my gauge is stuffed, probably dropped it at some point
Will get another to replace it soon

Will post photos of my not working boost gauge soon

User avatar
Ash Kelly Barr
Club Member - MR2OCNZ
Posts: 838
Joined: Sun Dec 29, 2013 10:12 am
Stomping Ground: Auckland
Prime Mover: AW11
First name: Ash

Re: Ash's Adub - yet to be named

Post by Ash Kelly Barr »

Photos of the shifter boot
Attachments
image.jpg
New leather boot fitted

User avatar
Ash Kelly Barr
Club Member - MR2OCNZ
Posts: 838
Joined: Sun Dec 29, 2013 10:12 am
Stomping Ground: Auckland
Prime Mover: AW11
First name: Ash

Re: Ash's Adub - yet to be named

Post by Ash Kelly Barr »

Boost gauge in place. Air vent worked well and was nice and desecrate
Not a fan of dilling holes in dashes or steering columns
As it turns out the gauge is broken (cheap auto gauge gear) will opt for a back faced and black rim one to tie in better with the interia and perhaps look a bit more factory

Sorry for crapy lighting in photos
Attachments
image.jpg
image.jpg

User avatar
Ash Kelly Barr
Club Member - MR2OCNZ
Posts: 838
Joined: Sun Dec 29, 2013 10:12 am
Stomping Ground: Auckland
Prime Mover: AW11
First name: Ash

Re: Ash's Adub - yet to be named

Post by Ash Kelly Barr »

So a little more time spent familiarising my self with the AW chassis and engine plant.
Unfortunatly as I've already told anouther member, according the the girlfriend other things take a bit more financial priority (rent and food to say the least) and although the idea of being a bit more slender and spending more time in my new toy (living out of) I think she may be right. This meaning my AE101 4agze with and M90 is put on the back burner till the end of the year at least :(
This being said that hasn't stopped me tinkering already
Having to make do with what I've got I've given her a good clean and degrease
Fitted a space saver up front to make room for a battery box
Started flipping the intake around as per fly-wedges idea

User avatar
Ash Kelly Barr
Club Member - MR2OCNZ
Posts: 838
Joined: Sun Dec 29, 2013 10:12 am
Stomping Ground: Auckland
Prime Mover: AW11
First name: Ash

Re: Ash's Adub - yet to be named

Post by Ash Kelly Barr »

Picked up a space saver for $20, fits well and new tire
Battery box $15
Need some cable but will need to investigate path to see how much I'll need
Attachments
New box
New box
The cat getting amongst the graveyard shift
All fitted up nicely, now to get some cable and lugs

User avatar
Ash Kelly Barr
Club Member - MR2OCNZ
Posts: 838
Joined: Sun Dec 29, 2013 10:12 am
Stomping Ground: Auckland
Prime Mover: AW11
First name: Ash

Re: Ash's Adub - yet to be named

Post by Ash Kelly Barr »

Started on flipping the intake. Easy as hell
Took the throttle off and gave it a good clean while I was doing this. The vent that bypass' the butterfly was all blocked up so cleaned that out.

While flipping the pipe was easy the case of this air was an issue. After talking to a couple people I thought it better to not just let it vent to atmos and instead of tapping a hose fitting just used a drill press to notch a bit out on the throttle body.
Put a bolt where the cam cover breather was

I managed to use the original pipe bits to connect up the TB pipe to the AFM and meter to pod filter now sitting in place of the side vent fan

Being left with a big hole to the old air filter I got to making a block off plate out of some snazzy looking alloy I had. Made a paper template from old pipe and traced it onto the alloy
Will just silicone a bit and use old bolts to fix her on

The fan was a pain in the ass to remove with the engine in. Got the 3 bolts out but after getting frustrated trying to wedge it out I ended up just cutting the surround off with tin snips

Now my only issue is getting the AFM cables over to it
Will look at taking it back through the loom but will probably just lengthen the cables
Attachments
Blocked breather
Blocked breather
image.jpg
Hole to air box I want to block off
image.jpg
Alloy plate
Alloy plate
Finley getting amongst it again
image.jpg
image.jpg (109.45 KiB) Viewed 3812 times

User avatar
Ash Kelly Barr
Club Member - MR2OCNZ
Posts: 838
Joined: Sun Dec 29, 2013 10:12 am
Stomping Ground: Auckland
Prime Mover: AW11
First name: Ash

Re: Ash's Adub - yet to be named

Post by Ash Kelly Barr »

Now to deal with cam breather. I notice only the IN vents not the EX
I've got another set of ZE covers so degreased and water blasted those today as I want to repainted and tidy them up
Was thinking since I've got two I could use one hose fitting off one and put it on the EX cover of the other set meaning both can then vent so going to do this some time in the next week and plumb the to a catch can with breather I'll mount where the battery was
Will post photos once complete
Attachments
Water blaster and repco degrease worked a treat although took some old paint off so may pay to be careful unless your planing on re painting<br />Thinking I'll do the engine bay next and get her sparkling
Water blaster and repco degrease worked a treat although took some old paint off so may pay to be careful unless your planing on re painting
Thinking I'll do the engine bay next and get her sparkling

User avatar
Ash Kelly Barr
Club Member - MR2OCNZ
Posts: 838
Joined: Sun Dec 29, 2013 10:12 am
Stomping Ground: Auckland
Prime Mover: AW11
First name: Ash

Re: Ash's Adub - yet to be named

Post by Ash Kelly Barr »

Sanded down the share cam covers today, filed off cast marking while I was at it
Pulled the hose attachment for the breather off the IN cover and drilled out the EX cover and fitted it to that.
On the IN cam cover I fitted the hose attachment off the intake pipe that connected to the cam cover.
I blocked this off on the intake by tapping it and putting a bolt with some lock tight

Reason I put the intake one on the IN cam cover was that I could make it face off to the side. The EX now come straight off and will bend around to meet the other breather pipe, and will cable tie together down to catch can, no technical reason, just will look neater and be easier to deal with if they come together

Now to prime and paint..
Attachments
Filed and sanded down ready for painting
image.jpg

User avatar
flying_wedge
Club Member - MR2OCNZ
Posts: 1698
Joined: Sat Aug 06, 2005 5:07 pm
Stomping Ground: Christchurch
Prime Mover: AW11
First name: Mark

Re: Ash's Adub - yet to be named

Post by flying_wedge »

I just used 2 x intake cam covers to get 2 x breathers.

Image

User avatar
Ash Kelly Barr
Club Member - MR2OCNZ
Posts: 838
Joined: Sun Dec 29, 2013 10:12 am
Stomping Ground: Auckland
Prime Mover: AW11
First name: Ash

Re: Ash's Adub - yet to be named

Post by Ash Kelly Barr »

Oh cool yeah I thought a bought that! Want to put the catch can over the other side. Did you run a catch can?? Look like their just venting??

User avatar
Ash Kelly Barr
Club Member - MR2OCNZ
Posts: 838
Joined: Sun Dec 29, 2013 10:12 am
Stomping Ground: Auckland
Prime Mover: AW11
First name: Ash

Re: Ash's Adub - yet to be named

Post by Ash Kelly Barr »

Any want an OEM look to so wanted to keep the ZE covers. Partly why I used the factory piping whe swopping the intake

User avatar
Ash Kelly Barr
Club Member - MR2OCNZ
Posts: 838
Joined: Sun Dec 29, 2013 10:12 am
Stomping Ground: Auckland
Prime Mover: AW11
First name: Ash

Re: Ash's Adub - yet to be named

Post by Ash Kelly Barr »

Mind my auto correct ^ on phone

User avatar
flying_wedge
Club Member - MR2OCNZ
Posts: 1698
Joined: Sat Aug 06, 2005 5:07 pm
Stomping Ground: Christchurch
Prime Mover: AW11
First name: Mark

Re: Ash's Adub - yet to be named

Post by flying_wedge »

They were just venting to atmo in that pic before I tee'd them both into the same line - then ran the return from catch can to intake.
Still vented to atmosphere at the catch can, better to make a closed loop with catch can in the middle.

Post Reply