Malcolm's 3SGTE AW11

Want a thread dedicated to your car?
Got a seriously pimped-out ride? Building an extreme performance MR2? Post here!

Moderator: Moderators

Forum rules
This section of the forum is a great resource if you're looking for ideas, and it's a cool way of obtaining technical information that may otherwise not have been posted. (Members can use the Search functionality at top right of the forum to speed up finding things) Please respect others' contributions and don't diss anyone - keep comments helpful, factual, positive and polite. One thread per vehicle or owner please - don't start lots of threads about just one car. And if you need assistance with your car and want to host a spanner day, please use the appropriate section of the forum: http://mr2.org.nz/phpbb3/viewforum.php?f=35 Thank you.
User avatar
Malcolm
Club Member - MR2OCNZ
Posts: 638
Joined: Mon May 24, 2010 8:24 pm
Stomping Ground: Auckland
Prime Mover: AW11
First name: Malcolm

Re: Malcolm's 3SGTE AW11

Post by Malcolm »

flying_wedge wrote:Looking good Malcolm - good progress!
Sweet workshop space you have as well, and access to a hoist!

What glue did you use to stick those brackets to the lip? That seems the perfect solution and I have been wondering how to make this work for the lip to sit tighter to the body.
Yeah I'm pretty spoilt with the space and tools we've got at work, recently got a sheetmetal bender/roller/shear which I can see being useful in the future. Biggest problem is usually the race between my workmates to get on the hoist in the evenings/weekends!

The glue is Plexus MA300, it's a really freaking strong 2 part adhesive, about $50 for a tube from Nuplex. You kinda need the proper double-plunger dispensing gun to use it, although you can improvise other methods to dispense the two parts in equal quantities

User avatar
Ash Kelly Barr
Club Member - MR2OCNZ
Posts: 838
Joined: Sun Dec 29, 2013 10:12 am
Stomping Ground: Auckland
Prime Mover: AW11
First name: Ash

Re: Malcolm's 3SGTE AW11

Post by Ash Kelly Barr »

Hey mate great progress! I'm currently doing the same and had the same amount of leaves collected in mine haha
Good idea with the aero tech lip, might haft to hit you up when I get mine
Toyota motors:
Current - 89 AW11 factory manual SC
Sold - 74 Toyota Crown wagon (MS63), Holden 308, TH400 trans

User avatar
flying_wedge
Club Member - MR2OCNZ
Posts: 1696
Joined: Sat Aug 06, 2005 5:07 pm
Stomping Ground: Christchurch
Prime Mover: AW11
First name: Mark

Re: Malcolm's 3SGTE AW11

Post by flying_wedge »

Sweet, I'm overdue for a supply run to Nuplex so will pick some up next time I go. I take it that the dispensing gun doesn't come with it like with the ados 2 part adhesives. I'm sure I will figure something out :wink:

Thinking my AW will probably more or less (for now!!) be complete by Chrismas too.

Have you thought about extending the centre piece of the Aerotech lip back to the radiator support tray, and even the underside of it back to the radiator support or even bottom of the frunk to help with directing airflow? On the underside would help create a similar effect as an air splitter, and with your radiator and venting mods you could completely block off the airflow under the radiator so it all goes out over the bonnet

Think I will look into this one very soon, to make pretty much any airflow into the front cavity to go through the radiator at least.

Be keen on some Erebuni style end caps for the rear instead of the factory mud flaps? Thinking of making a mold to pop out a few pieces once I complete a suitable plug
Image

User avatar
Malcolm
Club Member - MR2OCNZ
Posts: 638
Joined: Mon May 24, 2010 8:24 pm
Stomping Ground: Auckland
Prime Mover: AW11
First name: Malcolm

Re: Malcolm's 3SGTE AW11

Post by Malcolm »

flying_wedge wrote:Have you thought about extending the centre piece of the Aerotech lip back to the radiator support tray, and even the underside of it back to the radiator support or even bottom of the frunk to help with directing airflow? On the underside would help create a similar effect as an air splitter, and with your radiator and venting mods you could completely block off the airflow under the radiator so it all goes out over the bonnet
Yep I had been looking at doing exactly that. There's no radiator support panel so it will just be a 3-sided duct from the opening in the front bumper to the first radiator. One thing I need to be careful of is that if I force too much air through the radiators it could cause a high pressure zone to build up in front of them which would generate some front end lift - if this is a problem I would just add some louvres to the duct.

Be keen on some Erebuni style end caps for the rear instead of the factory mud flaps? Thinking of making a mold to pop out a few pieces once I complete a suitable plug
I would be actually, I bought some second hand sideskirts a while ago to look at modifying them to make end caps but decided they weren't even remotely the right shape

User avatar
Malcolm
Club Member - MR2OCNZ
Posts: 638
Joined: Mon May 24, 2010 8:24 pm
Stomping Ground: Auckland
Prime Mover: AW11
First name: Malcolm

Re: Malcolm's 3SGTE AW11

Post by Malcolm »

Had a productive day today. Pressure tested the cooling system and found the source of slow coolant loss: couple of loose hoseclamps. I also made some new mounts for the overflow bottle using vibration isolators as I'm a little concerned about the aluminium fatiguing.

Also made more progress with the painting. I've been repairing some cracks in the side skirts as well as finishing off the bonnet and engine lid. I've got quite a few parts primed and ready for sanding then top coat... Exciting! Might even finish painting it this year!ImageImageImage

User avatar
mickeyduck
Life Member - MR2OCNZ
Posts: 6144
Joined: Mon Apr 25, 2005 11:30 am
Stomping Ground: Auckland
Prime Mover: More than one MR2
First name: Charlie

Re: Malcolm's 3SGTE AW11

Post by mickeyduck »

It's going to be real nice to see this wee beastie back on its feet Malcolm. Should be mint when it's done. 8)

I'll be interested to see what you come up with for the speedo too.
#8^) Charlie the certified Westie
Retired - President 2012 - 2018
Retired - Committee Member 2009 - 2018
Retired - Auckland Area Coordinator 2009 - 2018
Retired - Webmaster, Forum Host & Admin 2010 - 2018 - Now it's mknz

Financial Club Member since 2004 and thanks to *84vvt and co-conspirators, Life Member since April 2017 8)
100+ MR2OCNZ runs and counting... When going hard, good rubber's your best protection against unwanted accidents. Buy good tyres!
When you're nearing the end of the drag-strip and you have no 'chute, you may as well keep your foot to the floor... Live life. There ain't no second pass. :twisted:

User avatar
Malcolm
Club Member - MR2OCNZ
Posts: 638
Joined: Mon May 24, 2010 8:24 pm
Stomping Ground: Auckland
Prime Mover: AW11
First name: Malcolm

Re: Malcolm's 3SGTE AW11

Post by Malcolm »

Finished off the strut brace tonight :)
ImageImageImage

Close up of the overflow bottle mounting
Image

Some point soon I need to take a trip to the powder coater and anodiser to get some bits tidied up
Last edited by Malcolm on Wed Sep 10, 2014 1:41 pm, edited 1 time in total.

Northseastorm
Club Member - MR2OCNZ
Posts: 94
Joined: Mon Sep 17, 2012 6:00 pm
Stomping Ground: Auckland
Prime Mover: AW11
First name: Christian

Re: Malcolm's 3SGTE AW11

Post by Northseastorm »

Loving the dub, Malcolm!

Can't wait to see this thing in person one day. Oh and thanks again for the door handle :lol:

Which colour are you going for for the paintjob?

User avatar
Malcolm
Club Member - MR2OCNZ
Posts: 638
Joined: Mon May 24, 2010 8:24 pm
Stomping Ground: Auckland
Prime Mover: AW11
First name: Malcolm

Re: Malcolm's 3SGTE AW11

Post by Malcolm »

I haven't quite decided on the colour yet... I have a fair idea but for now it's secret :)

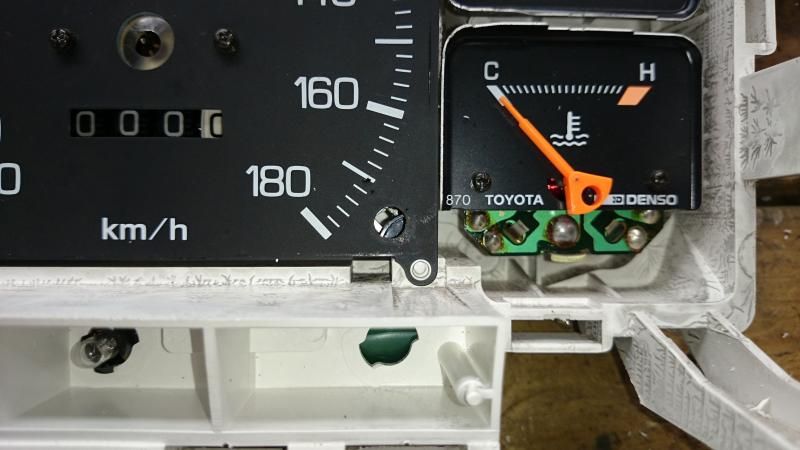
I haven't done much more on the painting recently, but I have dropped the strut brace off for powder coating and the intake and overflow bottle for anodising. I've also turned my attention back to the speedo.

Despite the many hours of work I put in to the stepper motor drive for the speedo, it has just never been reliable. The reality is that the speeds I am asking the stepper to do are quite difficult for it, and the precision required in the alignment of the stepper shaft and the speedo input is too high for the mounting and drive methods I had used. Instead I've been looking to replace the mechanical speedo with an electronically driven one (like the late model SW20s).

First thing I needed to do was to find an electronic speedo that would fit with the least amount of modification possible. After about 3 hours at pick-a-part, dismantling speedos in at least 10 cars (if anyone goes to Avondale PAP and sees lots of dismantled instrument clusters floating around, you'll know why :lol: ), I had learned a lot about the variants of speedos that are common in Japanese cars and had found one which had the best combination of size, needle sweep degrees per km, odometer and trip meter positions and size, and trip meter reset lever location. It was surprising how many units seemed ideal but had one fundamental problem which meant they would either be very difficult to fit into the AW11 instrument cluster housing, or would not read the correct speed when behind the AW11 speedo faceplate (I can change this by altering the signal going in, but then the odometer won't be accurate).

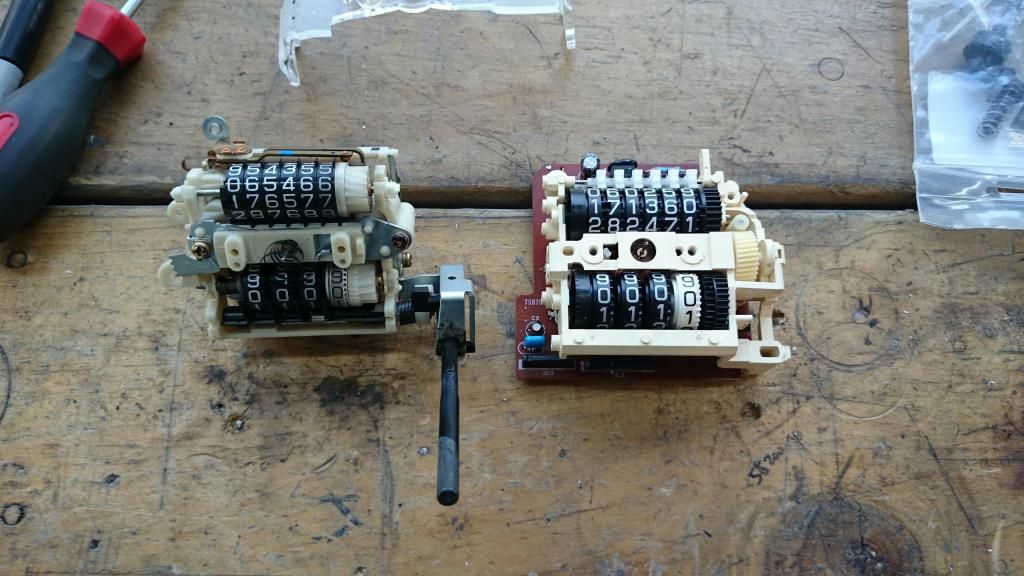
So in the end it was a Mazda Lantis that was nearest to ideal. Here are the units side by side
Image
Image

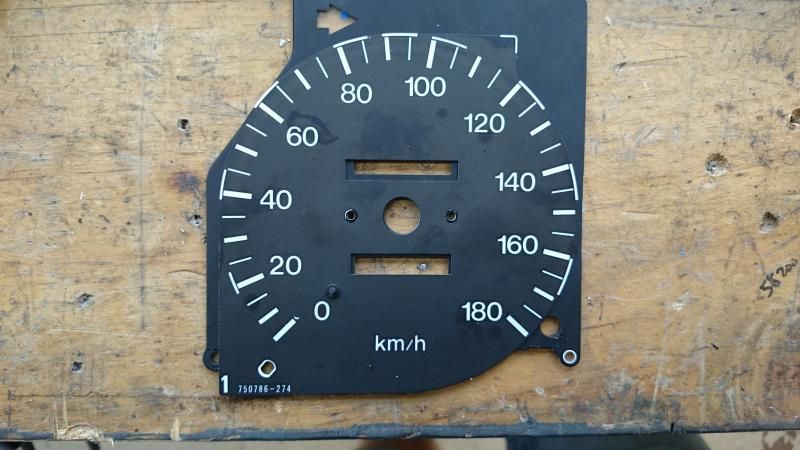
And here's the faceplate of the Mazda one laid on top of the AW11 one. The difference in windows for the odometer and trip meter is the main problem here
Image

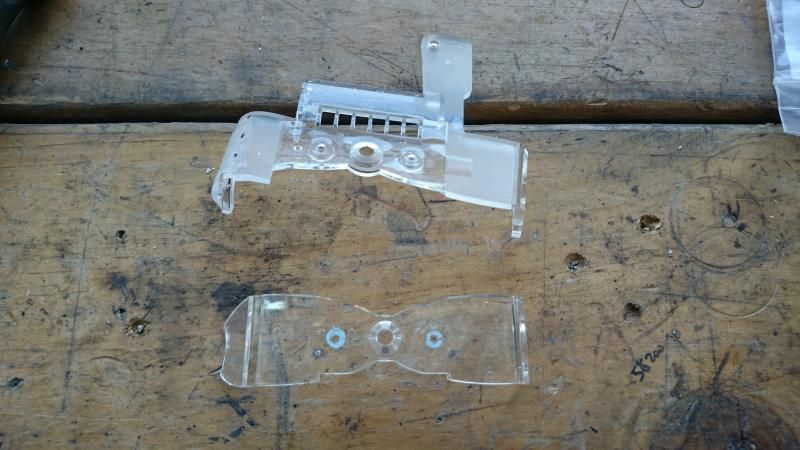
These are known as light pipes - the ends sit at the light source (the small bulbs in the back of the cluster) and light is internally reflected through it, emanating at the edges. These create the light that surrounds the odometer, trip meter and needle. The larger one is from the Mazda, I have trimmed it as well as heating it up and bending one corner to make it fit - unfortunately this bend created a lot of bubbles in the plastic which I suspect will reduce the effectiveness...we'll see
Image

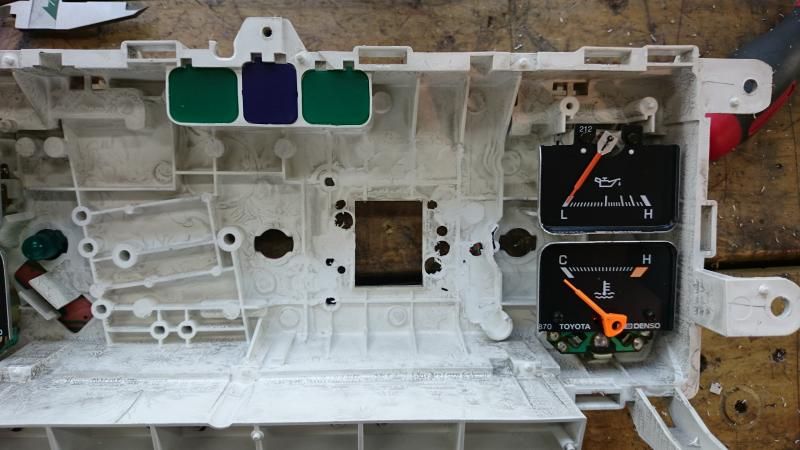
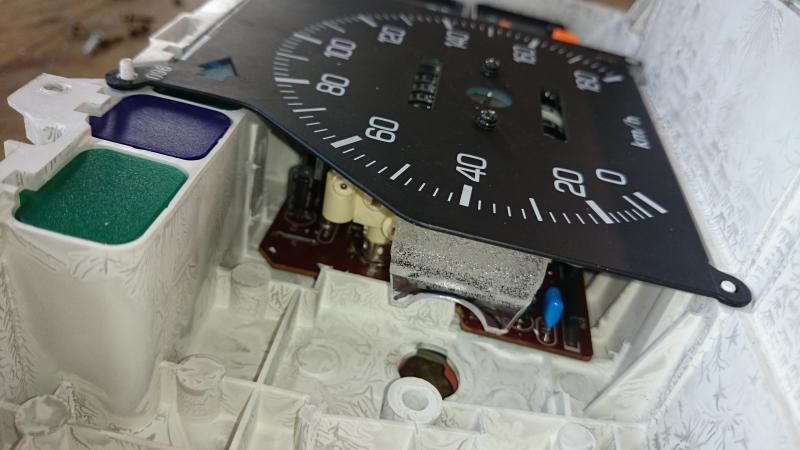
This shows (poorly) the modifications made inside the housing to fit the Mazda speedo. It's not obvious but I've used a die grinder to cut away all the reinforcing ribs that sit under the speedo, and I have also drilled some holes for where pins on the back of the Mazda speed sit deeper than the available depth - plus 3 holes which are dual purpose mounting and electrical feeds to the speedo
Image

This shows how tightly the Mazda speedo fits. It really couldn't be bigger in any dimension and still fit without needing much more significant chopping
Image

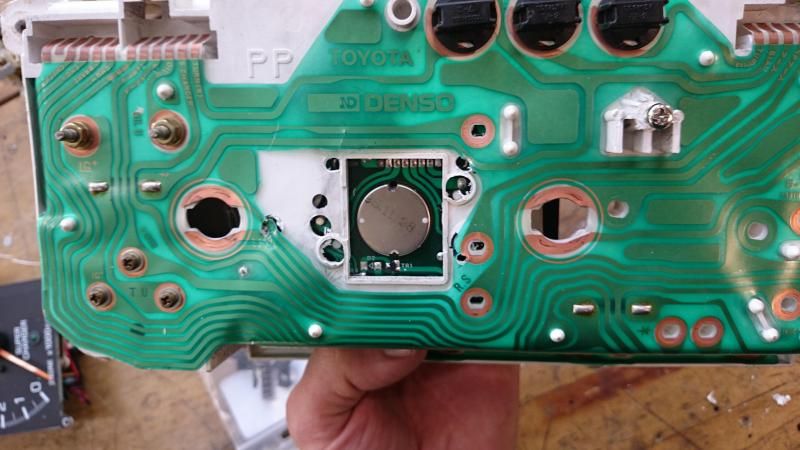
And here it is from the back. As you can see I was a bit of a muppet and managed to drill through the copper tracks on the cluster circuit once when I thought I was going to miss it, and also slipped and cut some with a knife as I was shaping the plastic! Repairable, but a pain. I did quite intentionally drill through the pad just above the letters "R.S.". As it turns out, this is usually the speed signal OUTPUT from the speedo to the ECU, but it aligns perfectly with the signal bolt hole for speed INPUT into the Mazda speedo, so I can feed a speed signal into the speed signal wire running to the ECU and it will also come to the dash and drive the speedo :)
Image

The final stumbling block - the trip meter reset lever sat about 5mm lower and further to the right than the hole in the AW11 faceplate - so I cut the end of it off, fortunately part of it still runs directly below the hole so I should just be able to glue a rod on here and be done with it :)
Image

After spending an hour or so carefully trimming the windows for the odo and trip meter with a hot knife, here's how it's looking
Image

Aside from tidying a few bits up, sticking on the odo reset lever and finding some suitable screws to hold the unit in, all that remains is the electronic side of things. I plan to continue using the Arduino and the speed sensor I had already installed, and have had the Arduino happily running the speedo on the bench so it should only be an hour's work or so to modify the software to do what I want it to.

Going through this process has uncovered some interesting possibilities if I can find an affordable way to make replacement gauge faces. I think I will follow that up later once this is finished and working

User avatar
Ash Kelly Barr
Club Member - MR2OCNZ
Posts: 838
Joined: Sun Dec 29, 2013 10:12 am
Stomping Ground: Auckland
Prime Mover: AW11
First name: Ash

Re: Malcolm's 3SGTE AW11

Post by Ash Kelly Barr »

Good work bro!
Toyota motors:
Current - 89 AW11 factory manual SC
Sold - 74 Toyota Crown wagon (MS63), Holden 308, TH400 trans

User avatar
Malcolm
Club Member - MR2OCNZ
Posts: 638
Joined: Mon May 24, 2010 8:24 pm
Stomping Ground: Auckland
Prime Mover: AW11
First name: Malcolm

Re: Malcolm's 3SGTE AW11

Post by Malcolm »

Bit overdue for an update here...

The speedo is in and working well. Surprisingly the lighting is quite even despite the modifications I made to the light pipes. I still need to put a needle stop at zero, and there's something funny with the code that is only allowing it to move in steps of about 5kmh. It is otherwise nice and accurate according to GPS.

Image

Updated engine bay shot with a few more bits coated
Image

I spent most of the weekend doing more paint prep and actually did some top coating finally!
Image

Folding mirrors, surprisingly annoying to paint! Image

Image

Image

User avatar
Malcolm
Club Member - MR2OCNZ
Posts: 638
Joined: Mon May 24, 2010 8:24 pm
Stomping Ground: Auckland
Prime Mover: AW11
First name: Malcolm

Re: Malcolm's 3SGTE AW11

Post by Malcolm »

Quick update on the painting, less words, more pics

Slow process of stripping parts off
Image
Image

Found a patch of rust inside the passenger door jamb - pretty minor but the worst bit I've found
Image

This second hand guard I picked up has been poorly repainted at some stage.
Image

5 minutes of blowing it with an air gun later...
Image

Door prep
Image

Image

Image

Time to do something about this...
Image

Image

As it sits tonight, hopefully this weekend nearly all the priming will be done!
Image

Lots of primed parts, ready for sanding
Image

Image

User avatar
Statek
Club Member - MR2OCNZ
Posts: 590
Joined: Sat Oct 20, 2012 12:56 pm
Stomping Ground: Auckland
Prime Mover: Looking for an MR2
First name: Kris

Re: Malcolm's 3SGTE AW11

Post by Statek »

You've always had an eye for details and i'm really looking forward to the finished product! Nice one
1986 Toyota MR2 AW11 20v ST - SOLD
Image

User avatar
Ash Kelly Barr
Club Member - MR2OCNZ
Posts: 838
Joined: Sun Dec 29, 2013 10:12 am
Stomping Ground: Auckland
Prime Mover: AW11
First name: Ash

Re: Malcolm's 3SGTE AW11

Post by Ash Kelly Barr »

Seconded that ^

Did you talk to cert guy about cutting the back Malcolm?

User avatar
JasonFriday13
Club Member - MR2OCNZ
Posts: 2503
Joined: Mon May 21, 2007 5:19 pm
Stomping Ground: Taranaki
Prime Mover: SW20
First name: Jason

Re: Malcolm's 3SGTE AW11

Post by JasonFriday13 »

It's not a structural piece so I think that's fine.
Jason Ross, current cars:
Project: 1990 SW20 GT, 1992+ brake swap, 1992+ subframe swap, 1996 Celica turbo engine swap, 1996 MR2 LSD gearbox swap, Caldina Turbo coil-on-plug ignition, Link G4 Storm, 161kw @ 10psi.
Daily: 2004 Toyota Vitz RS, 1.5L, 5sp
Tow rig: 2009 Camry, 2.4L, auto
Scrapped: 1989 SW20 GT, 1992 SW20 G-Limited, ex EssDub car, donor, 1997 Toyota Tercel 3dr hatch, front crash, 1990 SW20, G-Limited, ex EssDub car, roll crashed, donor
Sold: 1987 AW11 Supercharged, 1991 SW20 G-Limited, ex EssDub car

Post Reply