Unfortunately not new ones. These may have been the last set available in New Zealand and TwosRus stopped selling them a while ago.
If you are lucky you'll find a set or go for Eibach Pro Kit springs. That's what I was going to get if I couldn't get these.
I didn't think you wanted to mod your car, from what we've seen so far it's fully stock which is rare for an early model car. Mine looks stock on the outside bar the wheels and now the ride height but it's far from stock now. I guess most can be put back to stock though.
GDII's 1990 G-Limited
Moderator: Moderators
Forum rules
This section of the forum is a great resource if you're looking for ideas, and it's a cool way of obtaining technical information that may otherwise not have been posted. (Members can use the Search functionality at top right of the forum to speed up finding things) Please respect others' contributions and don't diss anyone - keep comments helpful, factual, positive and polite. One thread per vehicle or owner please - don't start lots of threads about just one car. And if you need assistance with your car and want to host a spanner day, please use the appropriate section of the forum: http://mr2.org.nz/phpbb3/viewforum.php?f=35 Thank you.
This section of the forum is a great resource if you're looking for ideas, and it's a cool way of obtaining technical information that may otherwise not have been posted. (Members can use the Search functionality at top right of the forum to speed up finding things) Please respect others' contributions and don't diss anyone - keep comments helpful, factual, positive and polite. One thread per vehicle or owner please - don't start lots of threads about just one car. And if you need assistance with your car and want to host a spanner day, please use the appropriate section of the forum: http://mr2.org.nz/phpbb3/viewforum.php?f=35 Thank you.
-
GDII

- Forum Moderator - MR2OCNZ
- Posts: 5739
- Joined: Sun Jul 10, 2011 5:13 pm
- Stomping Ground: Wellington
- Prime Mover: SW20
- First name: Phill
Re: GDII's 1990 G-Limited
1990 SW20 MR2 G-Limited (GEN4 3SGTE Installed)
2000 AE111R Corolla Wagon NZ New Daily
1996 AE101R Corolla Sprint NZ New Selling Soon
1990 EP81 Starlet XL (Sold)
1990 EE90 Corolla XL (Sold)
Instagram https://www.instagram.com/sw20glimited/
2000 AE111R Corolla Wagon NZ New Daily
1996 AE101R Corolla Sprint NZ New Selling Soon
1990 EP81 Starlet XL (Sold)
1990 EE90 Corolla XL (Sold)
Instagram https://www.instagram.com/sw20glimited/
-
Alsw20

- Club Member - MR2OCNZ
- Posts: 1749
- Joined: Mon Jun 28, 2010 1:56 pm
- Stomping Ground: Christchurch
- Prime Mover: SW20
- First name: Al
Re: GDII's 1990 G-Limited
Those were the last set available new, in New Zealand at least. There may be some NOS in the US.
-
GDII
- Forum Moderator - MR2OCNZ
- Posts: 5739
- Joined: Sun Jul 10, 2011 5:13 pm
- Stomping Ground: Wellington
- Prime Mover: SW20
- First name: Phill
Re: GDII's 1990 G-Limited
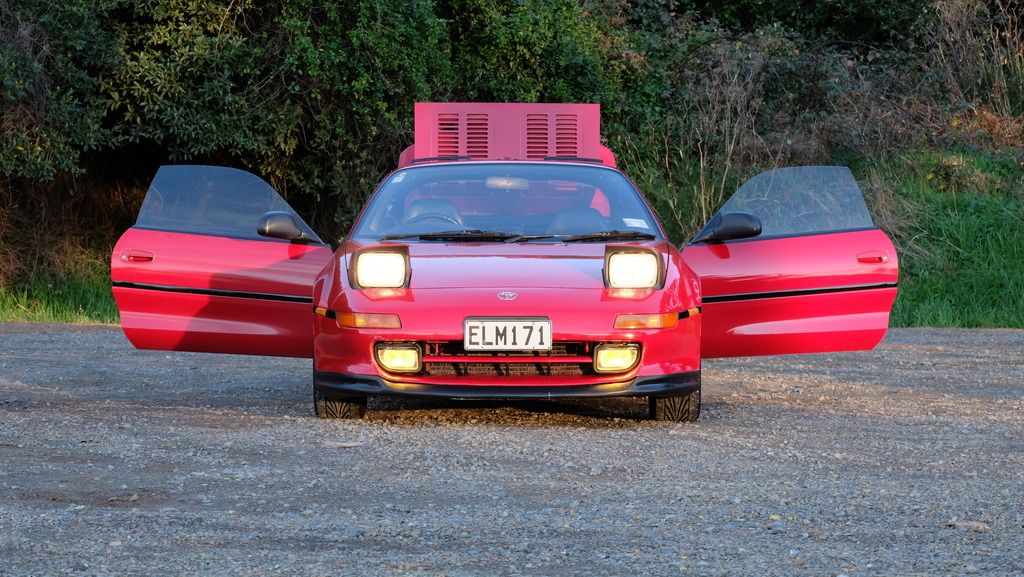
I took the car for a longer drive today and found a few things that are quite different over the stock springs. Obviously I have lots of other suspension changes over a stock car but the springs really changed things up.
First thing you notice is the ride quality, it's smooth and soft and not harsh like what I expected it to be. Yes larger bumps are more noticeable but not really harsh. The ride is comparable to the stock springs for most of the uneven bits on our roads. It's also not bouncing so the Bilsteins are doing their job well.
The second thing you notice is the turn in response is very good, I found I am turning at the same time as I used to into a corner but getting much quicker turn in making me get closer to the inside of the corner faster. Need to adjust my turning points now.
Third thing is the tendency toward more oversteer, which I need to dial out with my driving style and swaybars. The car sits very flat in corners and has far less pitch with braking and acceleration. Compared to the RS*R springs I had before, they are softer but handle better. It's not a direct comparison as the suspension has changed a lot since then. For a road car it's perfect but you still get the handling required for any future track work I want to do.
The last thing is that the initial turn in steering weight is much lighter. When I increased my caster angle to 5 degrees the steering was heavy but now it's lightened up, not as much as stock alignment but liveable.
I compared these to some H&R springs in another car, you push down on the car and the TRD springs are far softer but give the same ride height. This makes for a more comfortable ride, as mentioned by the owner of the car.
Overall for a lowering spring they are awesome. I guess that should be expected from TRD when making them for one of their own cars.
1990 SW20 MR2 G-Limited (GEN4 3SGTE Installed)
2000 AE111R Corolla Wagon NZ New Daily
1996 AE101R Corolla Sprint NZ New Selling Soon
1990 EP81 Starlet XL (Sold)
1990 EE90 Corolla XL (Sold)
Instagram https://www.instagram.com/sw20glimited/
2000 AE111R Corolla Wagon NZ New Daily
1996 AE101R Corolla Sprint NZ New Selling Soon
1990 EP81 Starlet XL (Sold)
1990 EE90 Corolla XL (Sold)
Instagram https://www.instagram.com/sw20glimited/
-
GDII
- Forum Moderator - MR2OCNZ
- Posts: 5739
- Joined: Sun Jul 10, 2011 5:13 pm
- Stomping Ground: Wellington
- Prime Mover: SW20
- First name: Phill
Re: GDII's 1990 G-Limited
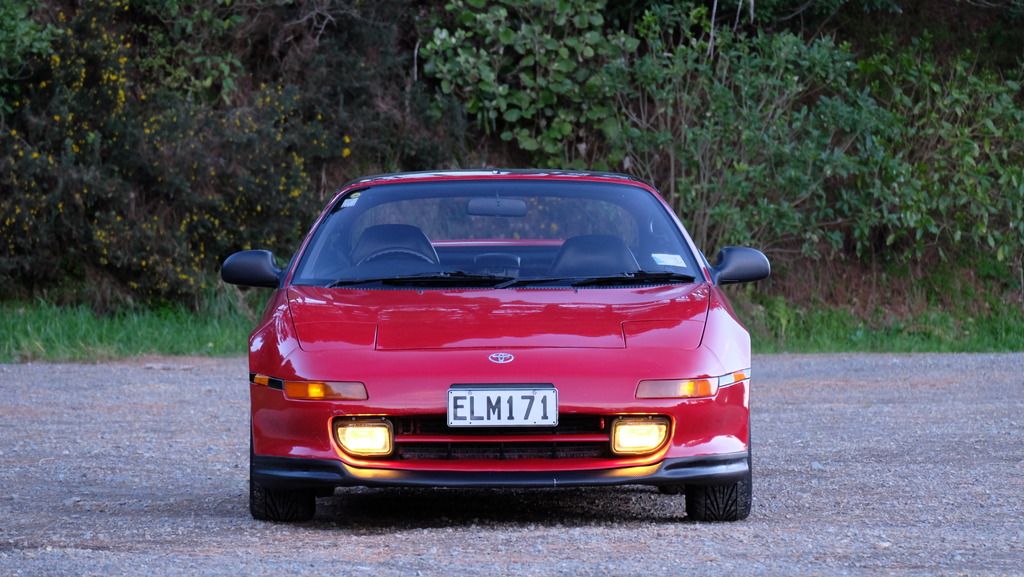
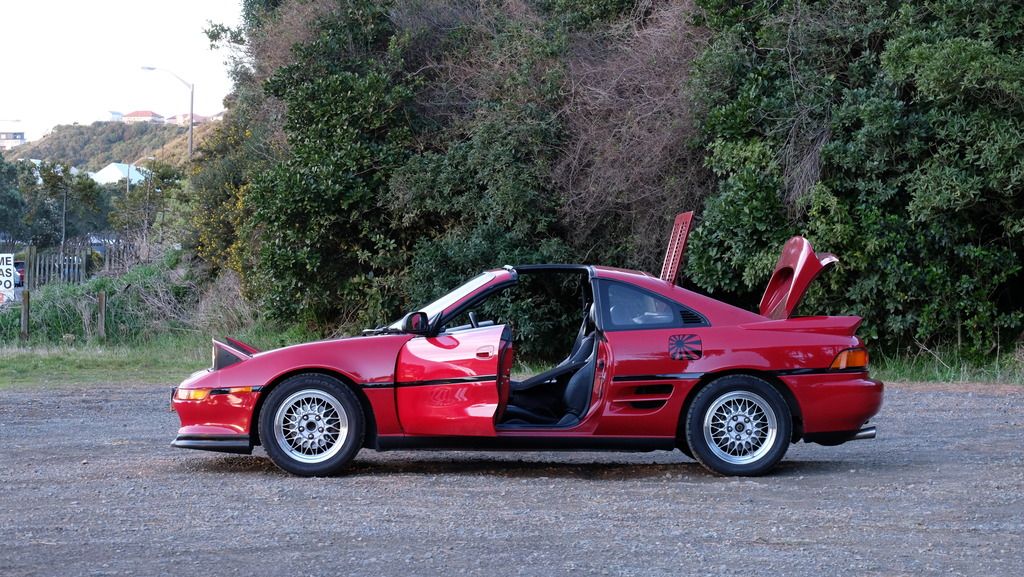
Some better photos I took this morning. The springs have settled down a bit more making it a little lower.
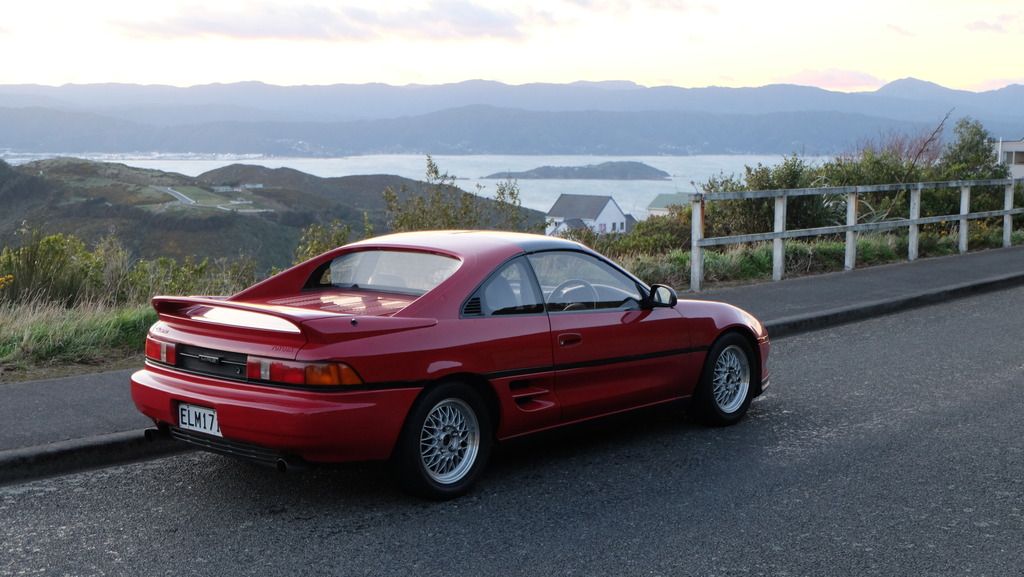
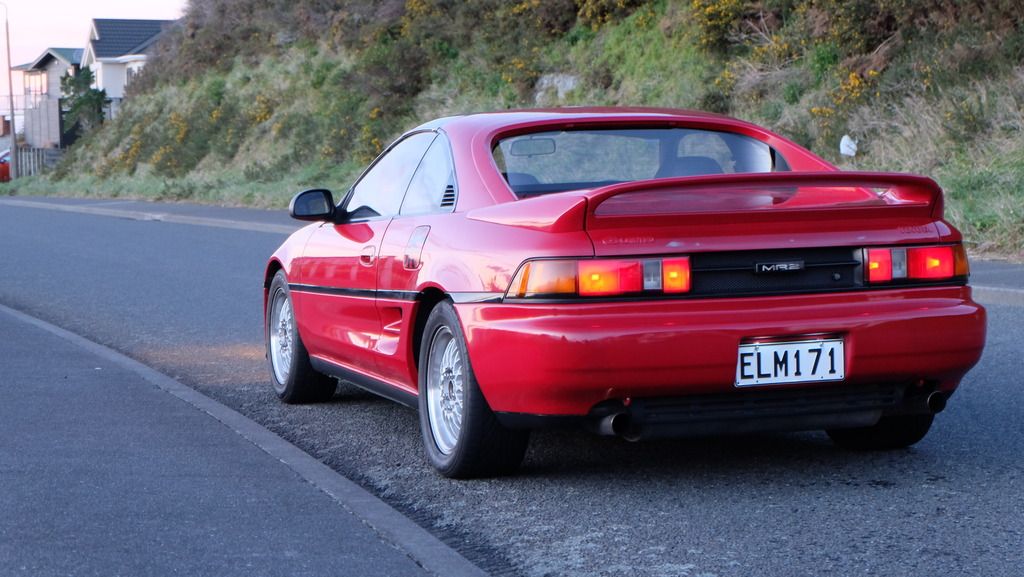

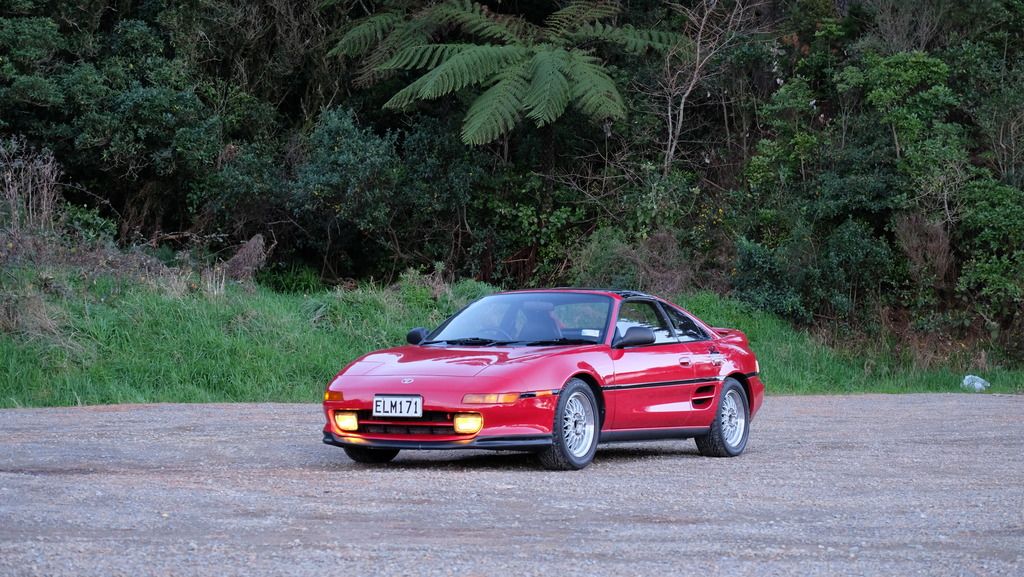


Last edited by GDII on Sat Aug 13, 2016 7:07 pm, edited 1 time in total.
1990 SW20 MR2 G-Limited (GEN4 3SGTE Installed)
2000 AE111R Corolla Wagon NZ New Daily
1996 AE101R Corolla Sprint NZ New Selling Soon
1990 EP81 Starlet XL (Sold)
1990 EE90 Corolla XL (Sold)
Instagram https://www.instagram.com/sw20glimited/
2000 AE111R Corolla Wagon NZ New Daily
1996 AE101R Corolla Sprint NZ New Selling Soon
1990 EP81 Starlet XL (Sold)
1990 EE90 Corolla XL (Sold)
Instagram https://www.instagram.com/sw20glimited/
-
*84vvt

- Life Member - MR2OCNZ
- Posts: 2557
- Joined: Sun Jun 06, 2004 11:44 am
- Stomping Ground: Wellington
- Prime Mover: AW11
- First name: Colin
Re: GDII's 1990 G-Limited
Looking good
Might needs some Flushness (wider rims ) to finish ......
Might needs some Flushness (wider rims ) to finish ......
Boosted cars are like hot women.
A little edgy, every guy wants one,
some guys can't handle them,
and if you throw a little alcohol in them they'll rock your world.

A little edgy, every guy wants one,
some guys can't handle them,
and if you throw a little alcohol in them they'll rock your world.
-
GDII
- Forum Moderator - MR2OCNZ
- Posts: 5739
- Joined: Sun Jul 10, 2011 5:13 pm
- Stomping Ground: Wellington
- Prime Mover: SW20
- First name: Phill
Re: GDII's 1990 G-Limited
Thanks Colin. Now it won't look so silly next to your car.*84vvt wrote:Looking good
*84vvt wrote: Might needs some Flushness (wider rims ) to finish ......
1990 SW20 MR2 G-Limited (GEN4 3SGTE Installed)
2000 AE111R Corolla Wagon NZ New Daily
1996 AE101R Corolla Sprint NZ New Selling Soon
1990 EP81 Starlet XL (Sold)
1990 EE90 Corolla XL (Sold)
Instagram https://www.instagram.com/sw20glimited/
2000 AE111R Corolla Wagon NZ New Daily
1996 AE101R Corolla Sprint NZ New Selling Soon
1990 EP81 Starlet XL (Sold)
1990 EE90 Corolla XL (Sold)
Instagram https://www.instagram.com/sw20glimited/
-
rocco26

- Club Member - MR2OCNZ
- Posts: 378
- Joined: Sat Apr 06, 2013 12:42 pm
- Stomping Ground: Wellington
- Prime Mover: SW20
- First name: brian
Re: GDII's 1990 G-Limited
Looks real good ,now my red one inherits the 4x4 crown.
-
GDII
- Forum Moderator - MR2OCNZ
- Posts: 5739
- Joined: Sun Jul 10, 2011 5:13 pm
- Stomping Ground: Wellington
- Prime Mover: SW20
- First name: Phill
Re: GDII's 1990 G-Limited
rocco26 wrote:Looks real good ,now my red one inherits the 4x4 crown.
Just swap out the springs from the black one.
1990 SW20 MR2 G-Limited (GEN4 3SGTE Installed)
2000 AE111R Corolla Wagon NZ New Daily
1996 AE101R Corolla Sprint NZ New Selling Soon
1990 EP81 Starlet XL (Sold)
1990 EE90 Corolla XL (Sold)
Instagram https://www.instagram.com/sw20glimited/
2000 AE111R Corolla Wagon NZ New Daily
1996 AE101R Corolla Sprint NZ New Selling Soon
1990 EP81 Starlet XL (Sold)
1990 EE90 Corolla XL (Sold)
Instagram https://www.instagram.com/sw20glimited/
-
GDII
- Forum Moderator - MR2OCNZ
- Posts: 5739
- Joined: Sun Jul 10, 2011 5:13 pm
- Stomping Ground: Wellington
- Prime Mover: SW20
- First name: Phill
Re: GDII's 1990 G-Limited
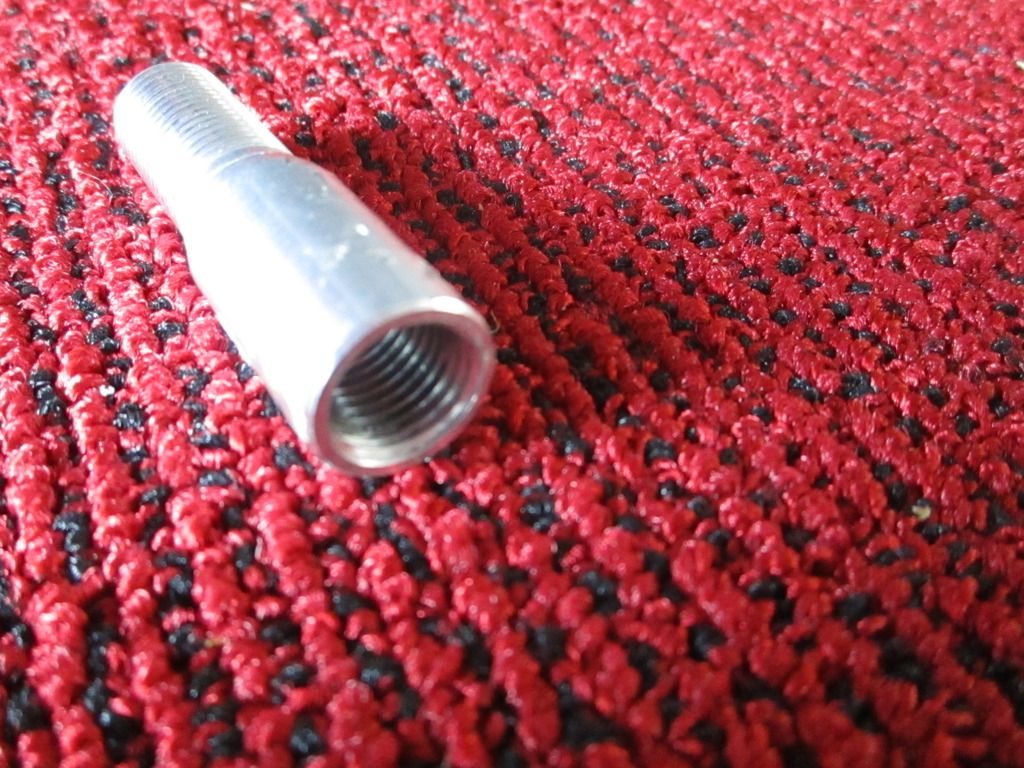
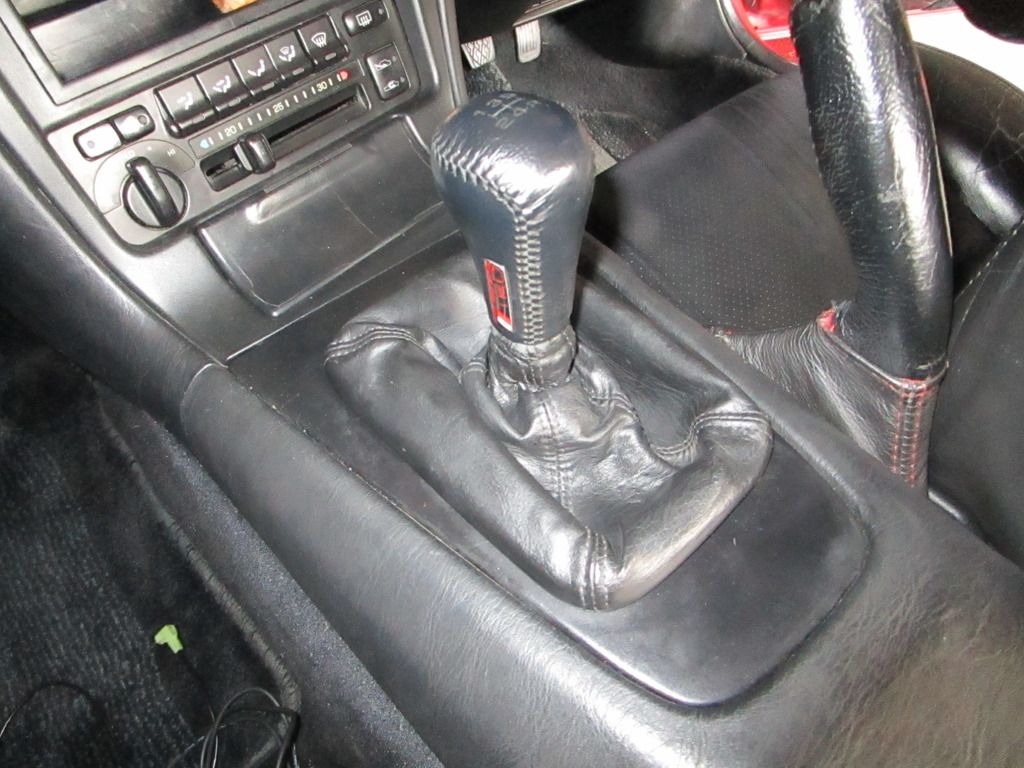
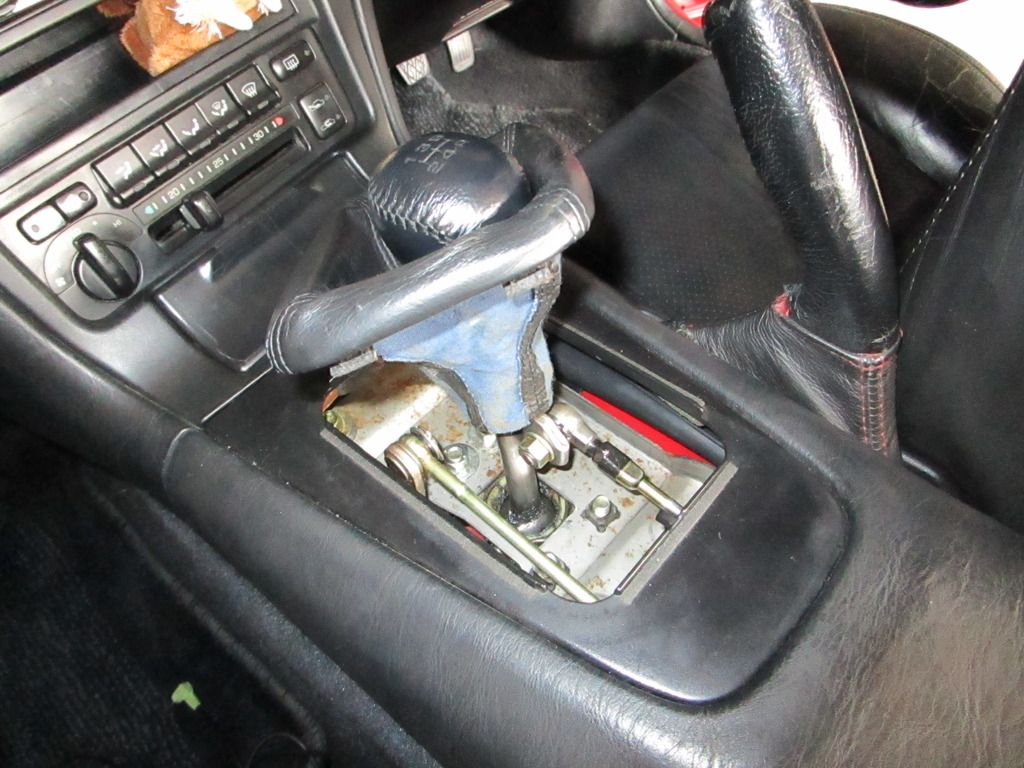
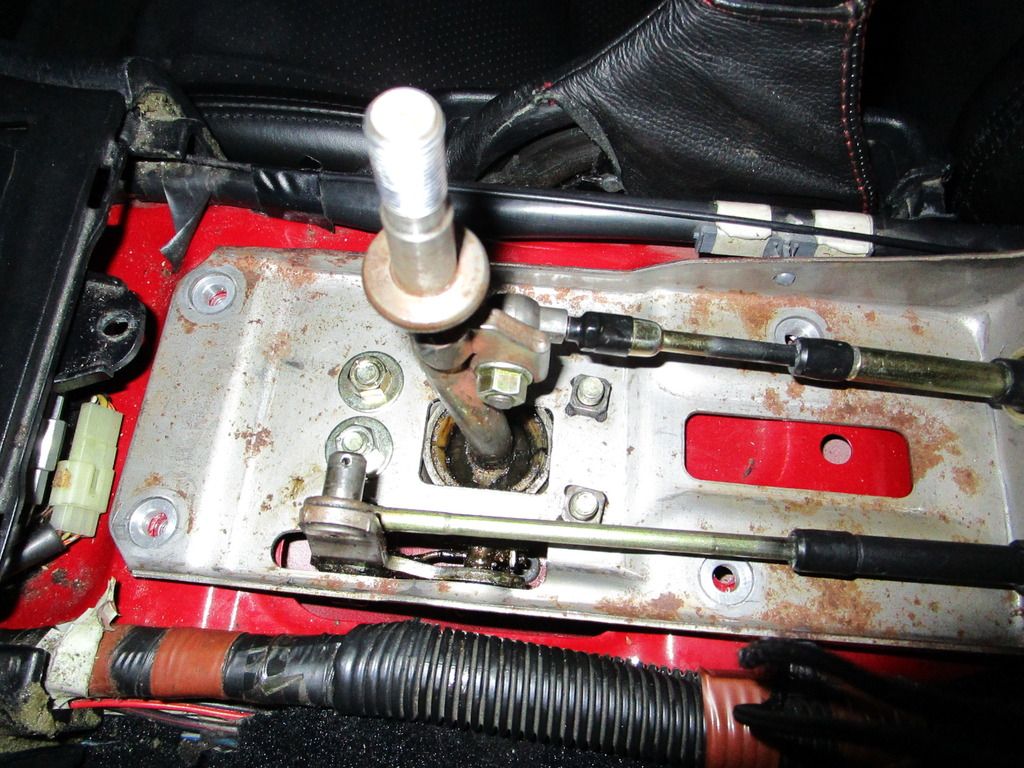
More new parts to add to the MR2. I had bought the 92+ shift lever and assembly but I wanted to add a few extras to it before I installed it.
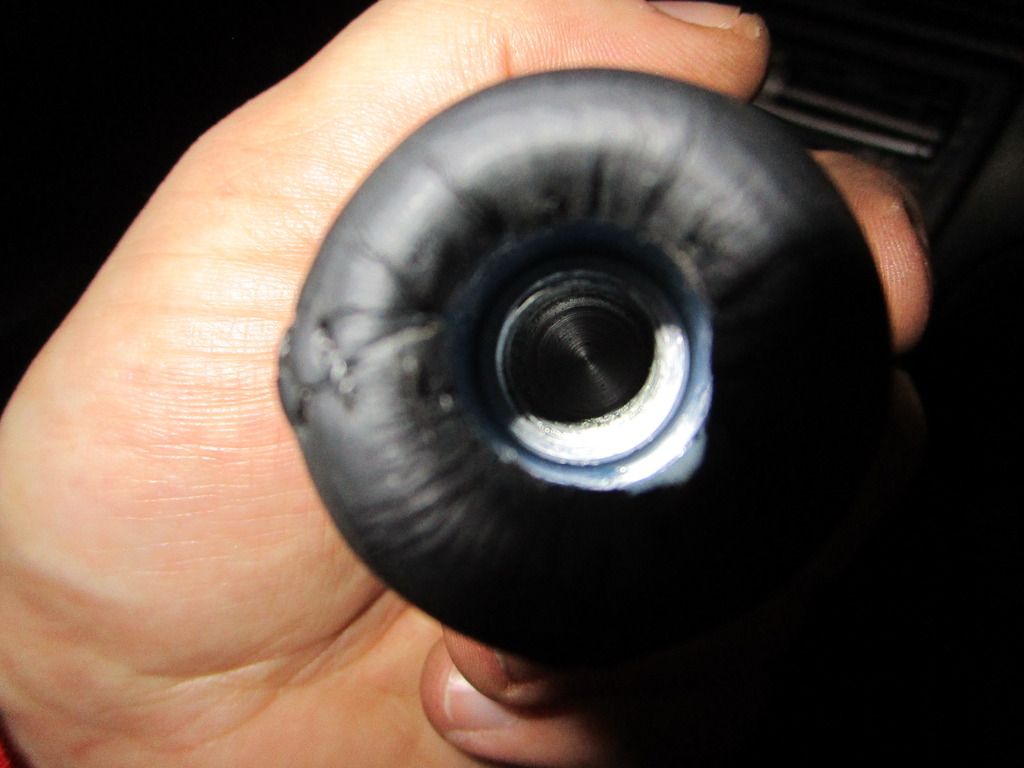
So I asked my brother to make some solid aluminium shift plate bushes and a knob adapter that I designed.The adapter will allow my TRD knob to fit on the shorter lever with the boot support ring.
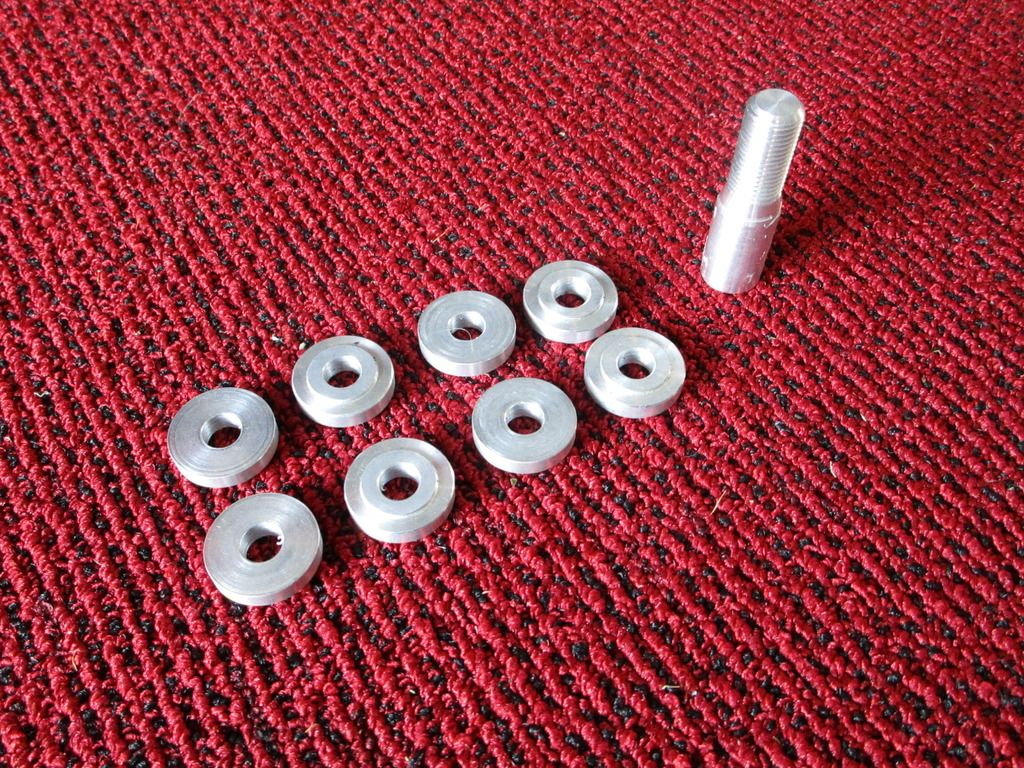
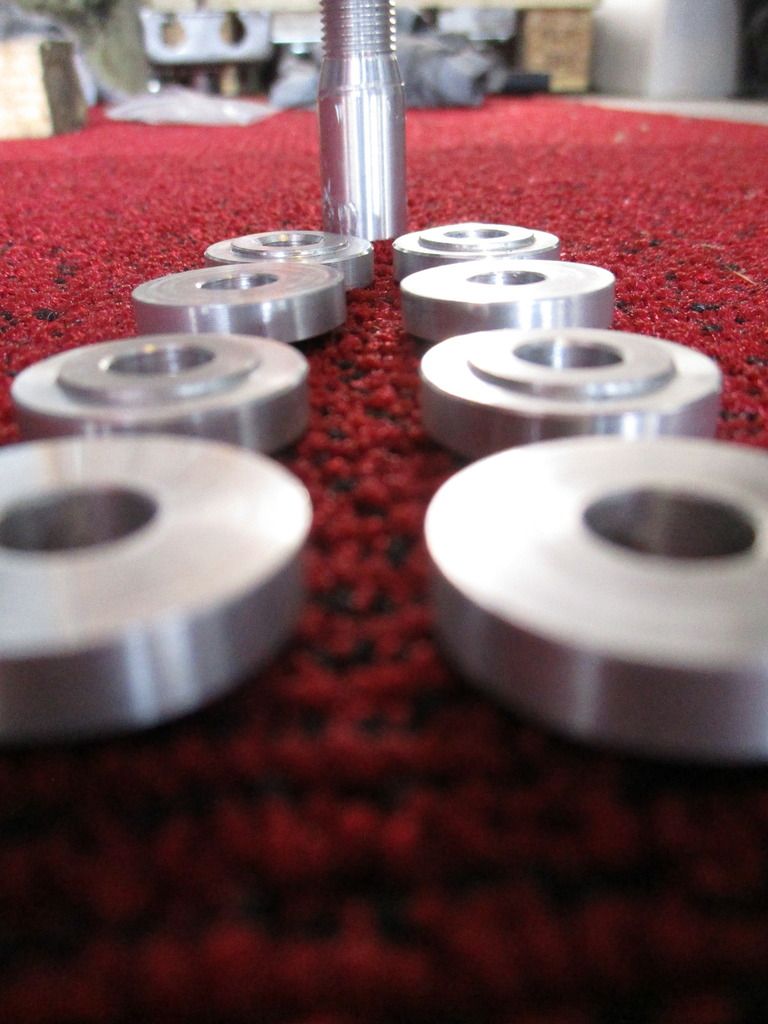
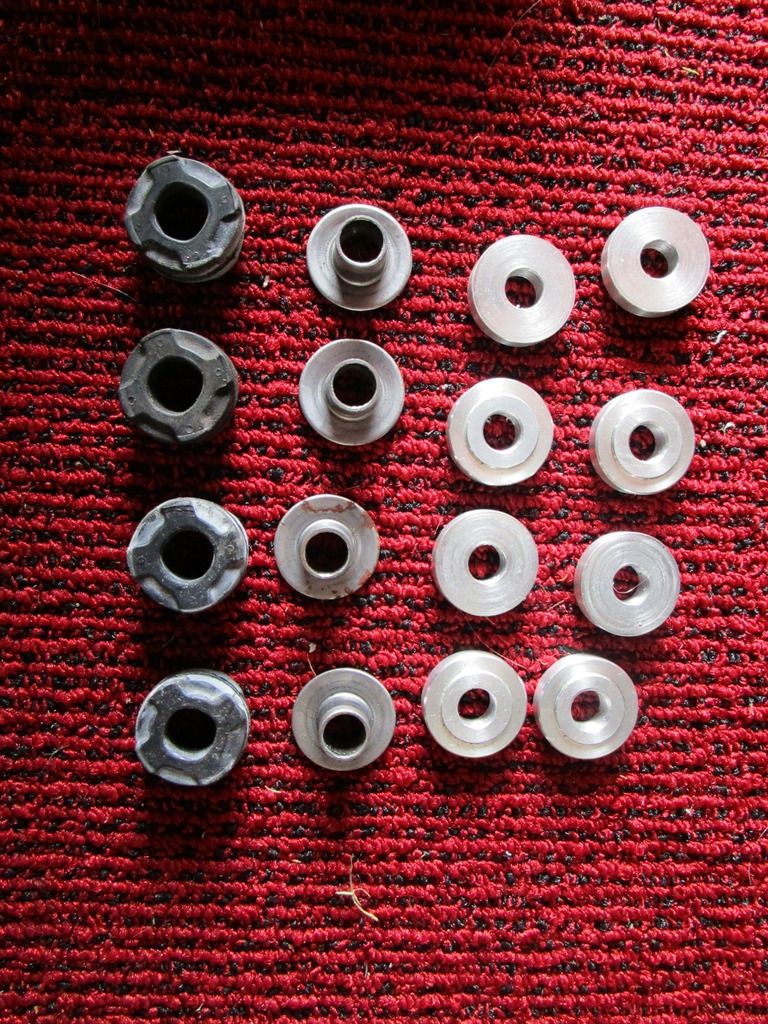
New bushes vs old rubber bushes. Nothing wrong with the rubber ones, they just allow the plate to move a bit when shifting. They are probably there for vibration and sound damping too.
New knob adapter. The 89-91 lever is about 20mm longer and the knob has a ring the holds the boot in place. The 92+ has a ring on the lever that supports the boot so the knob is separate from the boot. The 92+ knob is far shorter too so it all fits together fine. The TRD knob I have has a long thread deep inside so the 92+ lever won't even thread into it at all. So adding in the longer adapter allows the TRD knob to fit on the 92+ lever. This puts the knob back up at the 89-91 lever level but not a problem. I can switch out knobs depending on how I'm feeling.
I thought I would post up the process to change the shift lever and install the bushes. It doesn't cover pulling apart the lever mount because I just swapped over the whole plate and lever to the newer one. Most parts are the same but some have slightly different part numbers so I thought I'd go with the newer one.
Preparing the shift plate for new bushes

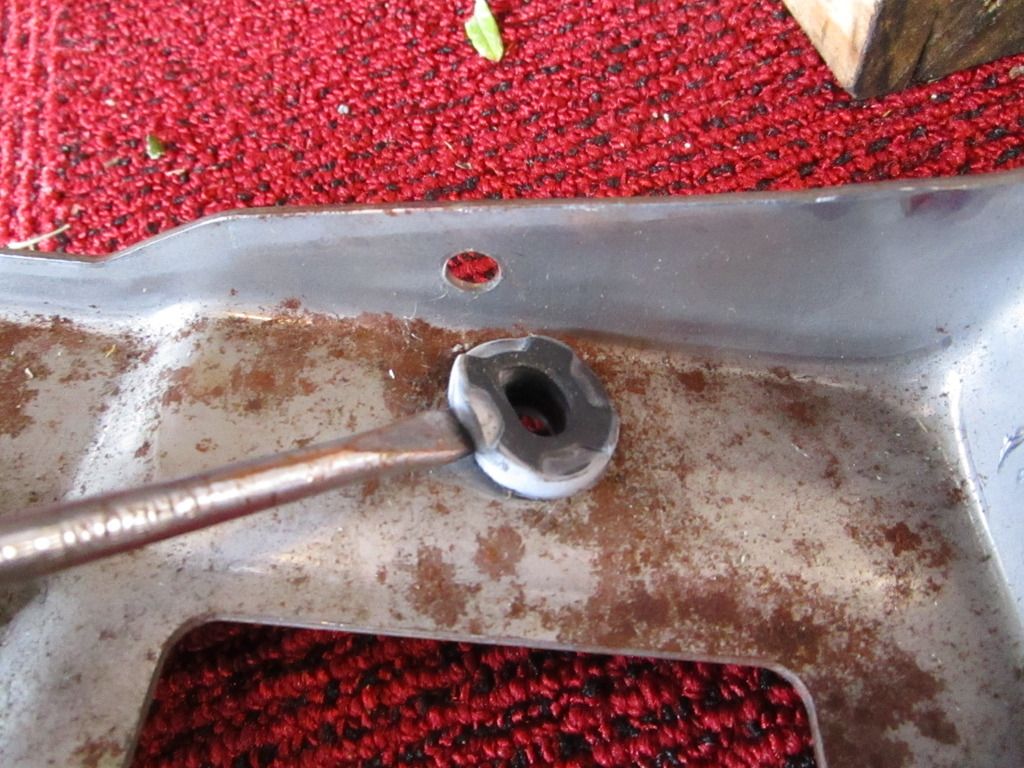
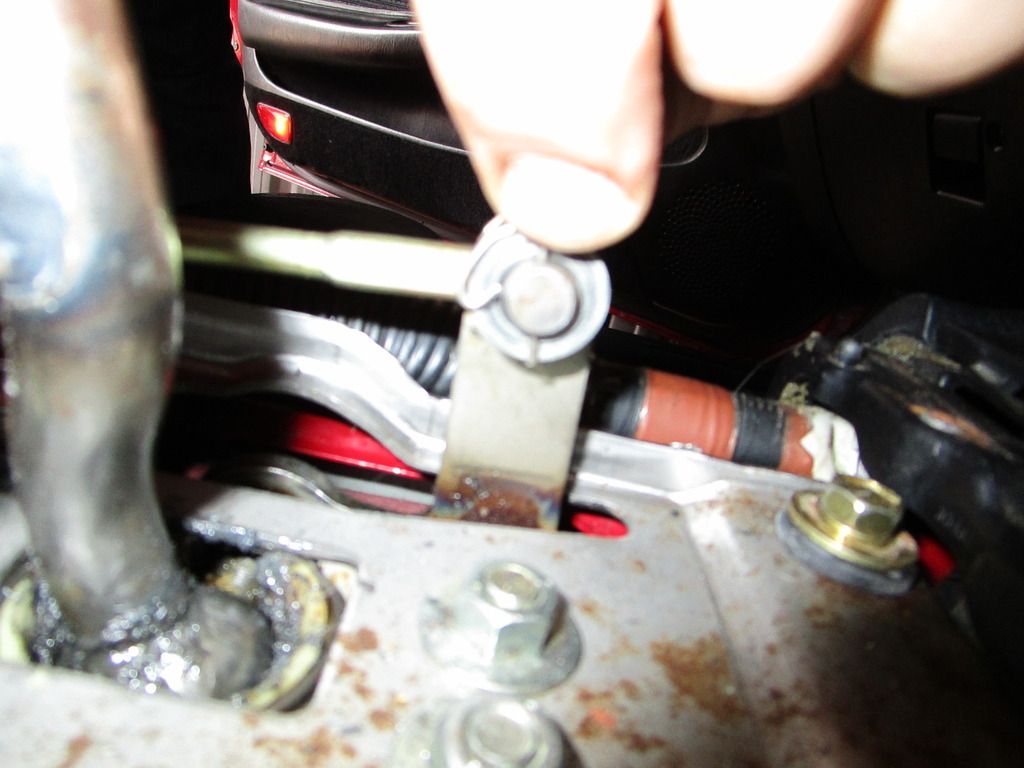
Use a 6mm socket to push out the steel centre
Use a flat head screw driver to force the rubber bushes out
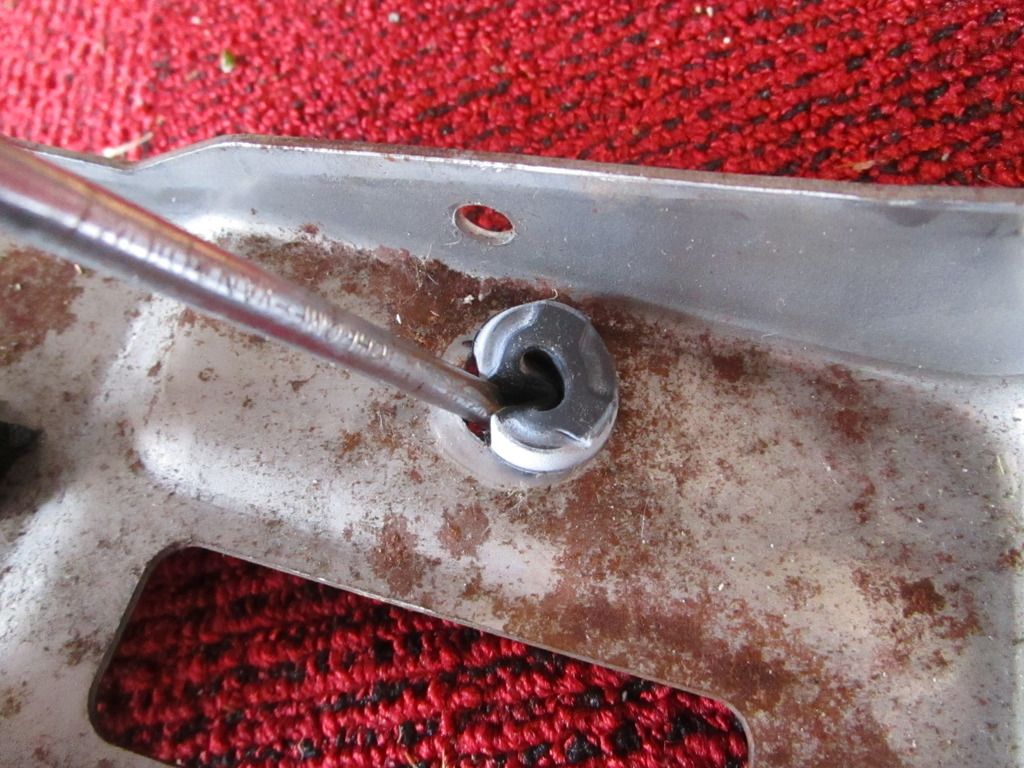
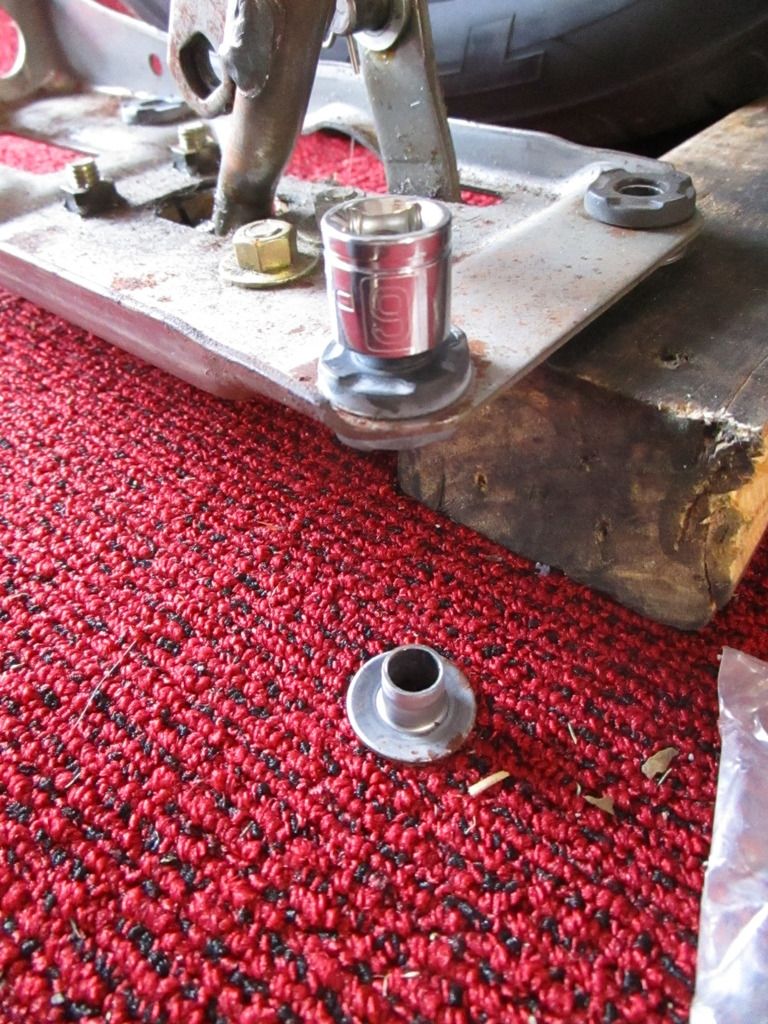
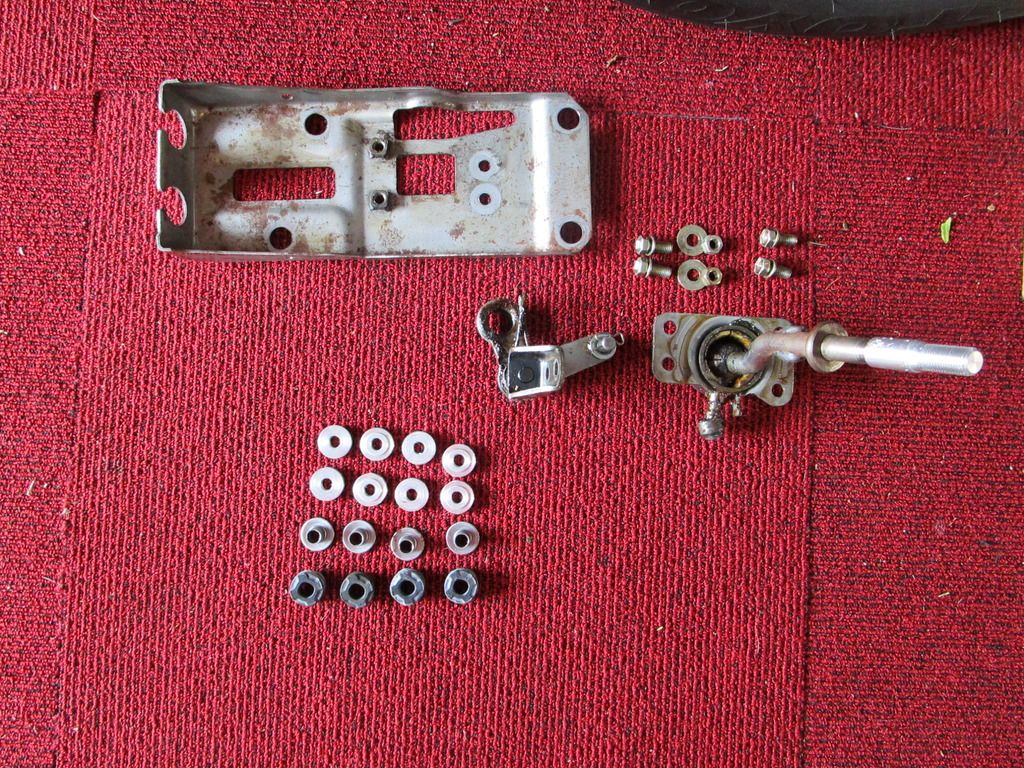
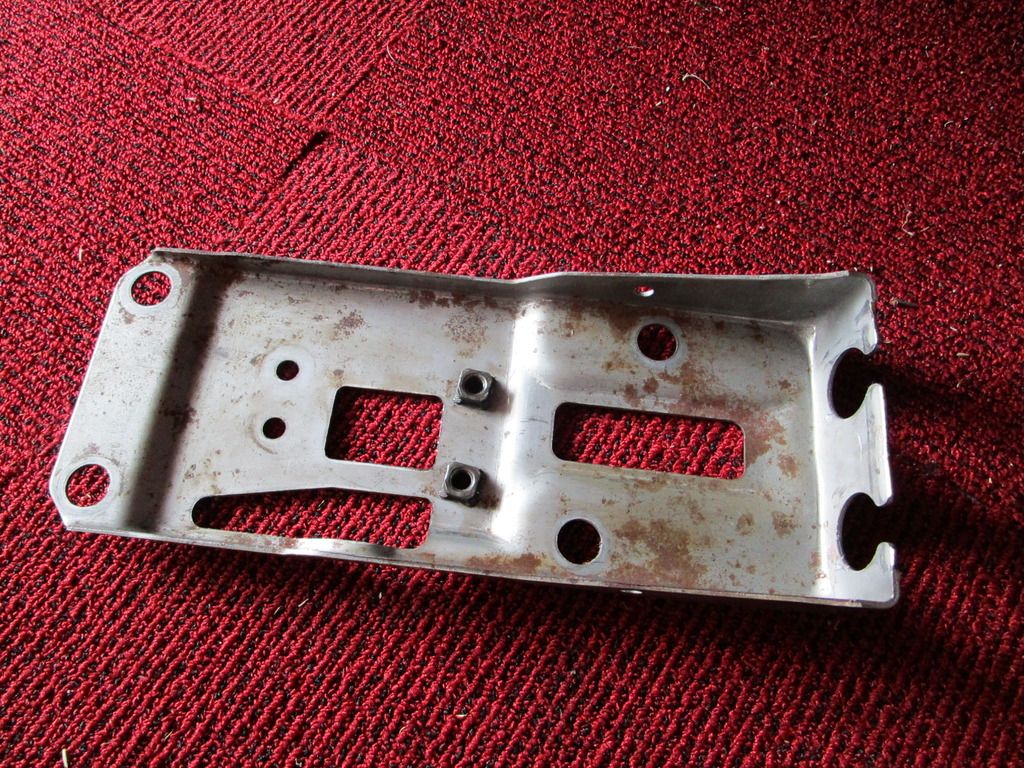
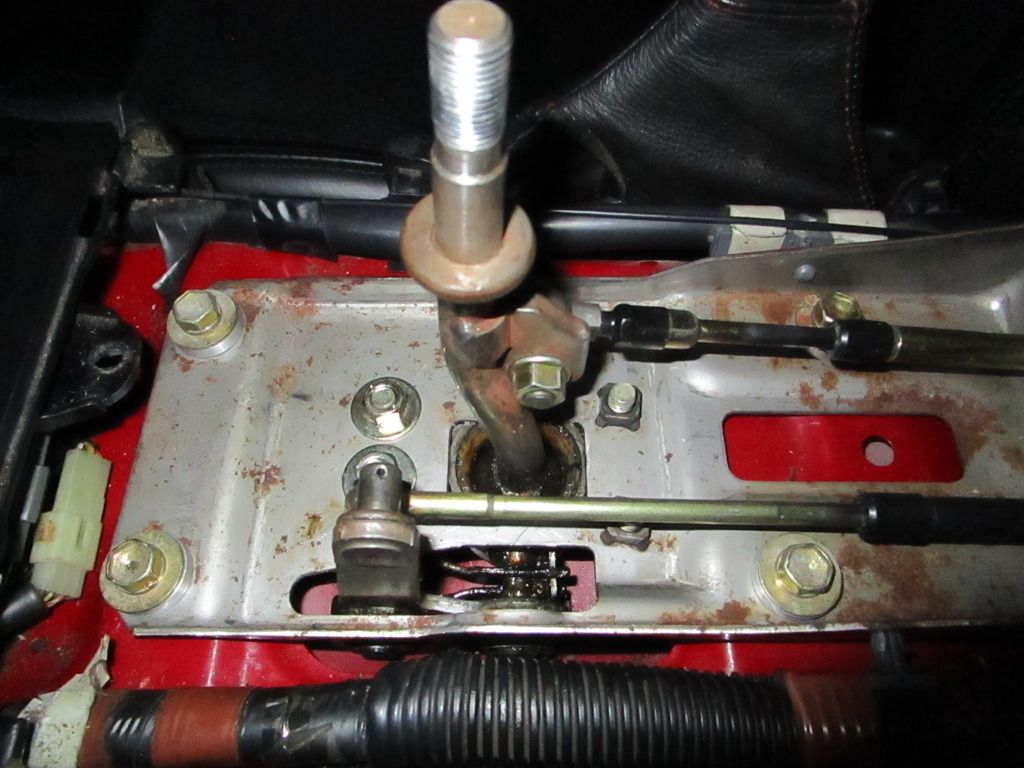
Ready for installation. I removed the shift lever and mechanism to clean the base plate. Just 4 12mm bolts and a bit of fiddling to get it all out.
Cleaned up plate
Bottom half of the bush sitting in place.
Top half sitting over it.

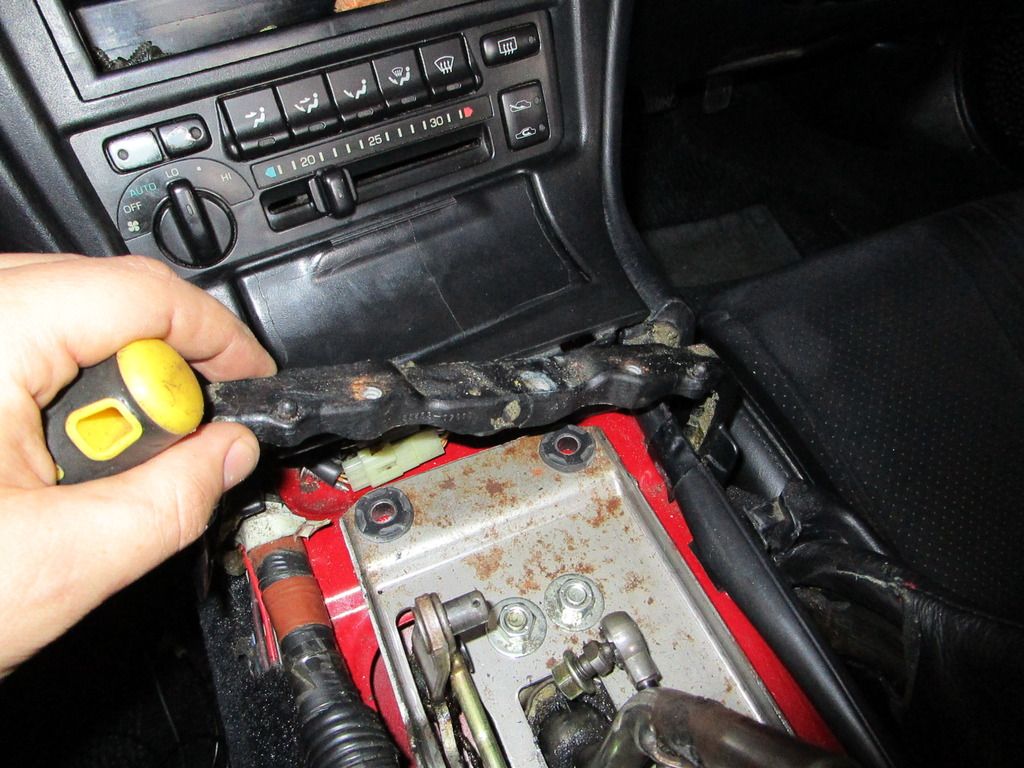
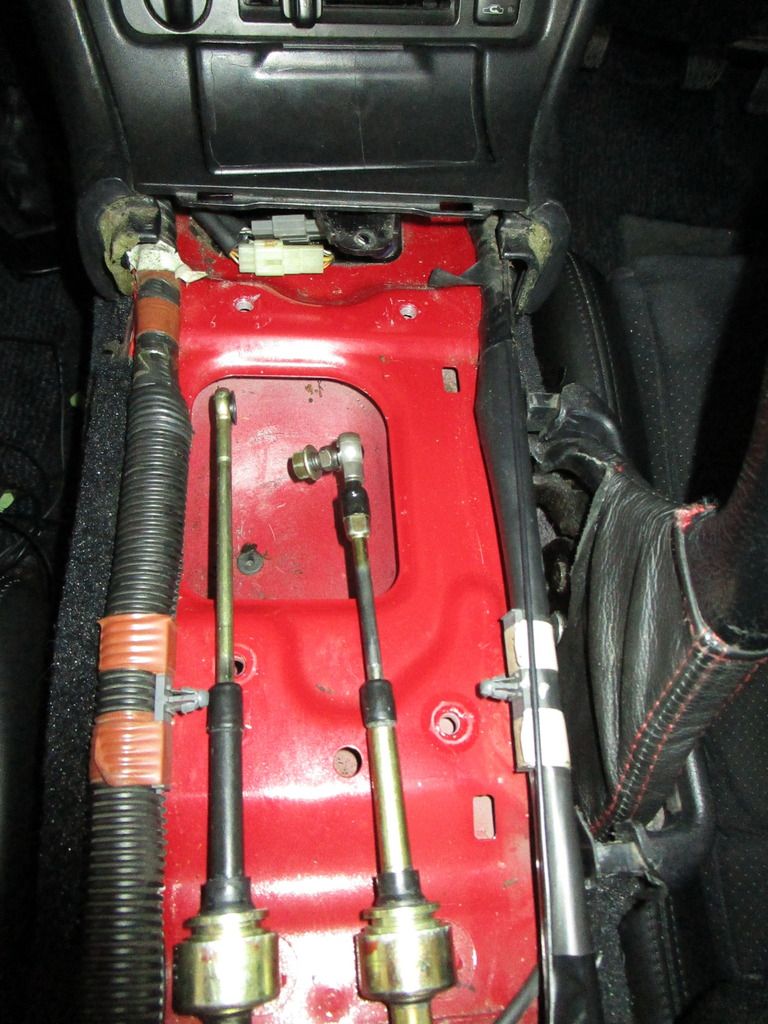
Now onto removing the interior parts to get to the shift plate.
On each side of the centre arm rest there are 2 screw near the back. Remove these.
Then inside the CD/Tape box there are 4 screws. Remove these, leave them in the box, shut the lids and remove the box from the car. Keeps the screws safe and in the correct place for later.
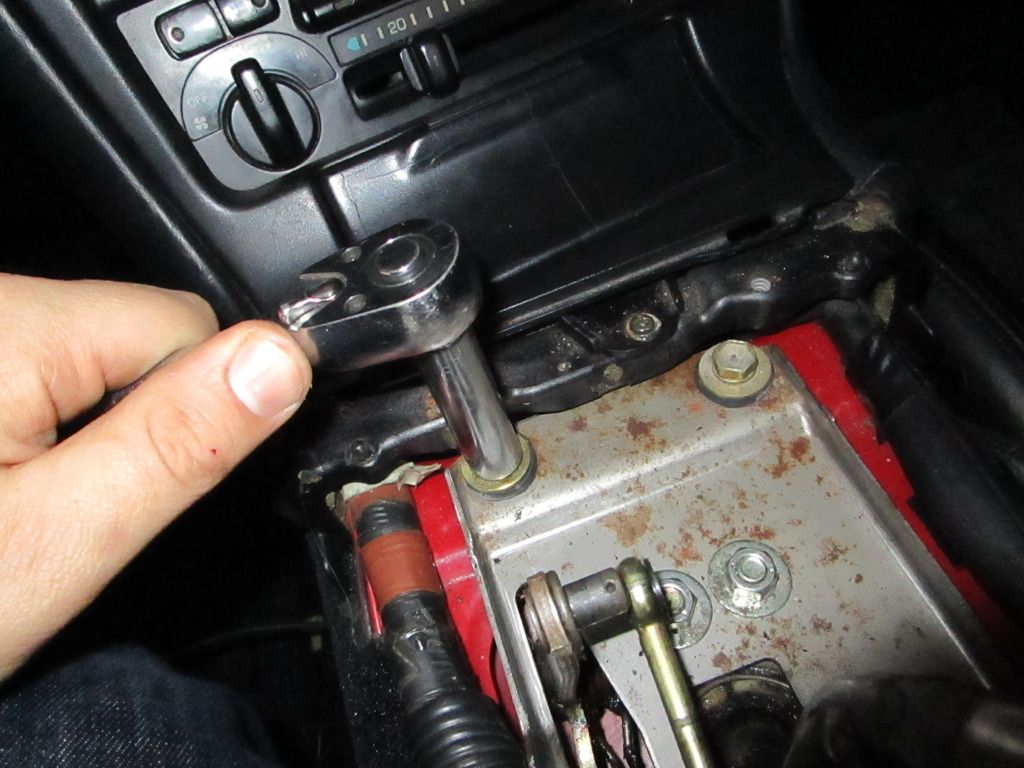
Next is the knob, shifter boot and surround. Unscrew the knob, pull the boot up from the front and put aside.
In the 4 corners of the surround plate there are small push in clips. Reach under and push them up with your finger so not to break the plastic clip tabs.
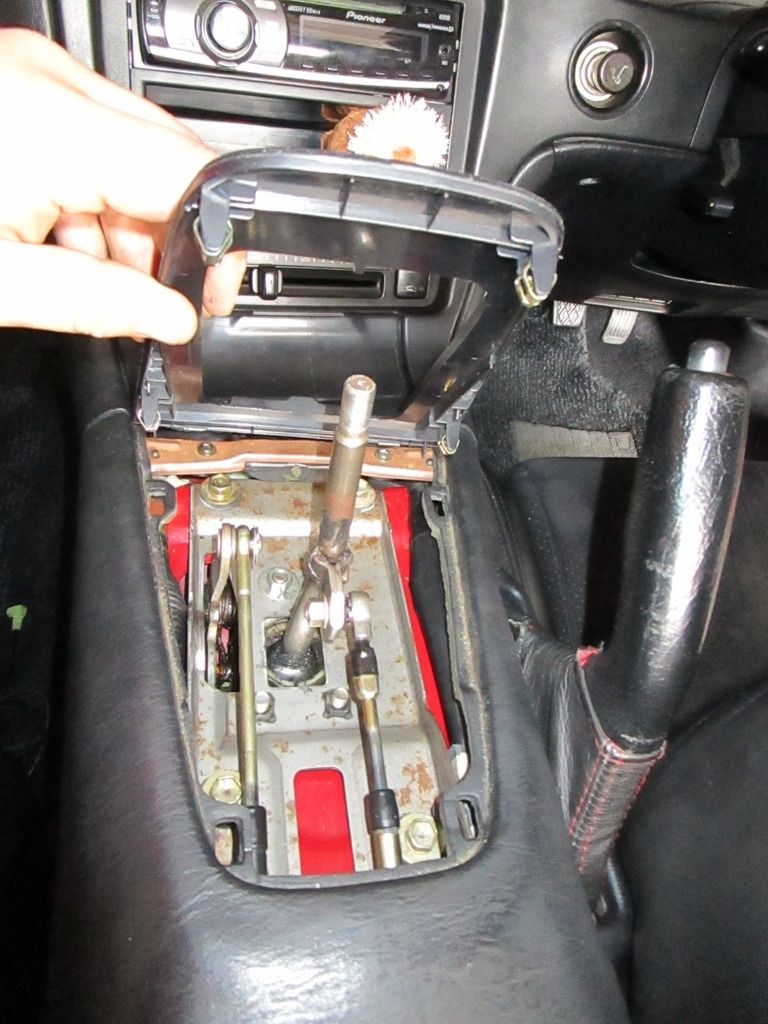
Remove the 2 front screws holding the arm rest to the centre console.

Then pull up the arm rest. It needs a bit of help around the hand brake lever. Then you are left with this.
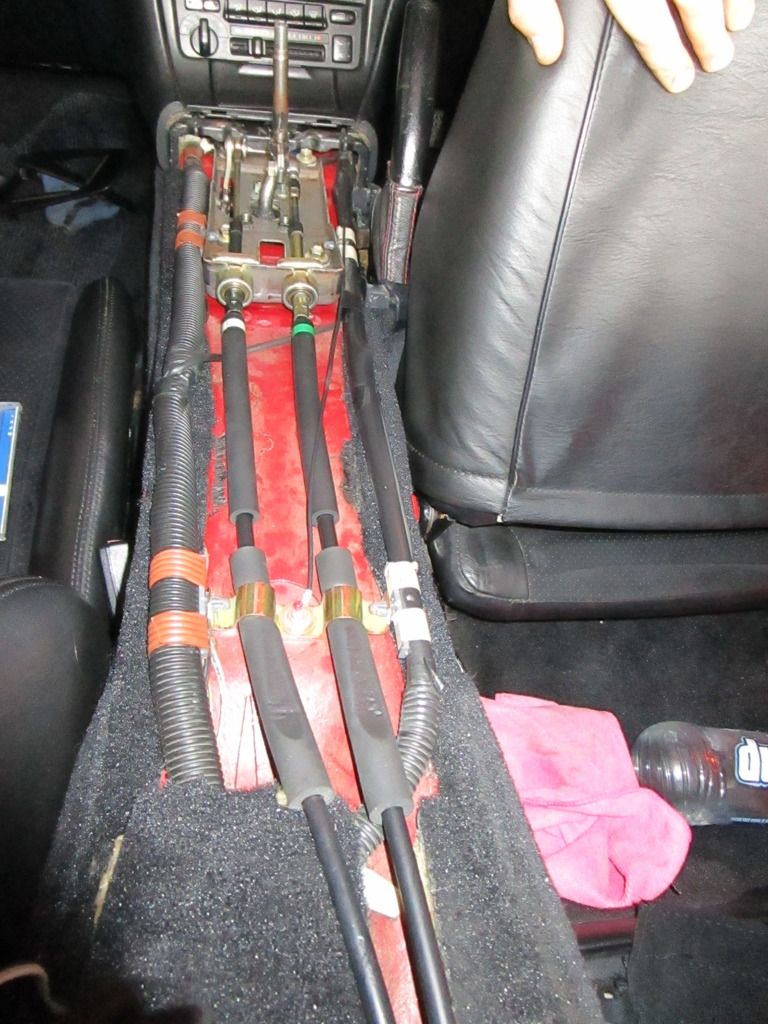
Don't forget to remove this last screw and plastic bracket.
Then remove the clips holding the cables in.
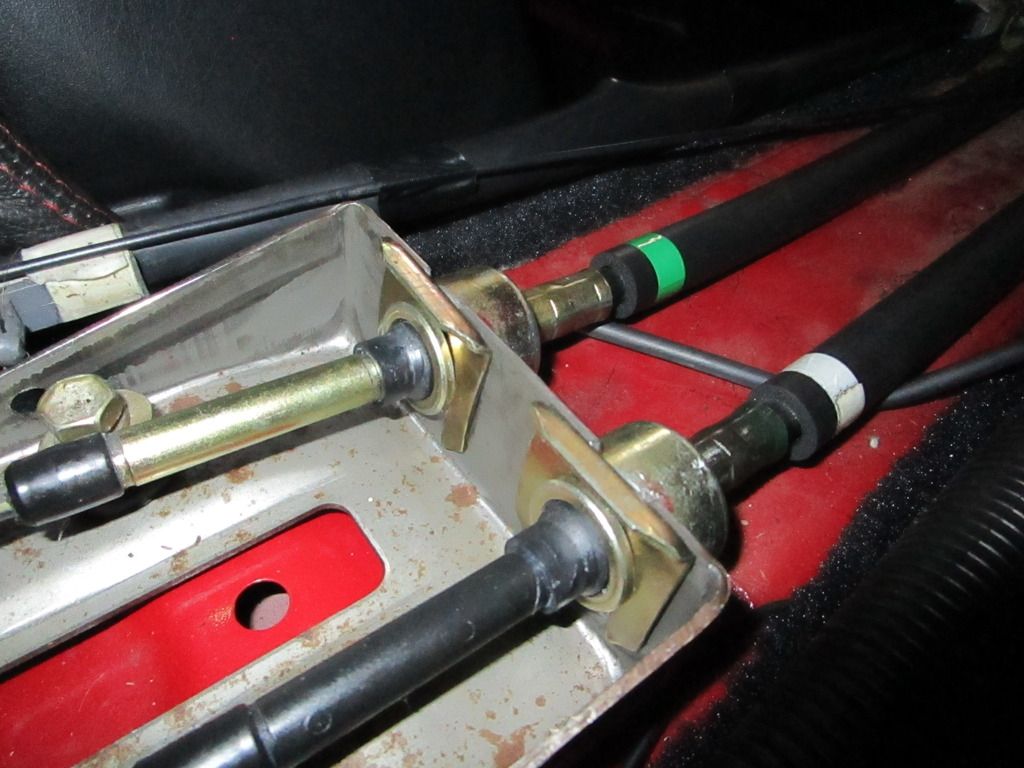
Remove the plastic clips holding the wiring loom either side.
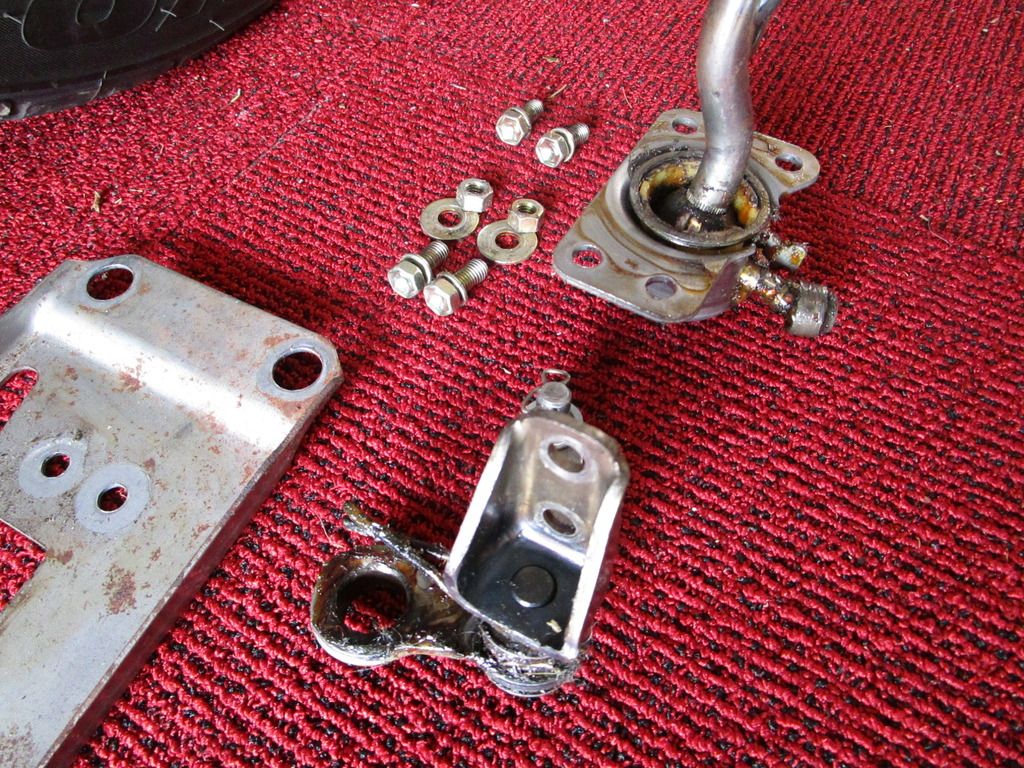
Pull off the clip holding one cable on and unbolt the other. 12mm nut.
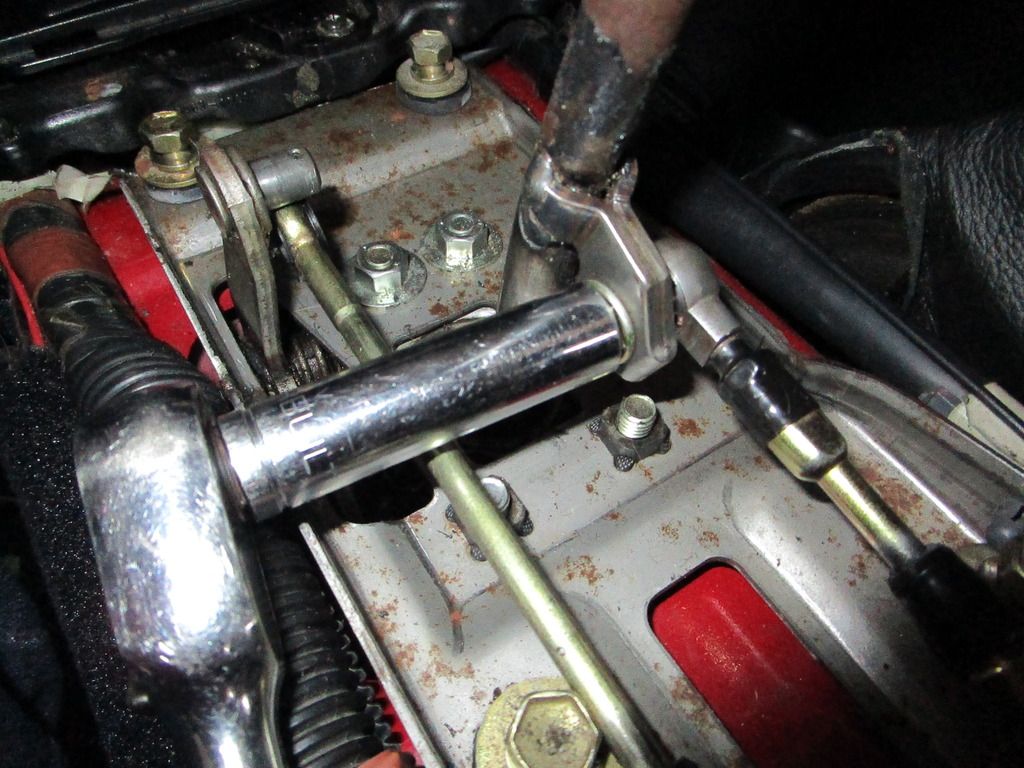
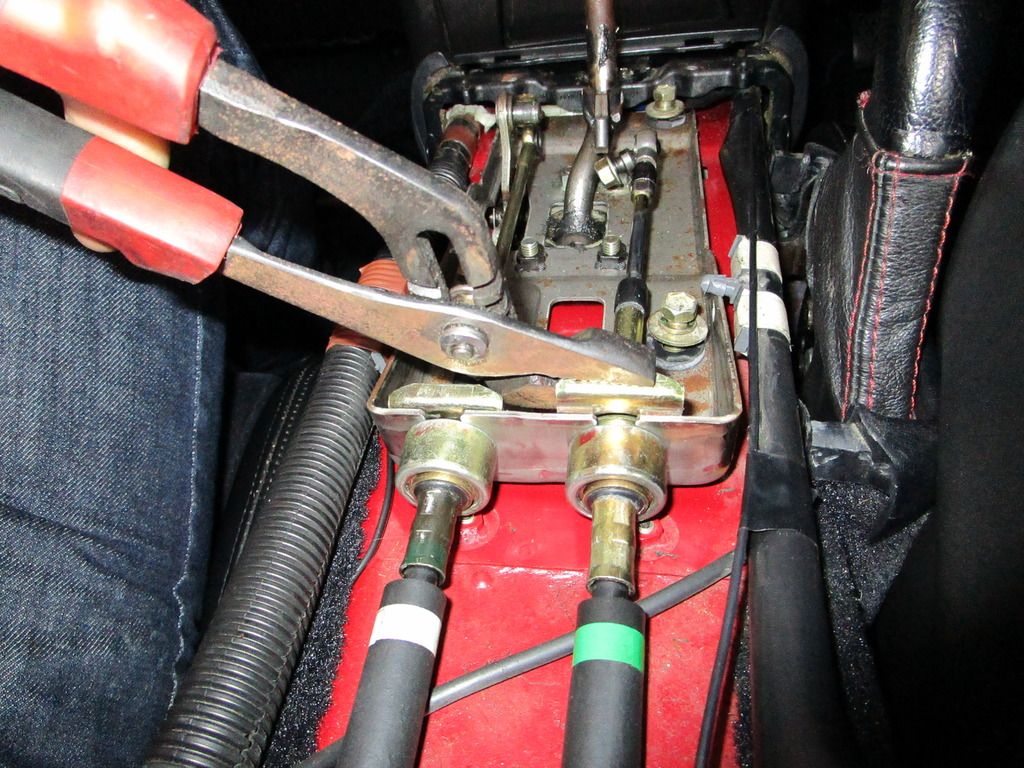
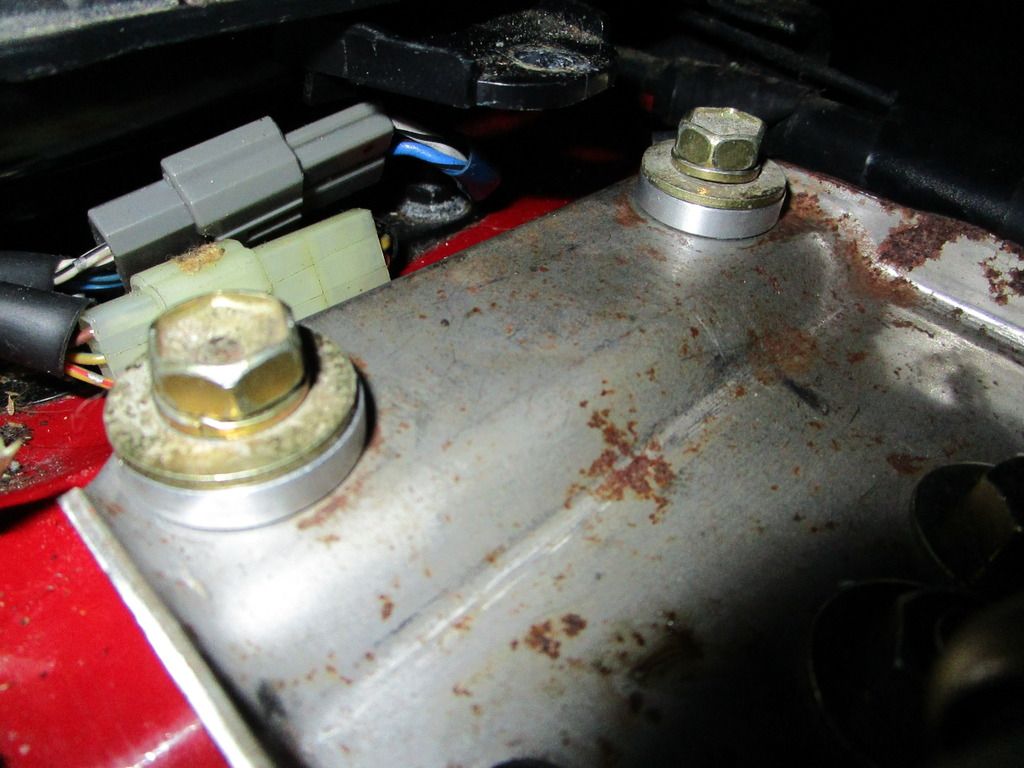
Next unbolt the 4 12mm bolts holding the plate down.
Lift the plate up and forward slightly to get the cables out from the mount at the back.
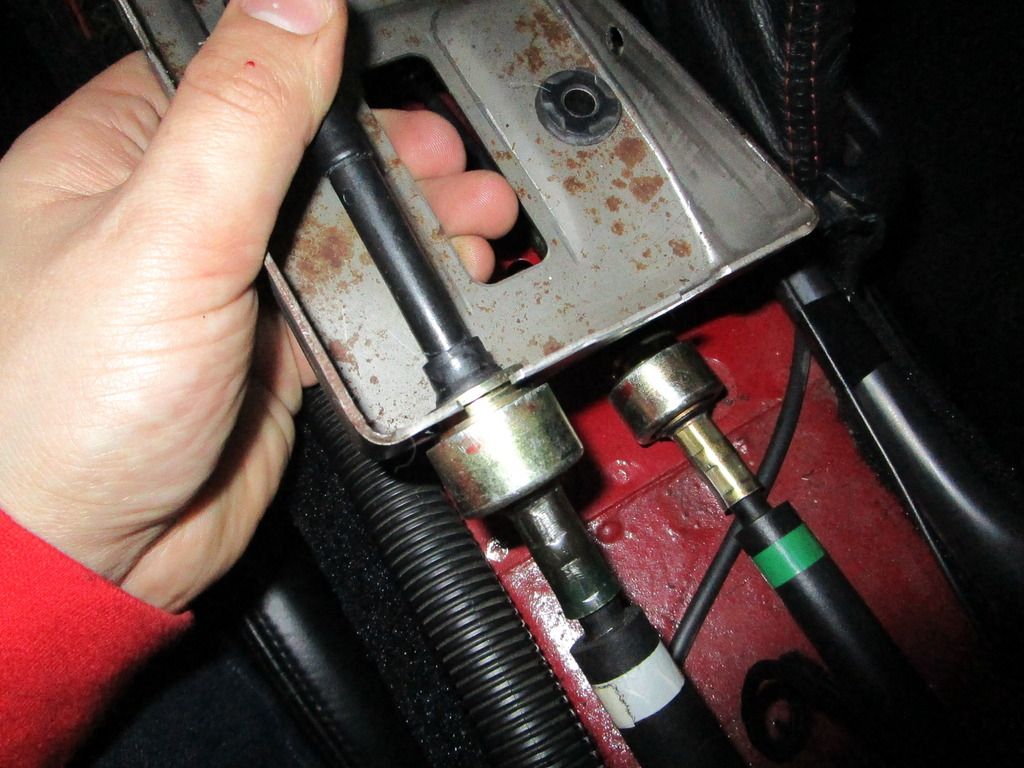
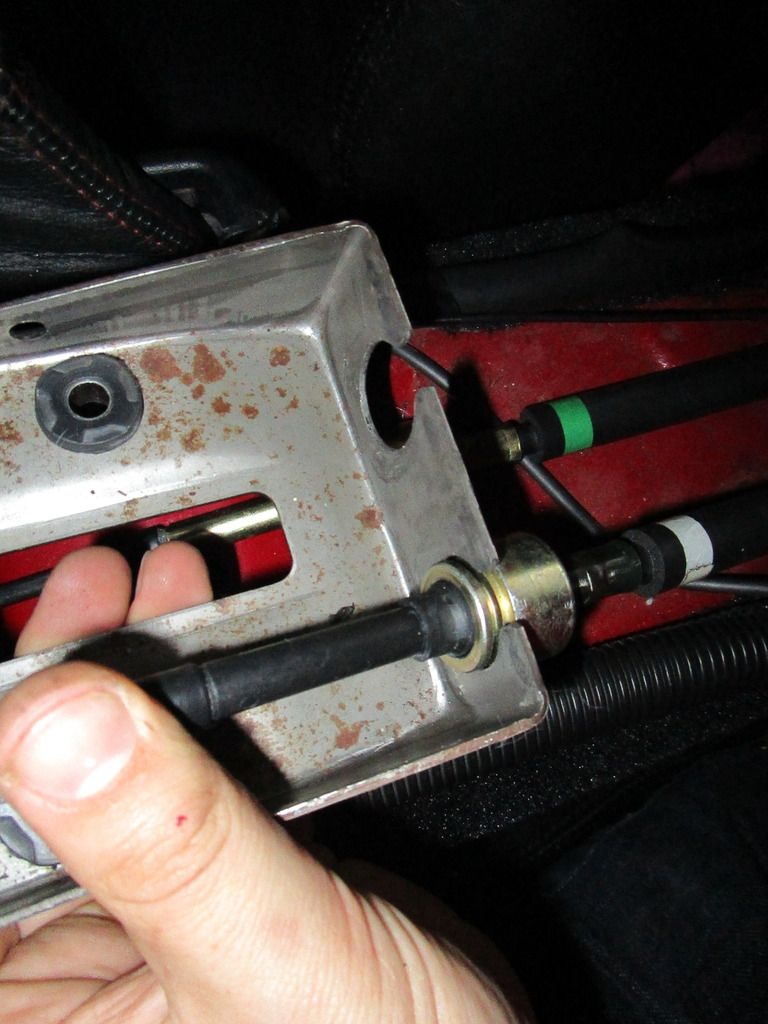
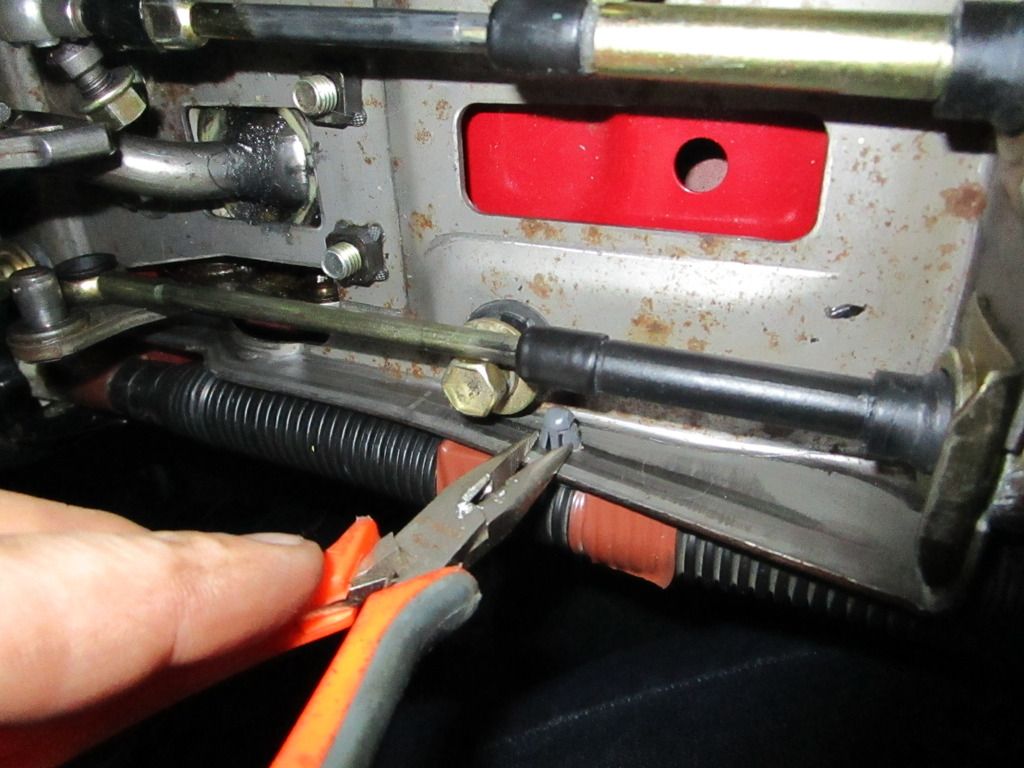
Then you should be left with this. Make sure you don't lose the plastic bush inside the end of the left cable.
89-91 (left) vs 92+ (right) plate and lever.
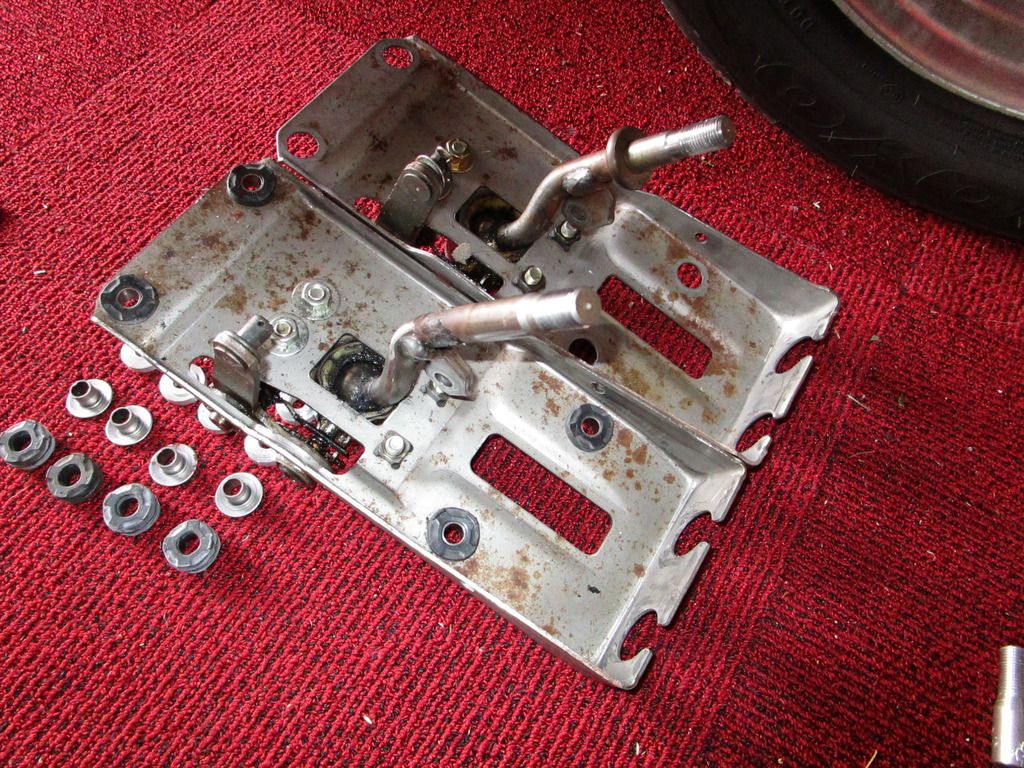
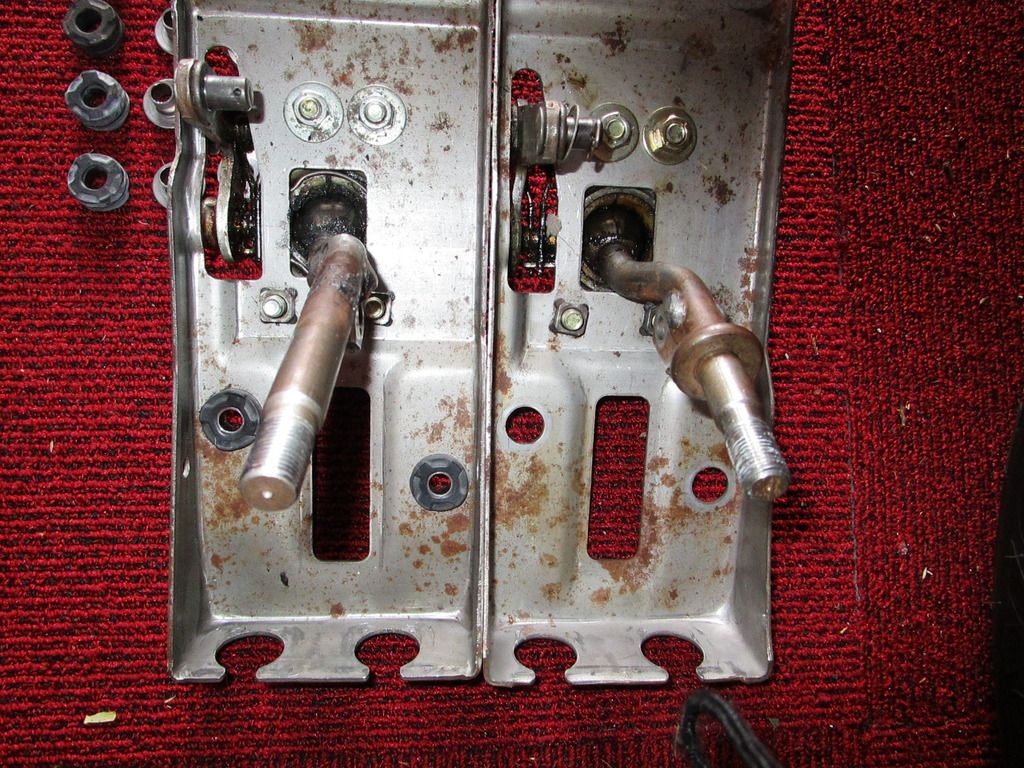
Once the plates have been swapped over place the 4 bottom bushes under it and line them up with the holes.
Place the top halves on and bolt it down.
Once that is done reassemble in the reverse order.
This is the 92+ boot installed. My black leather with red stitching boot doesn't quite fit right yet.
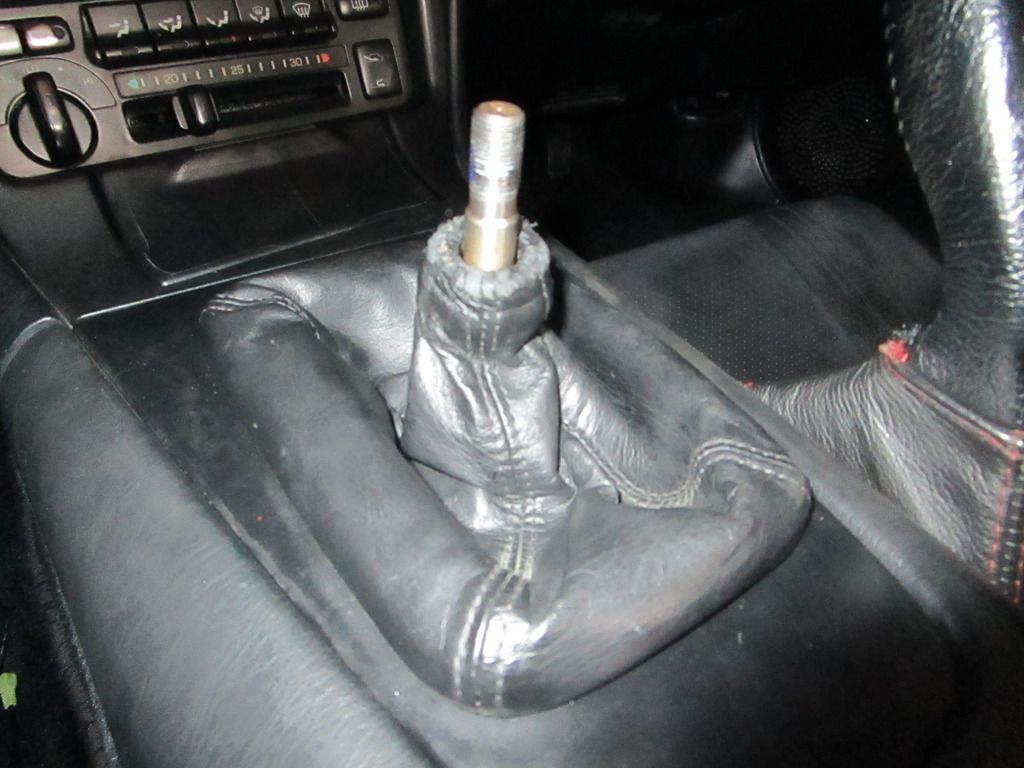
With the TRD knob and adapter on.
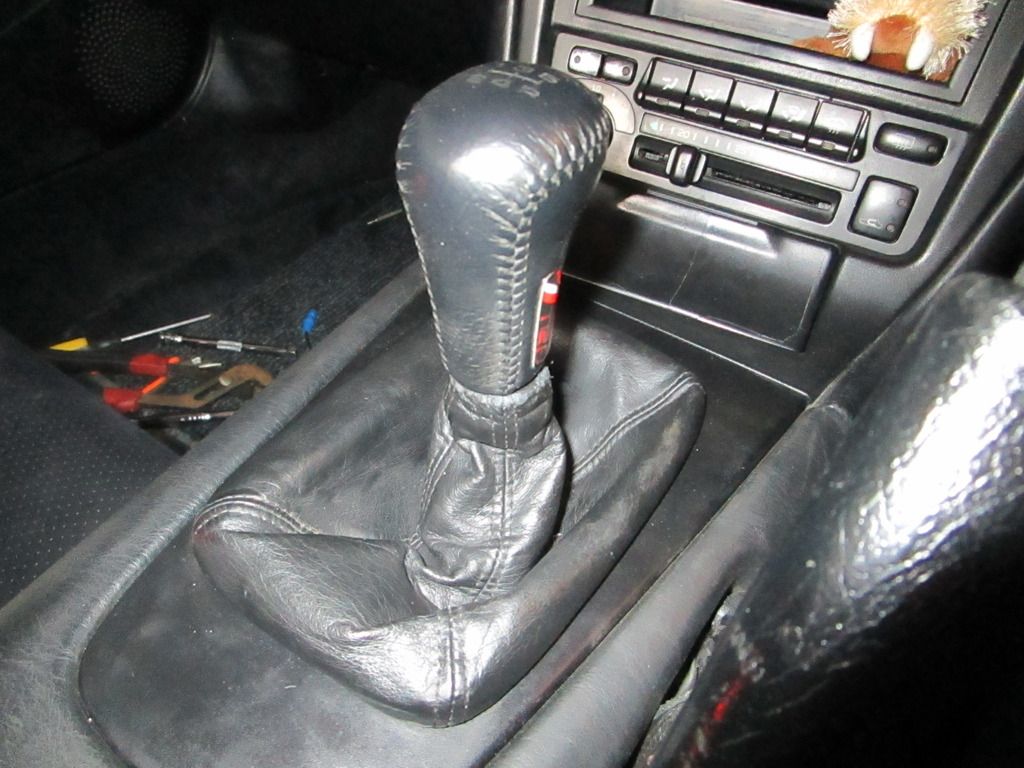
I haven't gone for a drive yet but it feels a bit nicer in the way of the movement path between gears.
The bushes can be bought from TwosRus if anyone wanted to know. These are custom bushes but essentiality the same thing just not anodised.
So I asked my brother to make some solid aluminium shift plate bushes and a knob adapter that I designed.The adapter will allow my TRD knob to fit on the shorter lever with the boot support ring.


New bushes vs old rubber bushes. Nothing wrong with the rubber ones, they just allow the plate to move a bit when shifting. They are probably there for vibration and sound damping too.

New knob adapter. The 89-91 lever is about 20mm longer and the knob has a ring the holds the boot in place. The 92+ has a ring on the lever that supports the boot so the knob is separate from the boot. The 92+ knob is far shorter too so it all fits together fine. The TRD knob I have has a long thread deep inside so the 92+ lever won't even thread into it at all. So adding in the longer adapter allows the TRD knob to fit on the 92+ lever. This puts the knob back up at the 89-91 lever level but not a problem. I can switch out knobs depending on how I'm feeling.
I thought I would post up the process to change the shift lever and install the bushes. It doesn't cover pulling apart the lever mount because I just swapped over the whole plate and lever to the newer one. Most parts are the same but some have slightly different part numbers so I thought I'd go with the newer one.
Preparing the shift plate for new bushes

Use a 6mm socket to push out the steel centre

Use a flat head screw driver to force the rubber bushes out


Ready for installation. I removed the shift lever and mechanism to clean the base plate. Just 4 12mm bolts and a bit of fiddling to get it all out.


Cleaned up plate

Bottom half of the bush sitting in place.

Top half sitting over it.

Now onto removing the interior parts to get to the shift plate.
On each side of the centre arm rest there are 2 screw near the back. Remove these.

Then inside the CD/Tape box there are 4 screws. Remove these, leave them in the box, shut the lids and remove the box from the car. Keeps the screws safe and in the correct place for later.

Next is the knob, shifter boot and surround. Unscrew the knob, pull the boot up from the front and put aside.


In the 4 corners of the surround plate there are small push in clips. Reach under and push them up with your finger so not to break the plastic clip tabs.

Remove the 2 front screws holding the arm rest to the centre console.

Then pull up the arm rest. It needs a bit of help around the hand brake lever. Then you are left with this.

Don't forget to remove this last screw and plastic bracket.


Then remove the clips holding the cables in.


Remove the plastic clips holding the wiring loom either side.

Pull off the clip holding one cable on and unbolt the other. 12mm nut.


Next unbolt the 4 12mm bolts holding the plate down.

Lift the plate up and forward slightly to get the cables out from the mount at the back.


Then you should be left with this. Make sure you don't lose the plastic bush inside the end of the left cable.

89-91 (left) vs 92+ (right) plate and lever.


Once the plates have been swapped over place the 4 bottom bushes under it and line them up with the holes.

Place the top halves on and bolt it down.


Once that is done reassemble in the reverse order.
This is the 92+ boot installed. My black leather with red stitching boot doesn't quite fit right yet.

With the TRD knob and adapter on.


I haven't gone for a drive yet but it feels a bit nicer in the way of the movement path between gears.
The bushes can be bought from TwosRus if anyone wanted to know. These are custom bushes but essentiality the same thing just not anodised.
1990 SW20 MR2 G-Limited (GEN4 3SGTE Installed)
2000 AE111R Corolla Wagon NZ New Daily
1996 AE101R Corolla Sprint NZ New Selling Soon
1990 EP81 Starlet XL (Sold)
1990 EE90 Corolla XL (Sold)
Instagram https://www.instagram.com/sw20glimited/
2000 AE111R Corolla Wagon NZ New Daily
1996 AE101R Corolla Sprint NZ New Selling Soon
1990 EP81 Starlet XL (Sold)
1990 EE90 Corolla XL (Sold)
Instagram https://www.instagram.com/sw20glimited/
-
GDII
- Forum Moderator - MR2OCNZ
- Posts: 5739
- Joined: Sun Jul 10, 2011 5:13 pm
- Stomping Ground: Wellington
- Prime Mover: SW20
- First name: Phill
Re: GDII's 1990 G-Limited
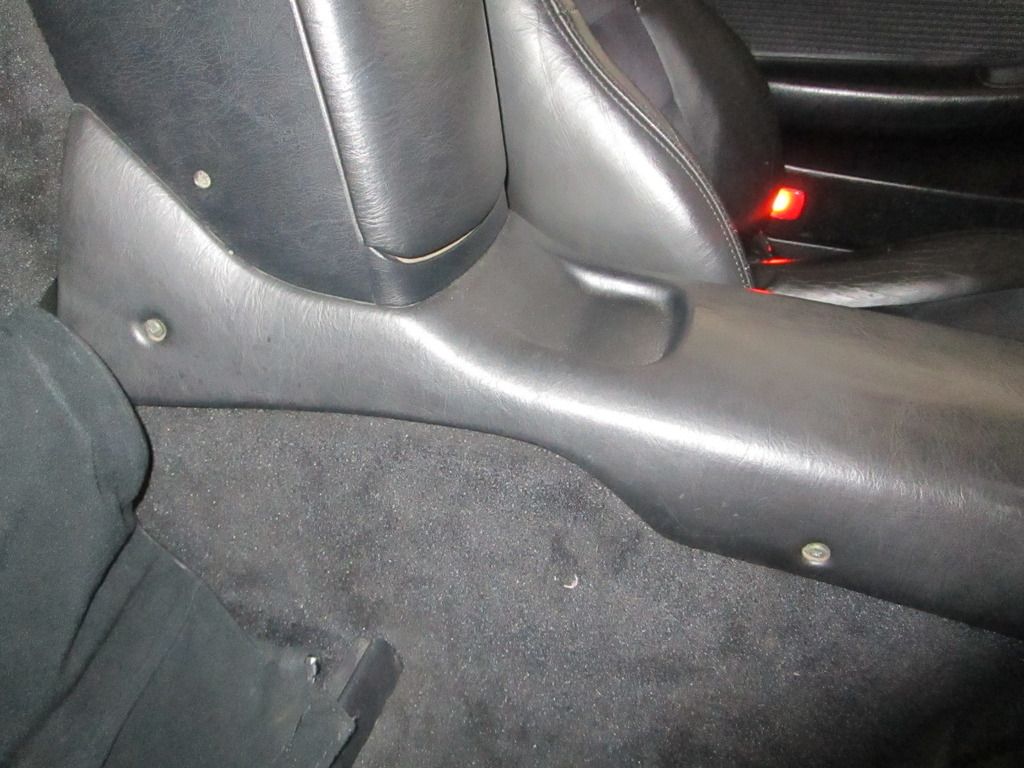
There have been a few little bits on the interior that have been missing, broken or just the completely wrong part.
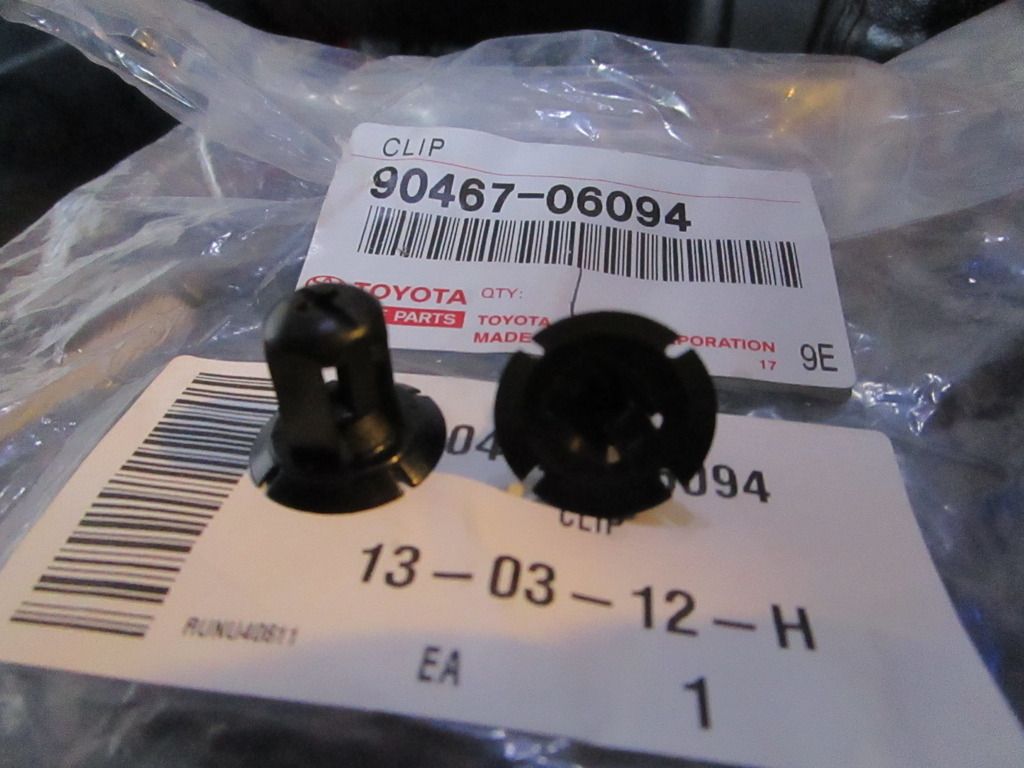
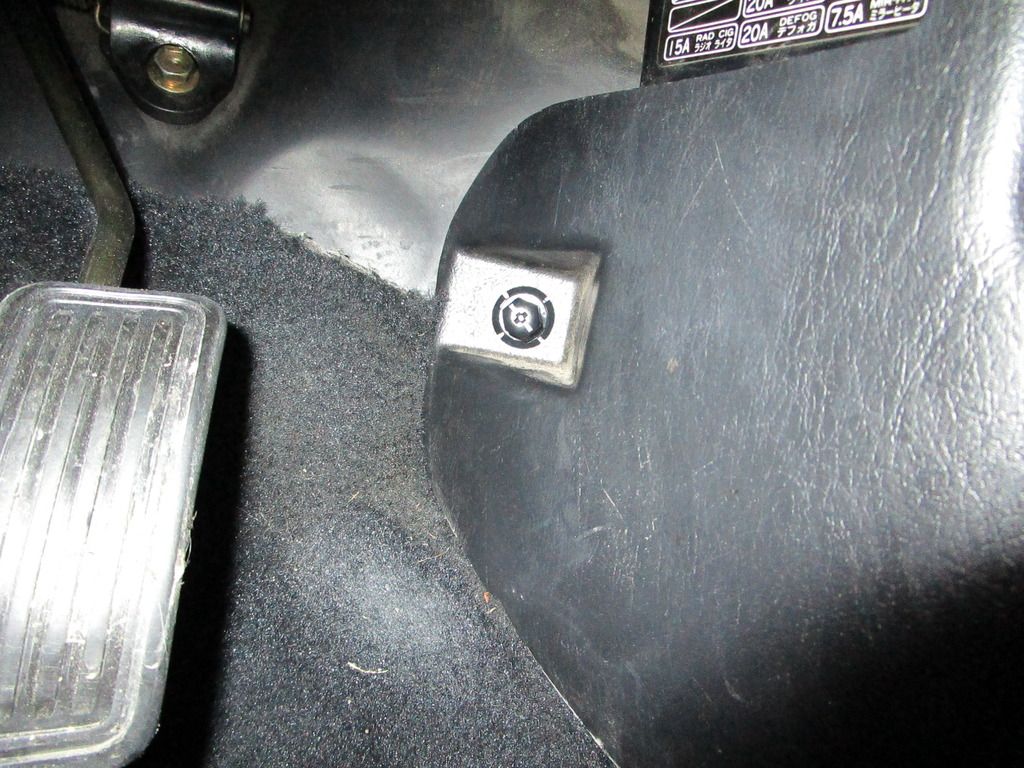
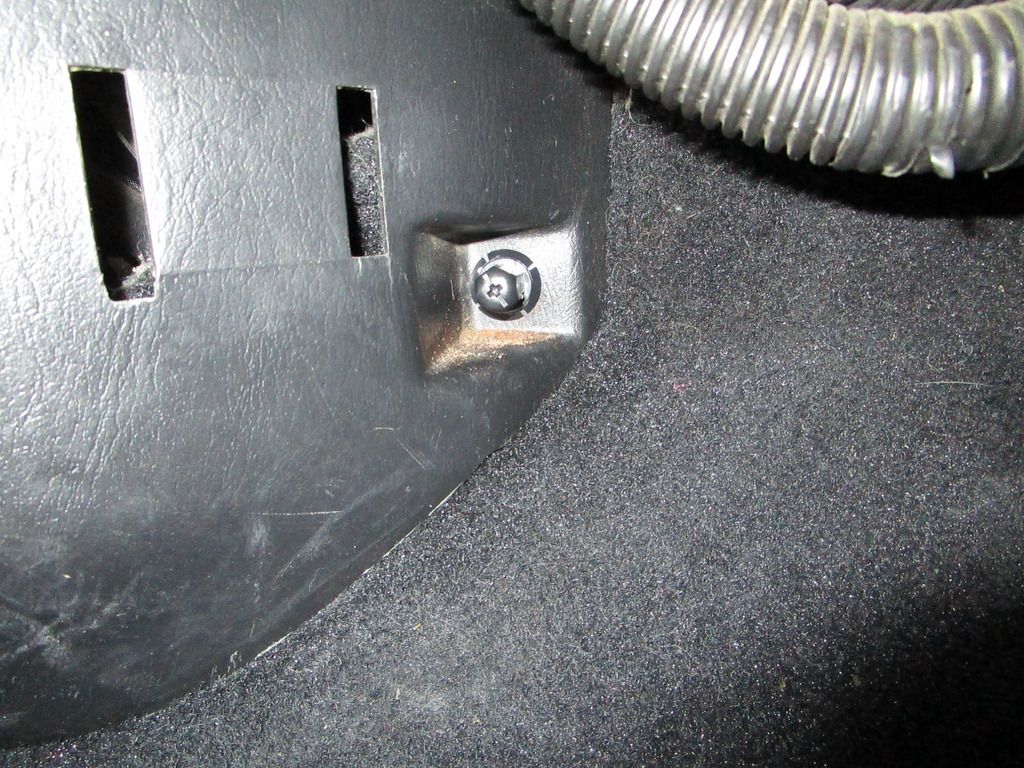
The 2 little plastic cap screws holding the sill trim down at the front. Missing or the wrong part.
New parts from Toyota.
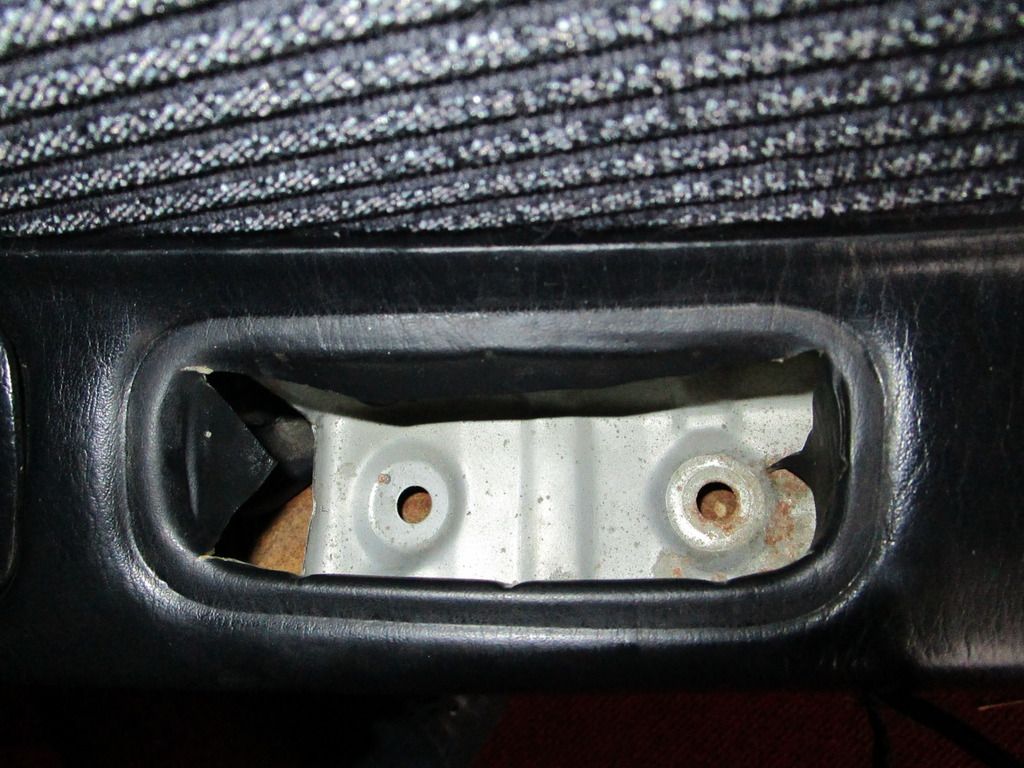
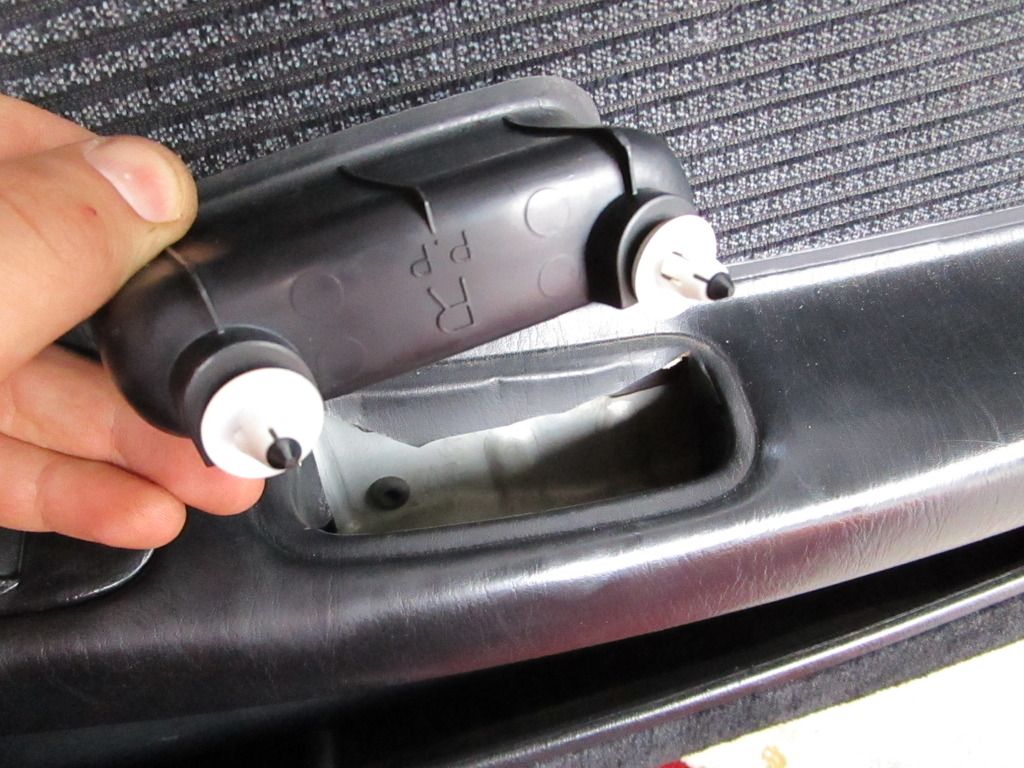
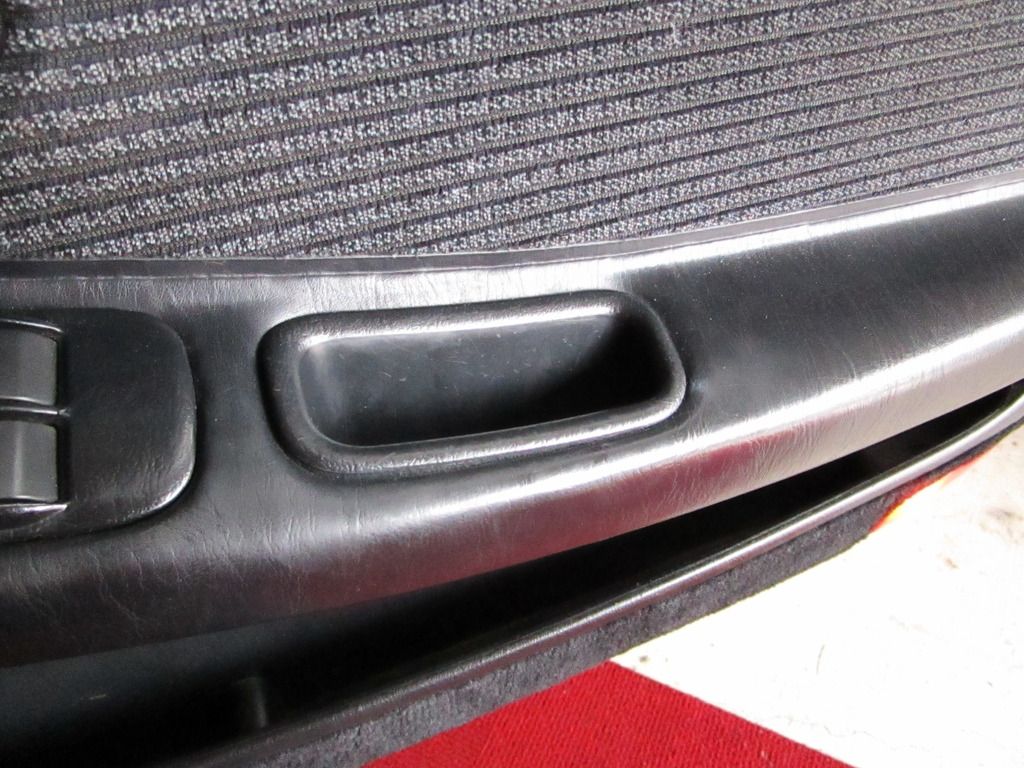
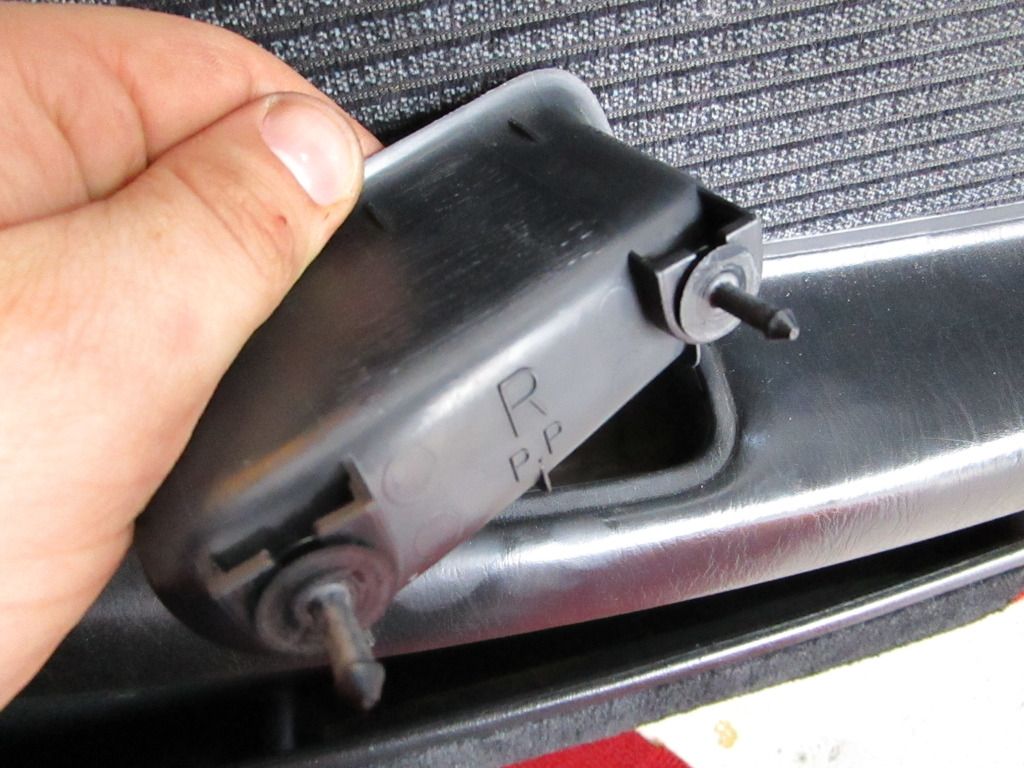
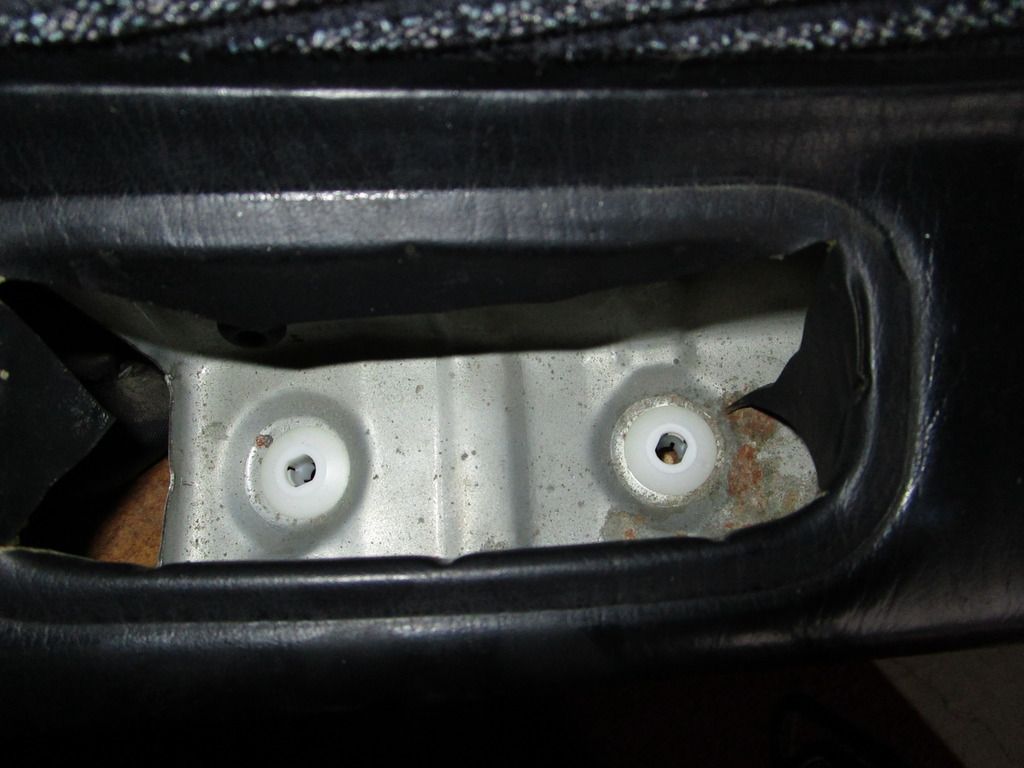
Next was to sort out my door cups. They never stayed in place well and I couldn't figure out why. I tried lots of plastic plugs and none worked. Then I figured out none of the normal ones would work. They are special 2 piece plugs. White bottom half that fits in the door and black top half that fits in the cup base.
These are what I had in the car when I got it.

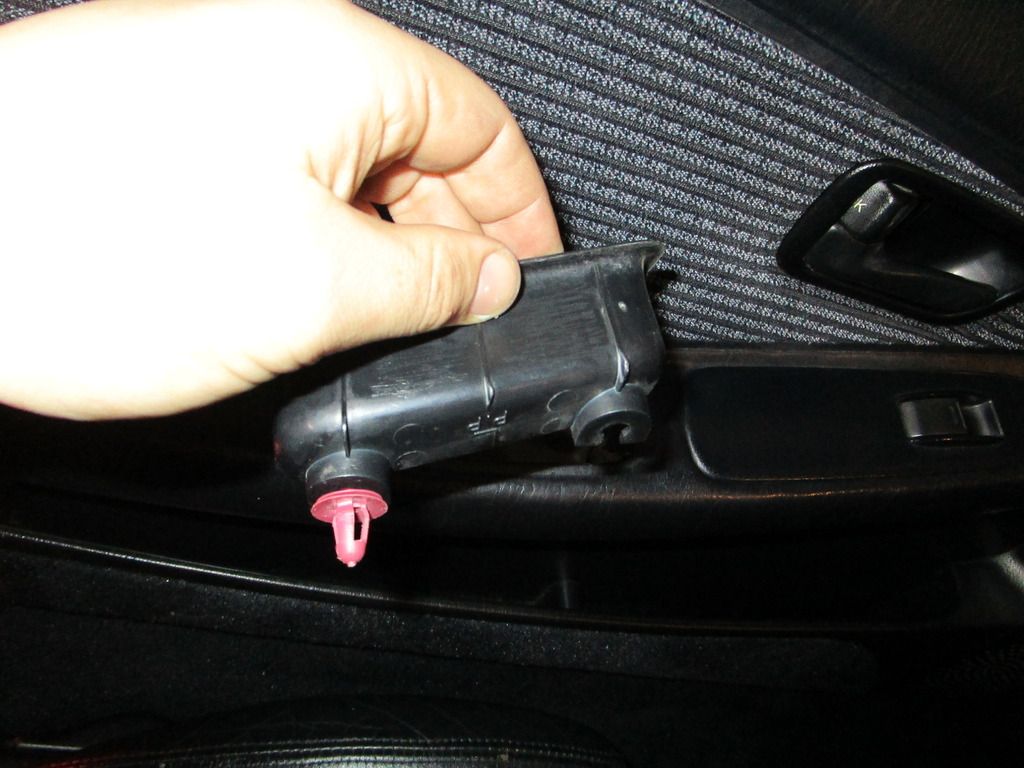
These are what are meant to be in there.
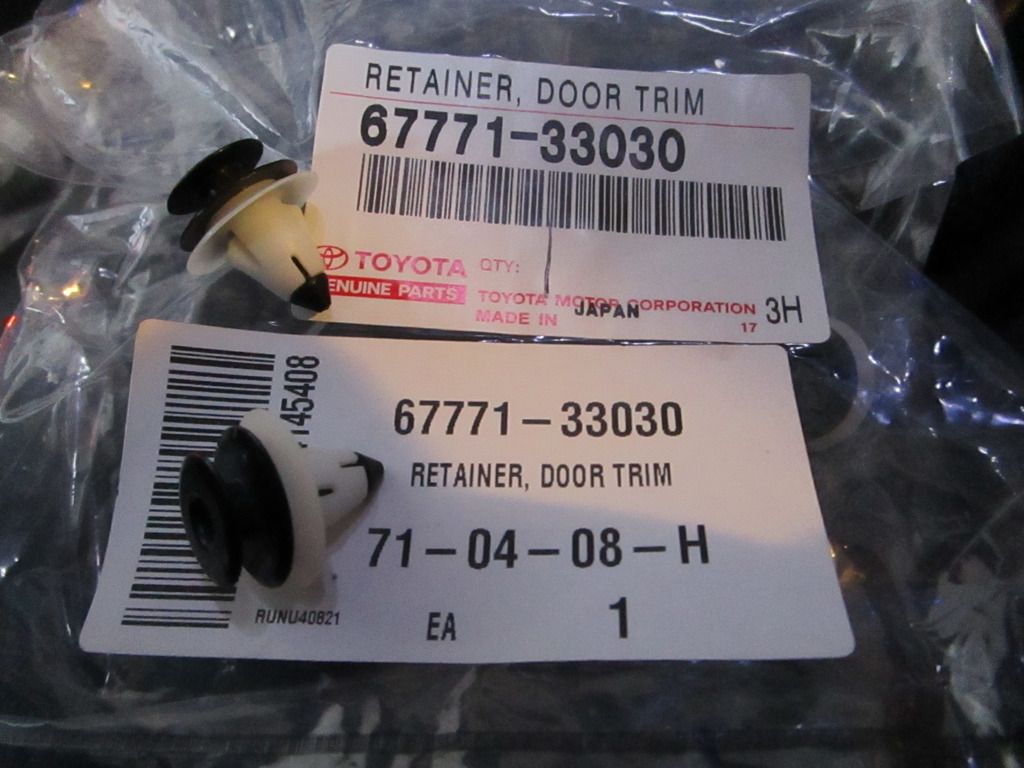
To install, slot the black half with the white half into the cup, then press into the door. Once they are located you can pull the cup out and the black part will separate from the white half leaving the white half in the car. Needs lots of force but at least they won't come out with normal use.
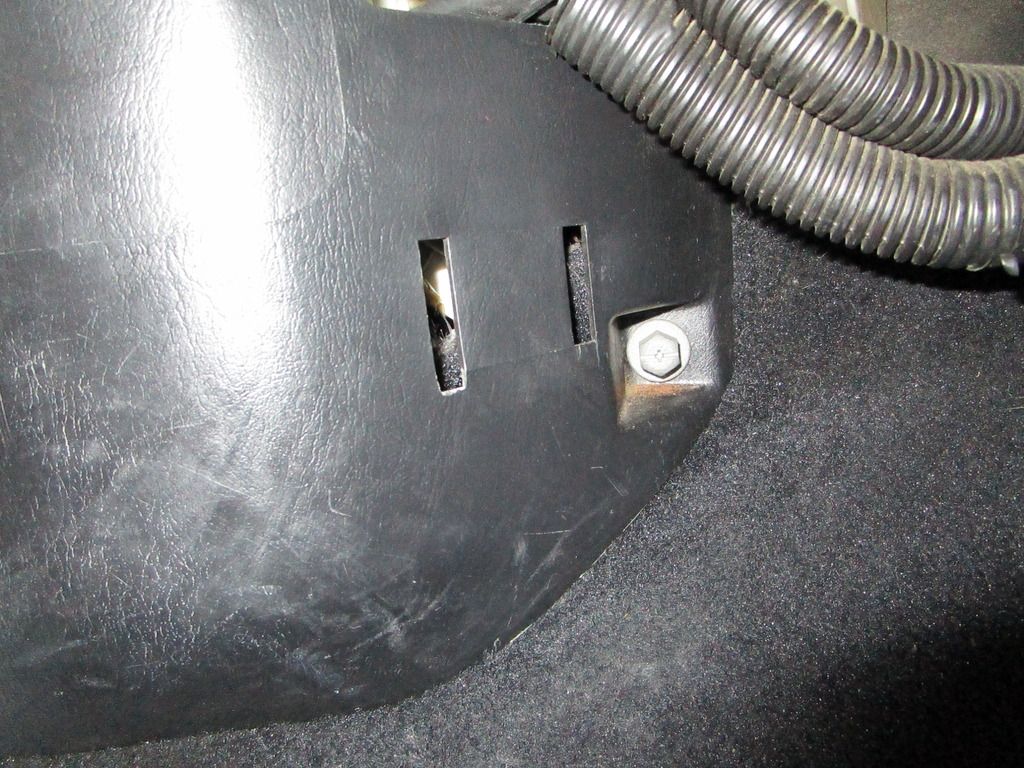
Bonus fun fact that some people might not know, the 2 slots down on the left kick panel shown below are for clips to hold a flare. In Japan you legally need to car one so JDM cars have this mount for them usually down by the passenger kick panel.
The 2 little plastic cap screws holding the sill trim down at the front. Missing or the wrong part.


New parts from Toyota.


Next was to sort out my door cups. They never stayed in place well and I couldn't figure out why. I tried lots of plastic plugs and none worked. Then I figured out none of the normal ones would work. They are special 2 piece plugs. White bottom half that fits in the door and black top half that fits in the cup base.
These are what I had in the car when I got it.


These are what are meant to be in there.

To install, slot the black half with the white half into the cup, then press into the door. Once they are located you can pull the cup out and the black part will separate from the white half leaving the white half in the car. Needs lots of force but at least they won't come out with normal use.


Bonus fun fact that some people might not know, the 2 slots down on the left kick panel shown below are for clips to hold a flare. In Japan you legally need to car one so JDM cars have this mount for them usually down by the passenger kick panel.
1990 SW20 MR2 G-Limited (GEN4 3SGTE Installed)
2000 AE111R Corolla Wagon NZ New Daily
1996 AE101R Corolla Sprint NZ New Selling Soon
1990 EP81 Starlet XL (Sold)
1990 EE90 Corolla XL (Sold)
Instagram https://www.instagram.com/sw20glimited/
2000 AE111R Corolla Wagon NZ New Daily
1996 AE101R Corolla Sprint NZ New Selling Soon
1990 EP81 Starlet XL (Sold)
1990 EE90 Corolla XL (Sold)
Instagram https://www.instagram.com/sw20glimited/
-
GDII
- Forum Moderator - MR2OCNZ
- Posts: 5739
- Joined: Sun Jul 10, 2011 5:13 pm
- Stomping Ground: Wellington
- Prime Mover: SW20
- First name: Phill
Re: GDII's 1990 G-Limited
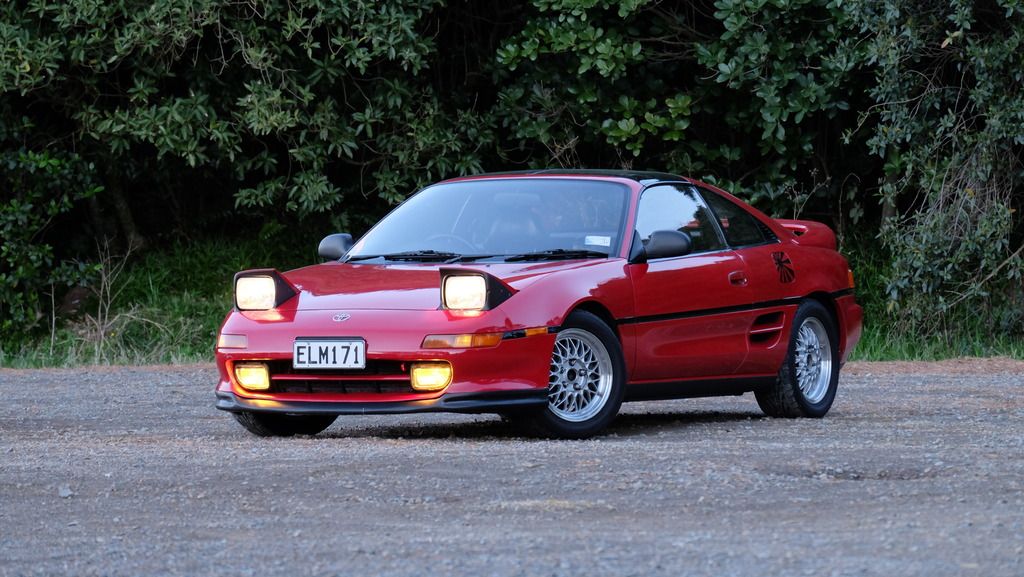
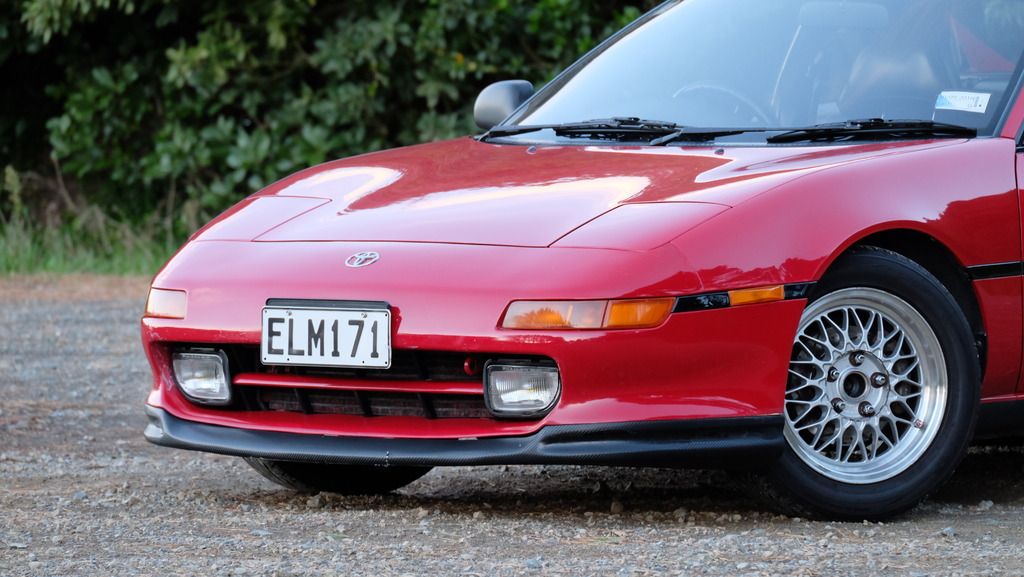
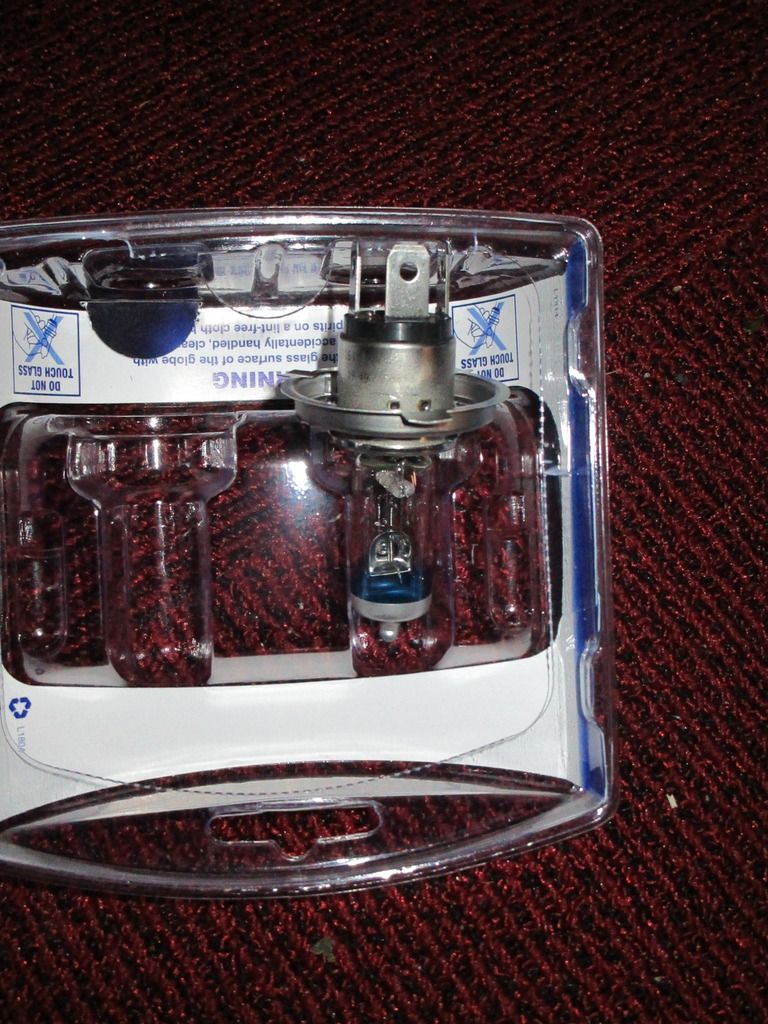
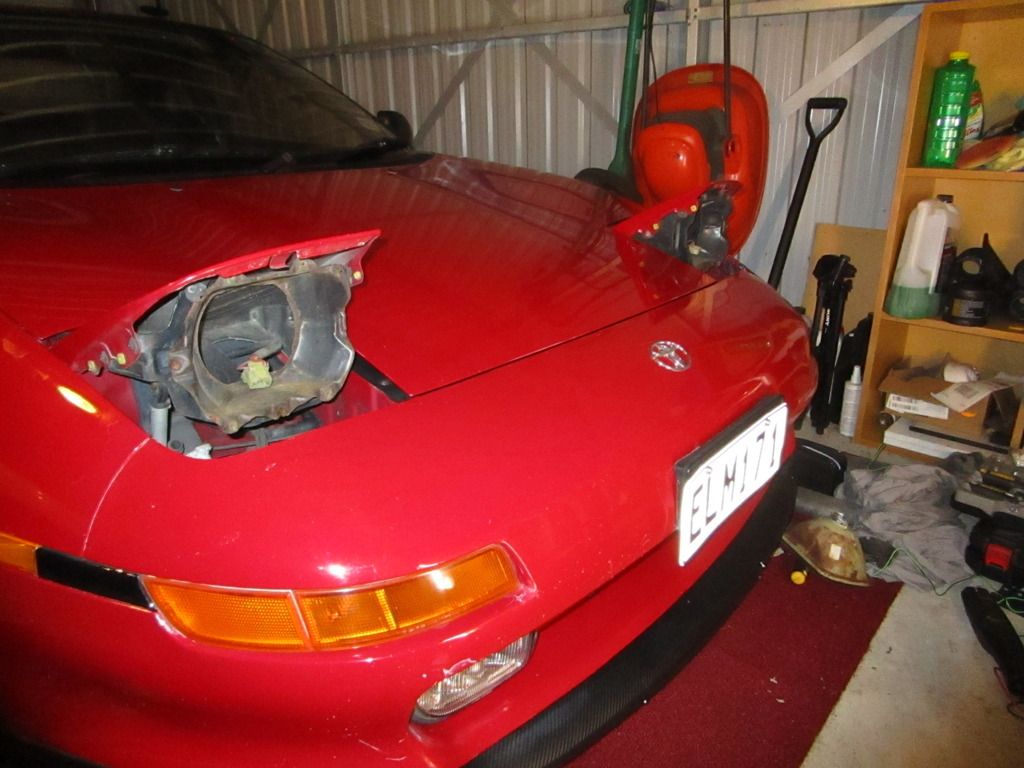
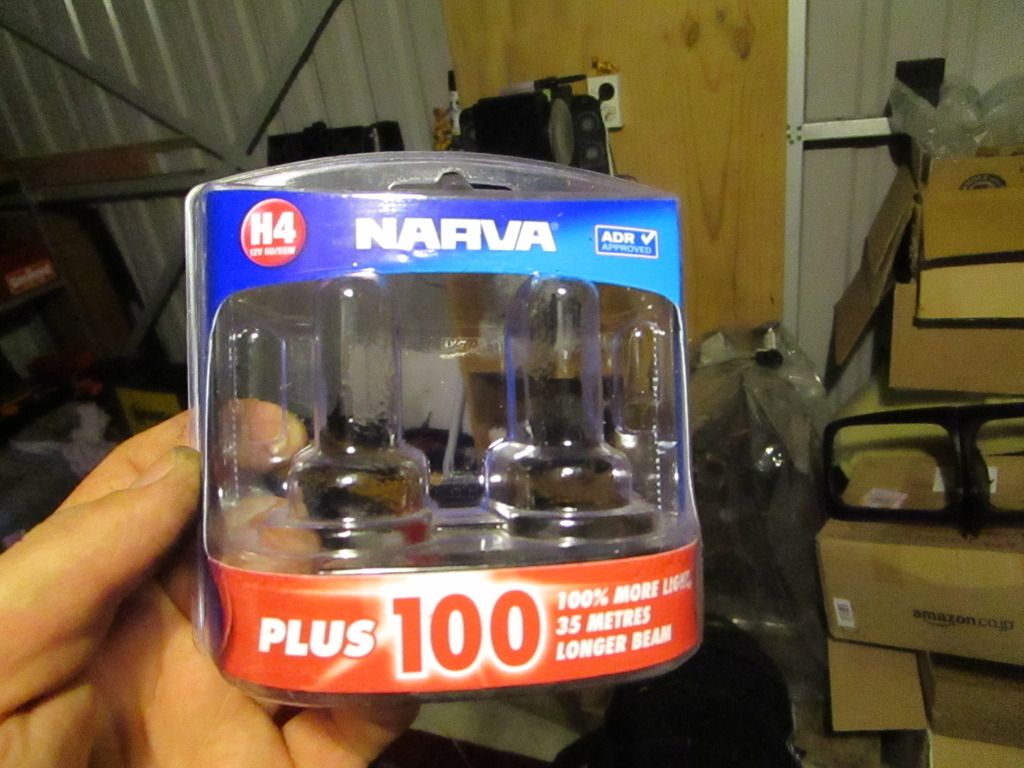
New Narva Plus 100 H4 55/60 headlight bulbs. Still haven't driven at night with them but they seem brighter and whiter than the old ones.
I bought the car with some unknown bulbs, turns out they were half Narva, half Repco. I bought some better brighter bulbs and kept the originals. The brighter bulbs blew out after about 4 years so I put the originals back in, they lasted another 4 years until this week. One broke the low beam filament when removing it from the car, the other looked a bit worn but still works. Not bad bulb life but I did notice the package says brighter ones don't last as long.
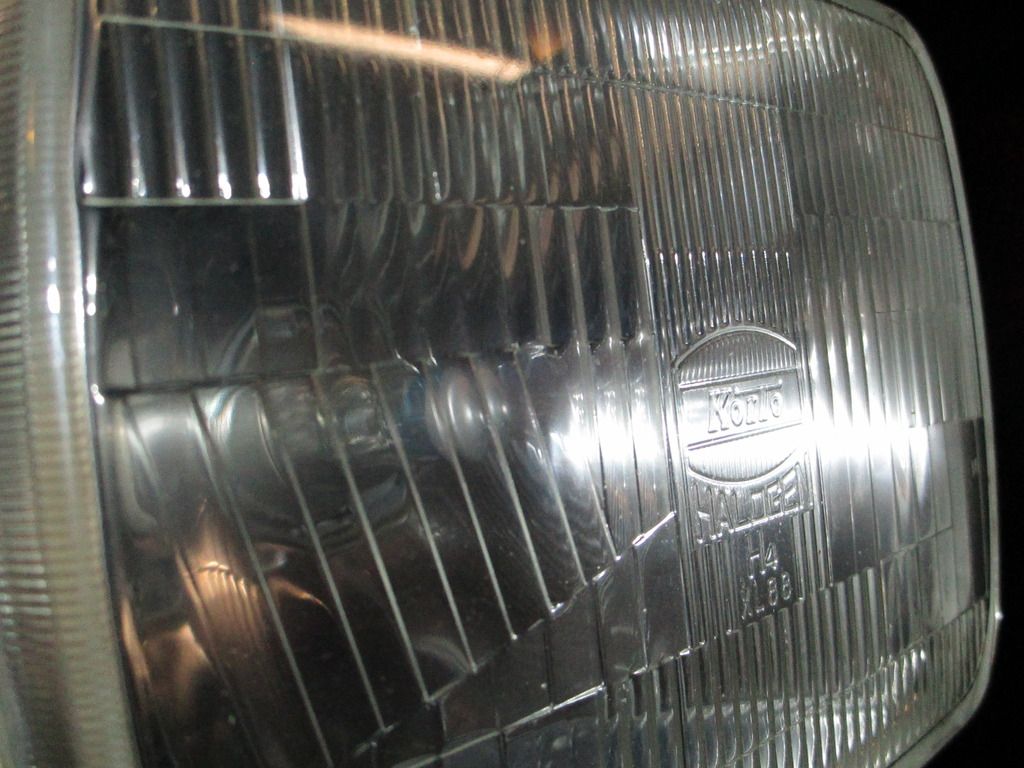
The car already has semi sealed H4 lenses so easy swap. Just remove the plastic surrounds and the steel retainer around the lens.
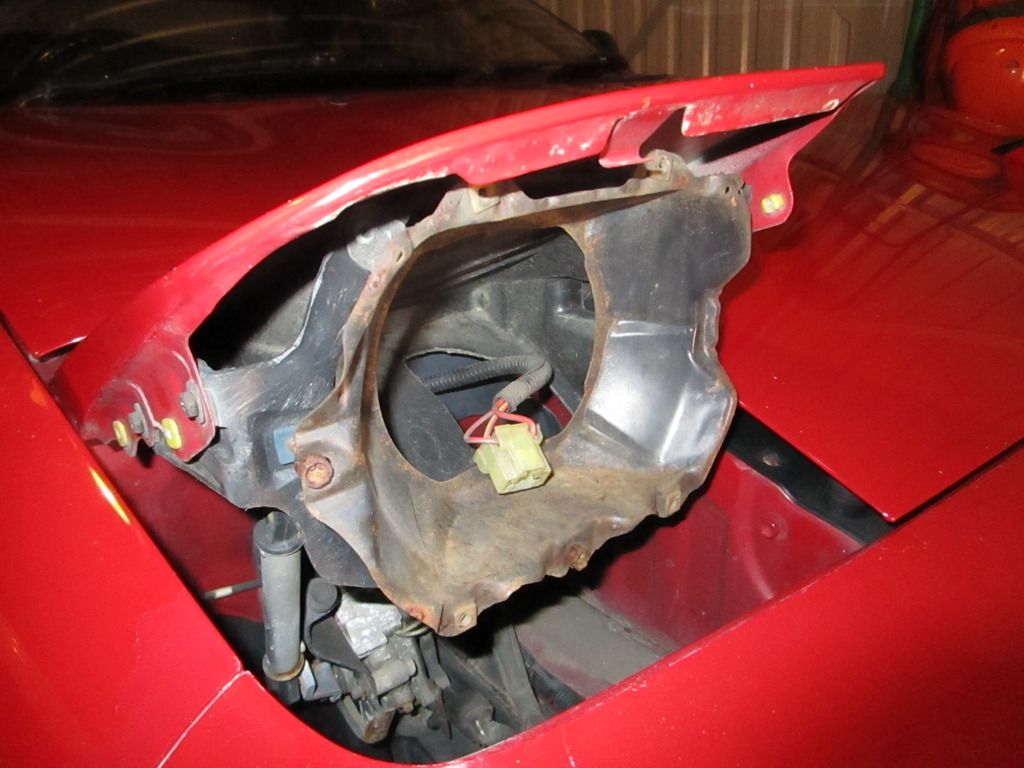
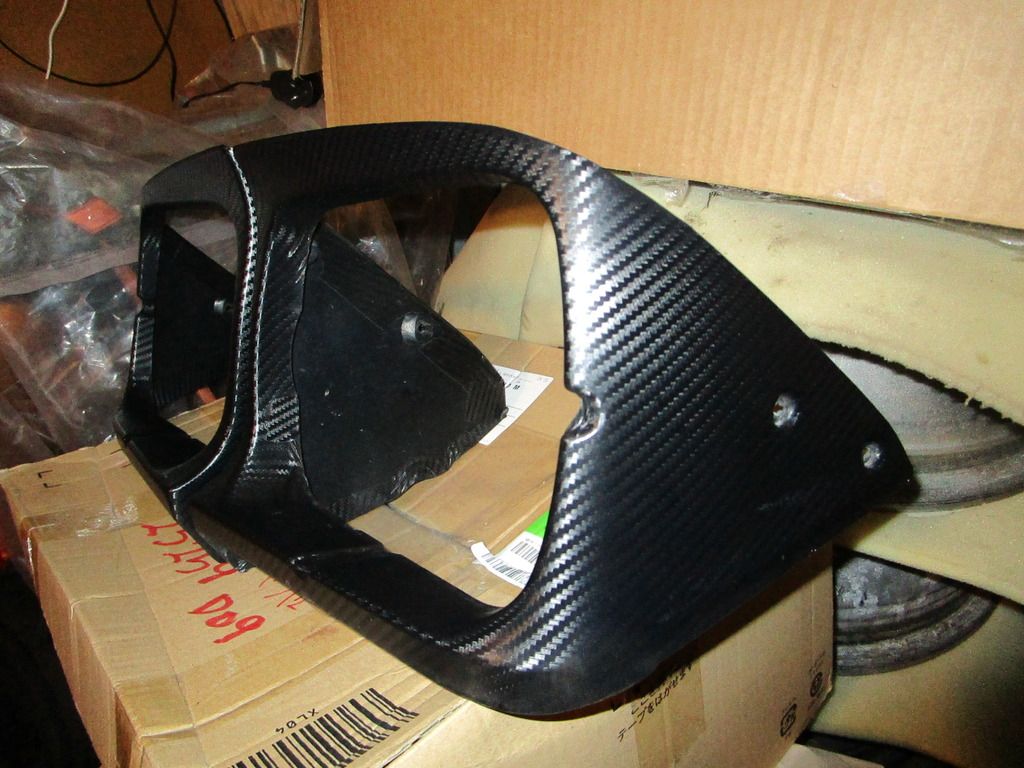
Carbon vinyl still holding up very well.


1990 SW20 MR2 G-Limited (GEN4 3SGTE Installed)
2000 AE111R Corolla Wagon NZ New Daily
1996 AE101R Corolla Sprint NZ New Selling Soon
1990 EP81 Starlet XL (Sold)
1990 EE90 Corolla XL (Sold)
Instagram https://www.instagram.com/sw20glimited/
2000 AE111R Corolla Wagon NZ New Daily
1996 AE101R Corolla Sprint NZ New Selling Soon
1990 EP81 Starlet XL (Sold)
1990 EE90 Corolla XL (Sold)
Instagram https://www.instagram.com/sw20glimited/
-
*84vvt
- Life Member - MR2OCNZ
- Posts: 2557
- Joined: Sun Jun 06, 2004 11:44 am
- Stomping Ground: Wellington
- Prime Mover: AW11
- First name: Colin
Re: GDII's 1990 G-Limited
I like the carbon
BUT you need to splash a bit more paint around
BUT you need to splash a bit more paint around
Boosted cars are like hot women.
A little edgy, every guy wants one,
some guys can't handle them,
and if you throw a little alcohol in them they'll rock your world.
A little edgy, every guy wants one,
some guys can't handle them,
and if you throw a little alcohol in them they'll rock your world.
-
GDII
- Forum Moderator - MR2OCNZ
- Posts: 5739
- Joined: Sun Jul 10, 2011 5:13 pm
- Stomping Ground: Wellington
- Prime Mover: SW20
- First name: Phill
Re: GDII's 1990 G-Limited
Where do you think I need more paint*84vvt wrote:I like the carbon
BUT you need to splash a bit more paint around
1990 SW20 MR2 G-Limited (GEN4 3SGTE Installed)
2000 AE111R Corolla Wagon NZ New Daily
1996 AE101R Corolla Sprint NZ New Selling Soon
1990 EP81 Starlet XL (Sold)
1990 EE90 Corolla XL (Sold)
Instagram https://www.instagram.com/sw20glimited/
2000 AE111R Corolla Wagon NZ New Daily
1996 AE101R Corolla Sprint NZ New Selling Soon
1990 EP81 Starlet XL (Sold)
1990 EE90 Corolla XL (Sold)
Instagram https://www.instagram.com/sw20glimited/
-
GDII
- Forum Moderator - MR2OCNZ
- Posts: 5739
- Joined: Sun Jul 10, 2011 5:13 pm
- Stomping Ground: Wellington
- Prime Mover: SW20
- First name: Phill
Re: GDII's 1990 G-Limited
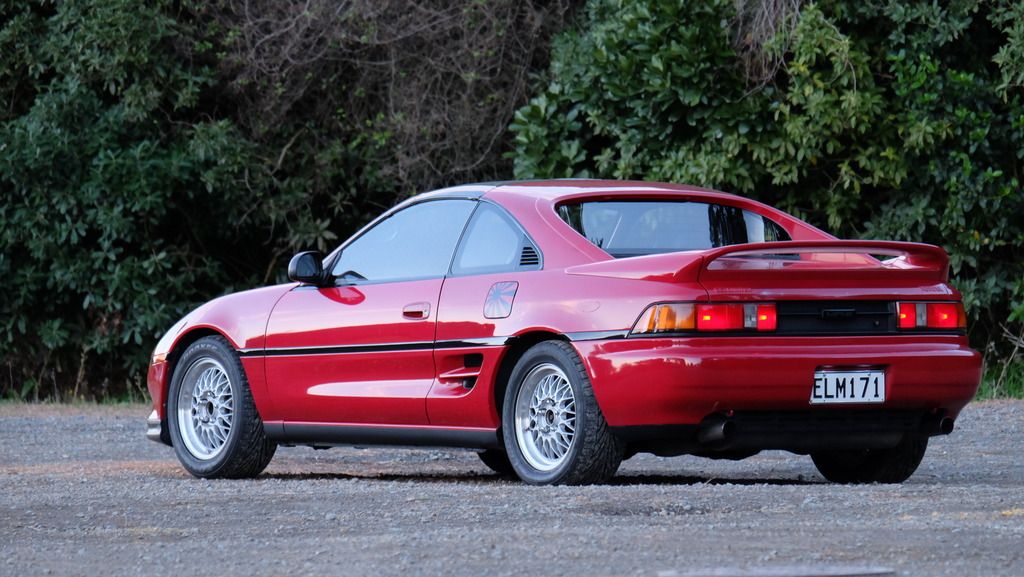
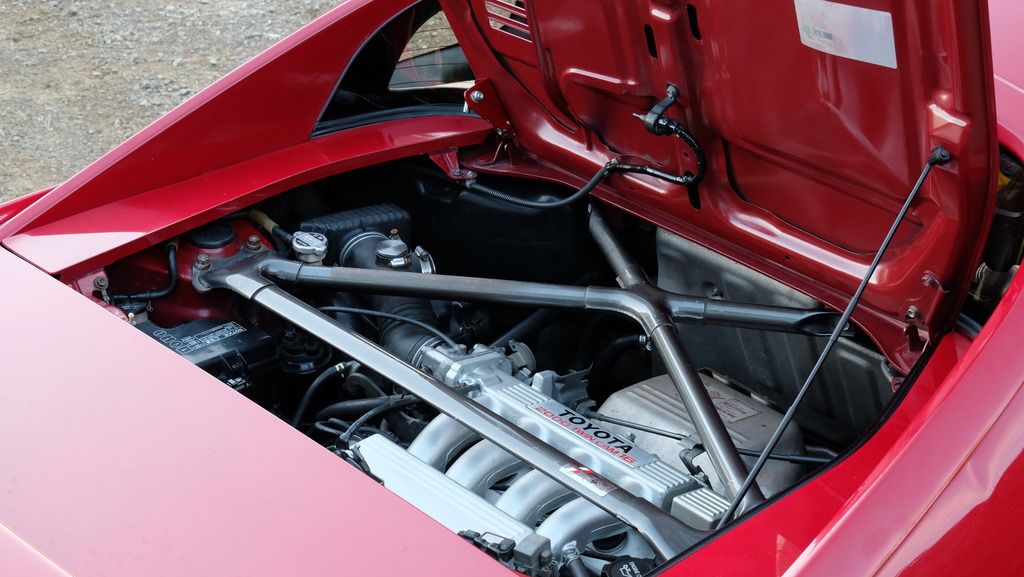
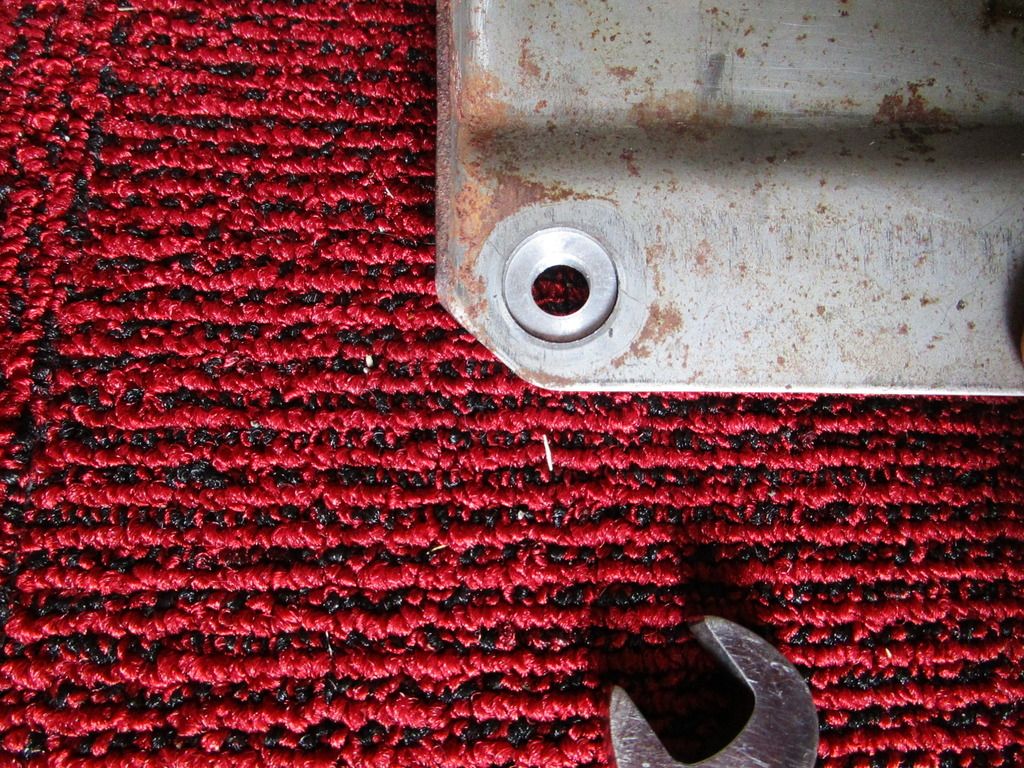
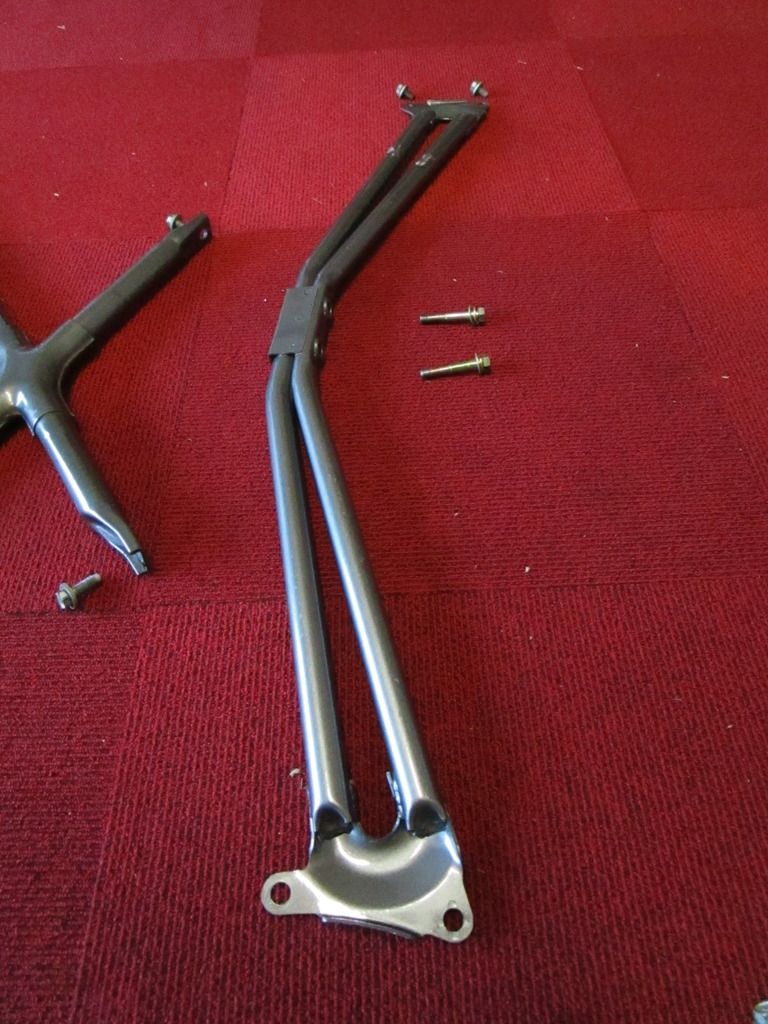
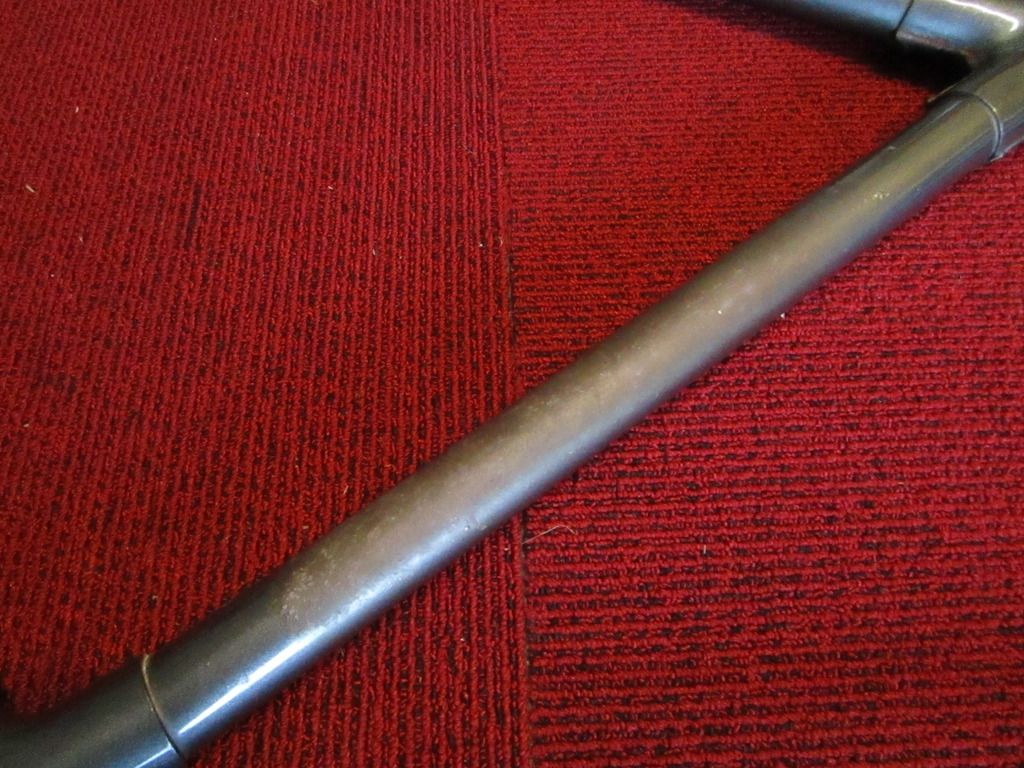
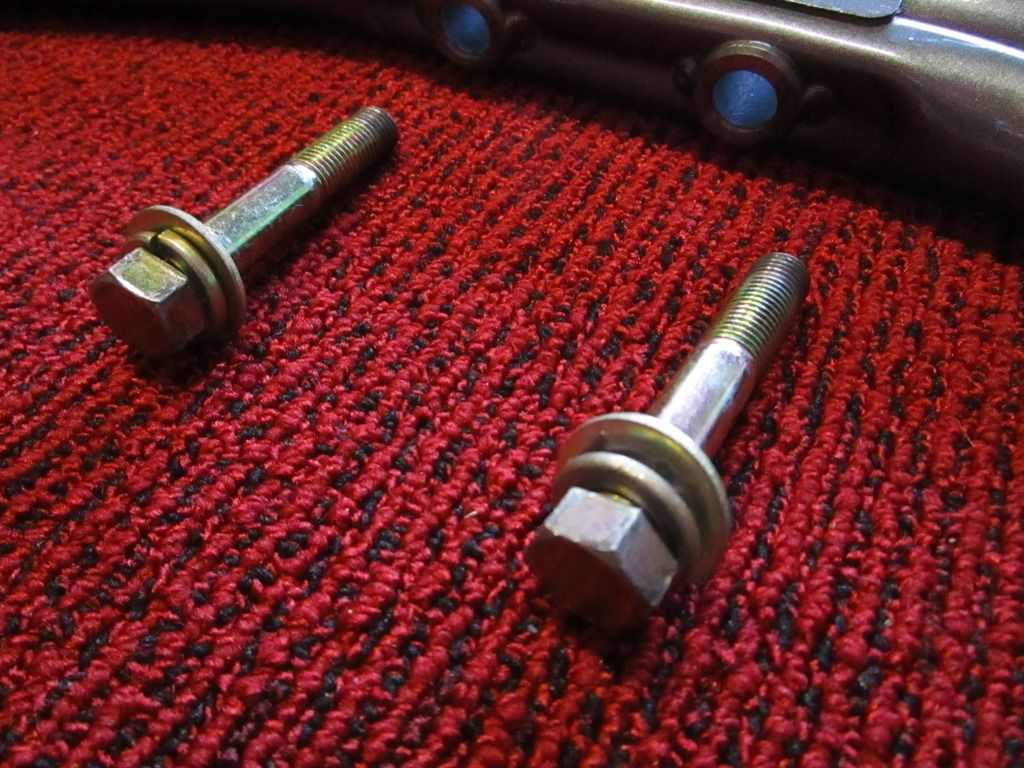
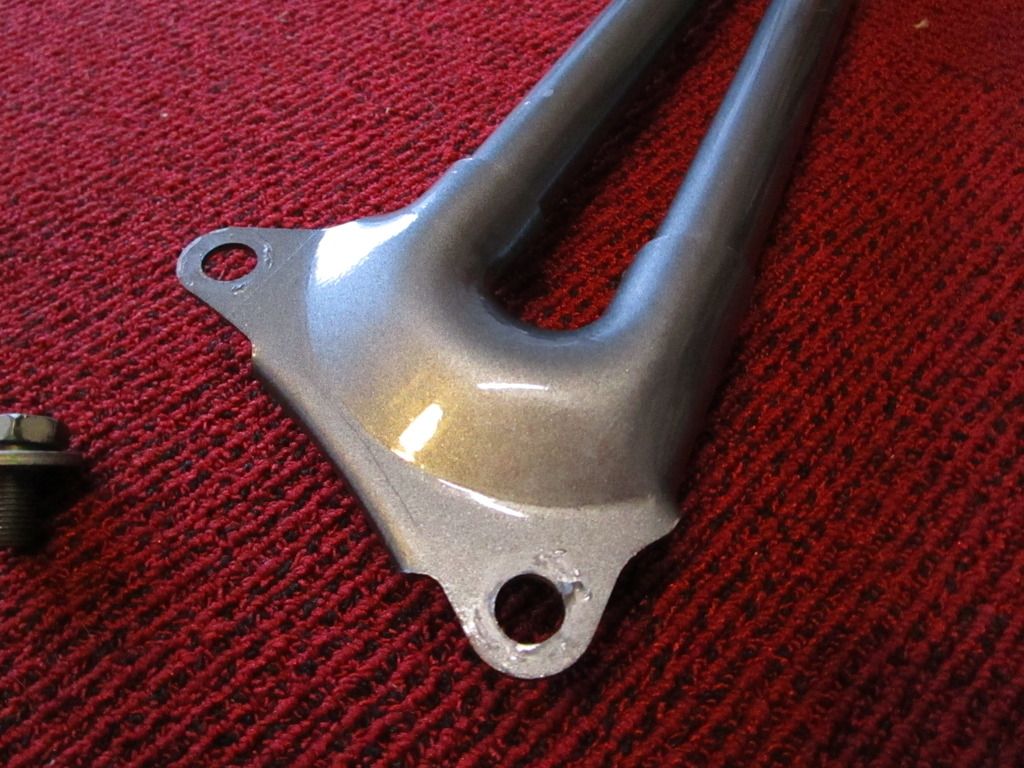
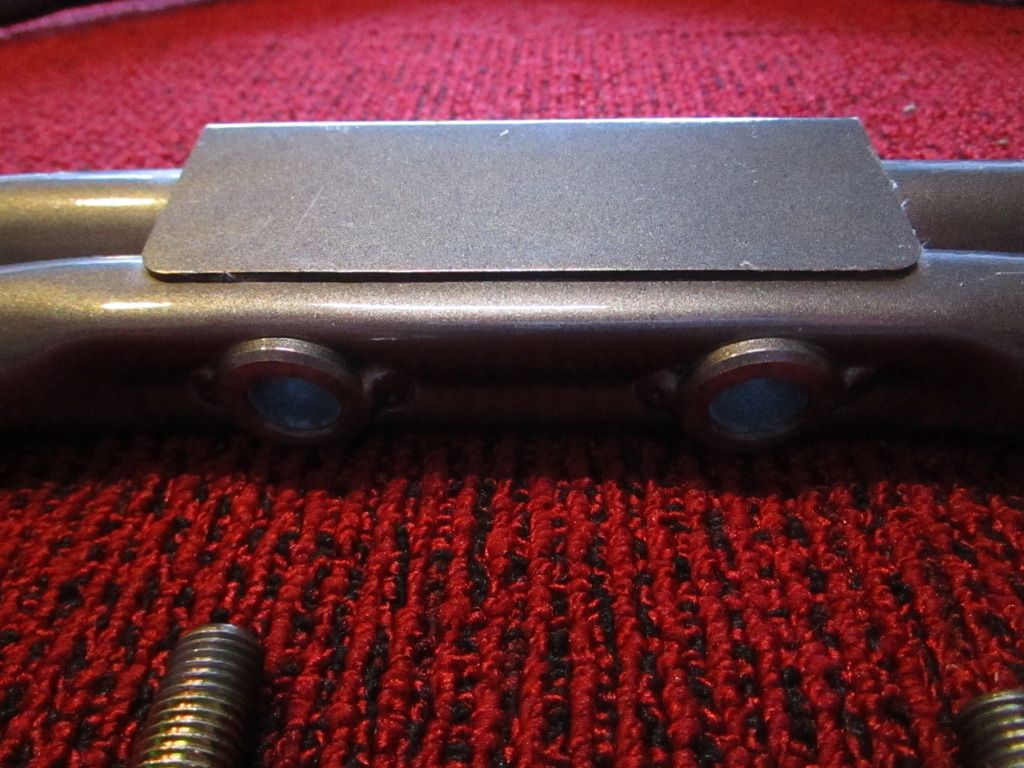
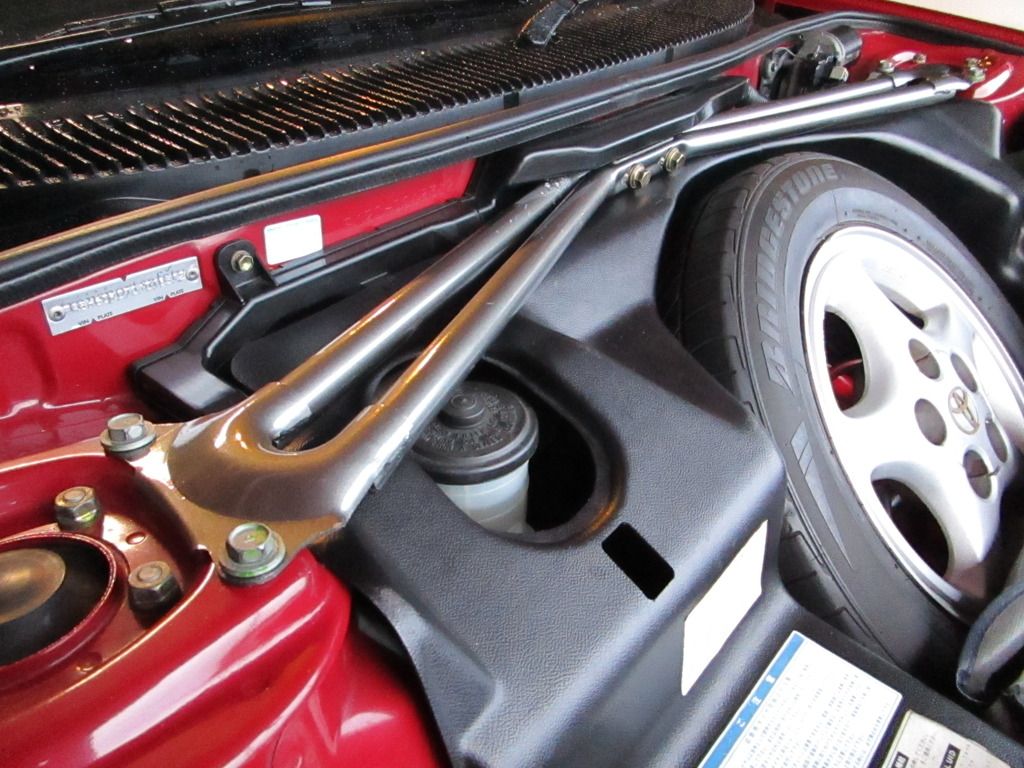
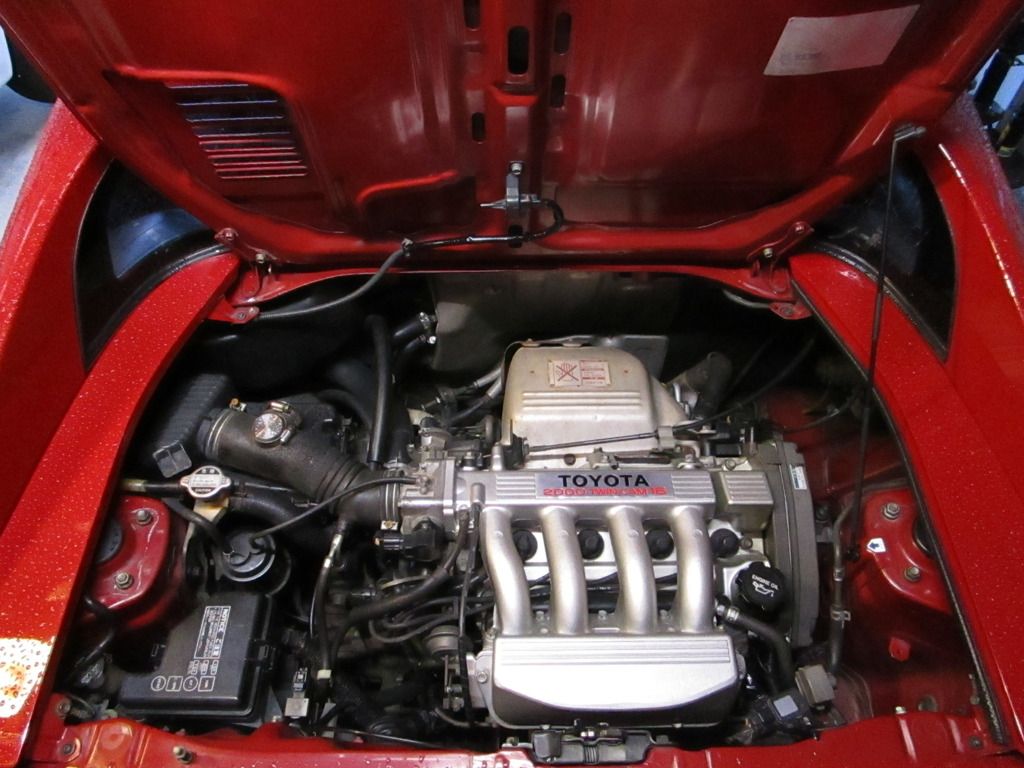
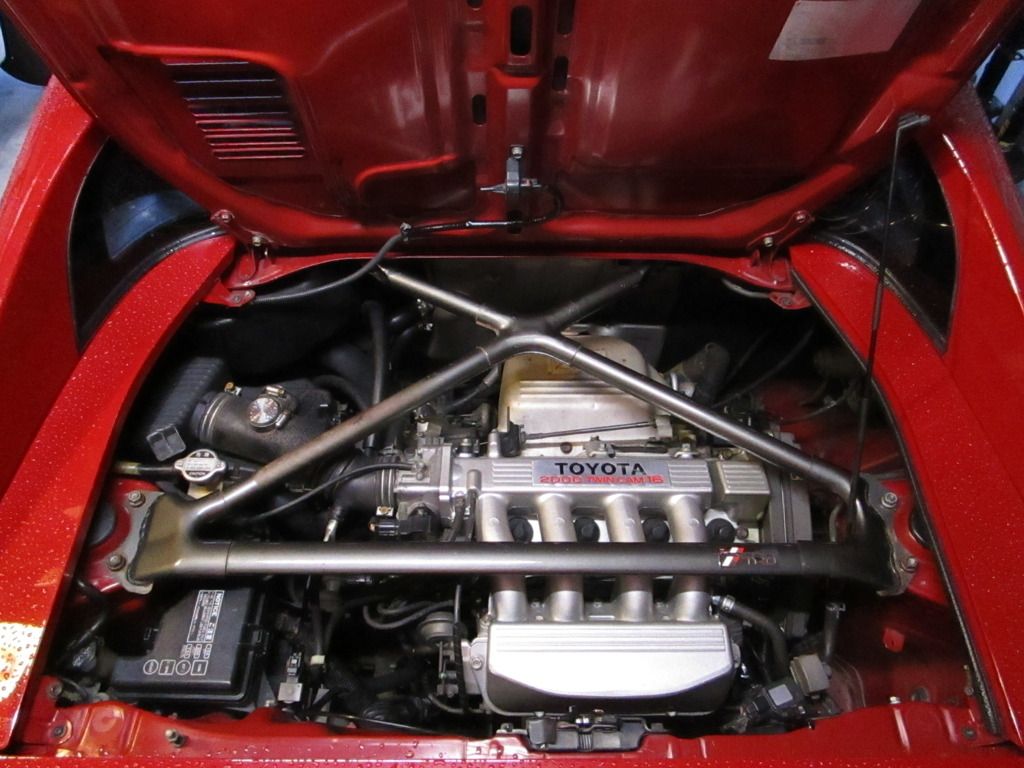
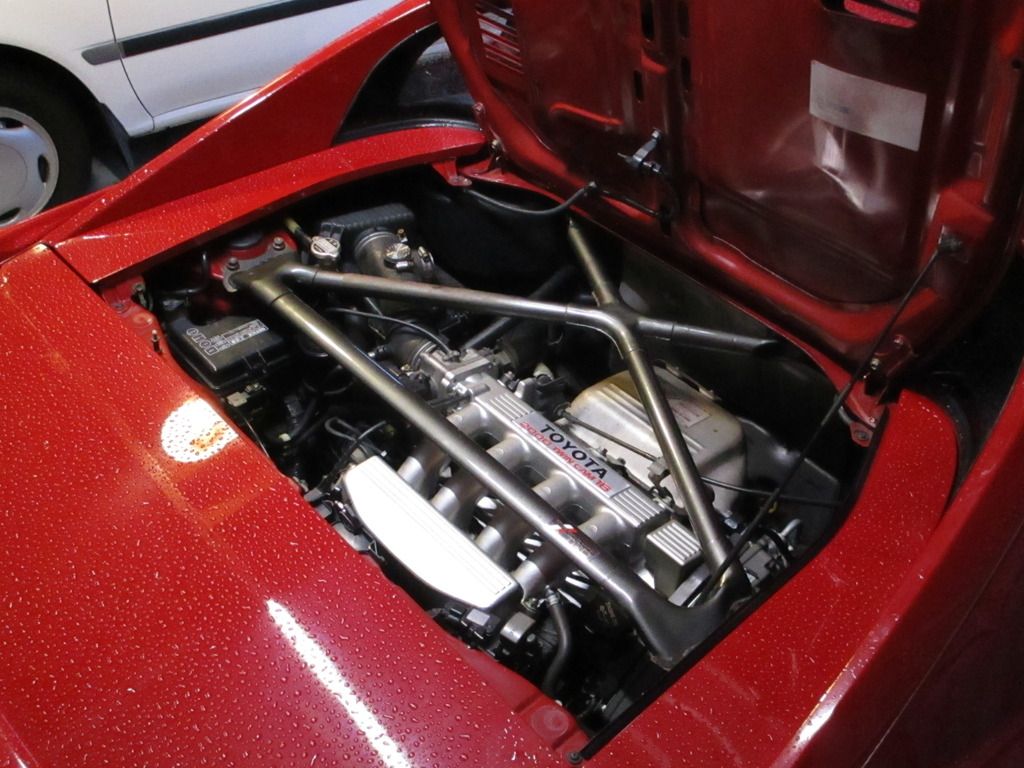
The next addition the MR2 is a pair of TRD strut bars. Usually the rear one is the only one up for sale but this time their was a pair. I took the opportunity to purchase these from a club member. They are not in mint condition but as I see it they have been well used looking at the typical damage to the surface from the hole in the engine lid. Nothing a sand and repaint can't fix. Just need to get the metallic matched up. The front bar came with the original longer centre bolts too which is a bonus. I think the bars came with a few more bolts for front bar but they are not really required. Just use the short centre bolt(s) in the extra hole that doesn't have a bolt on the right strut tower.
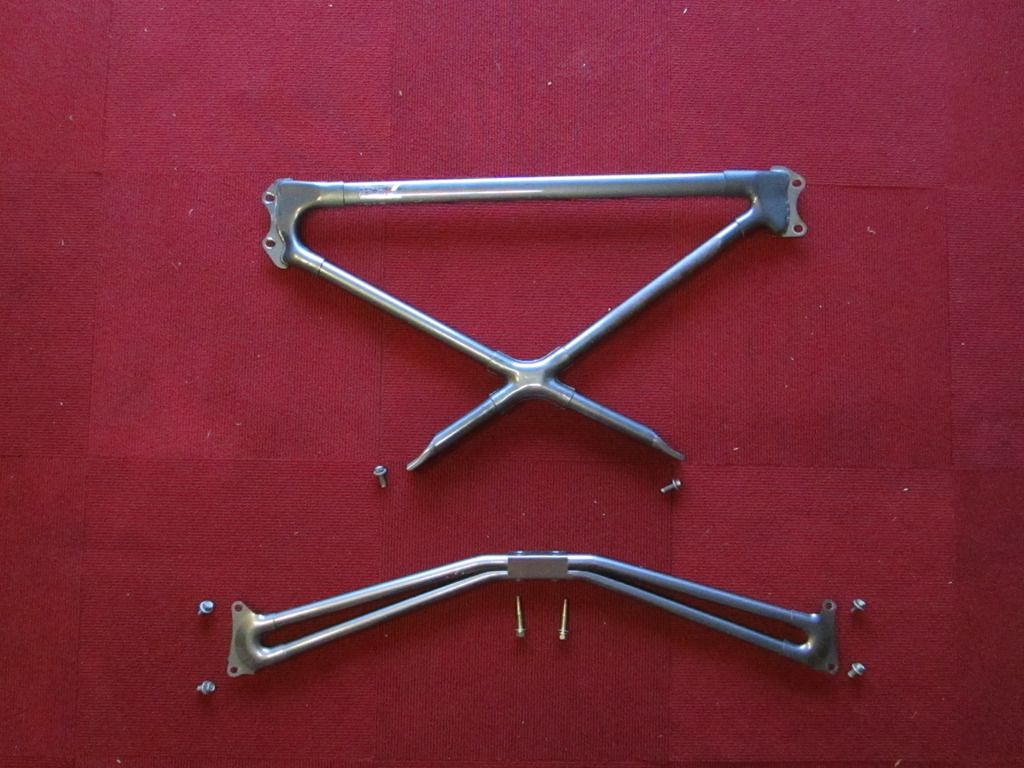
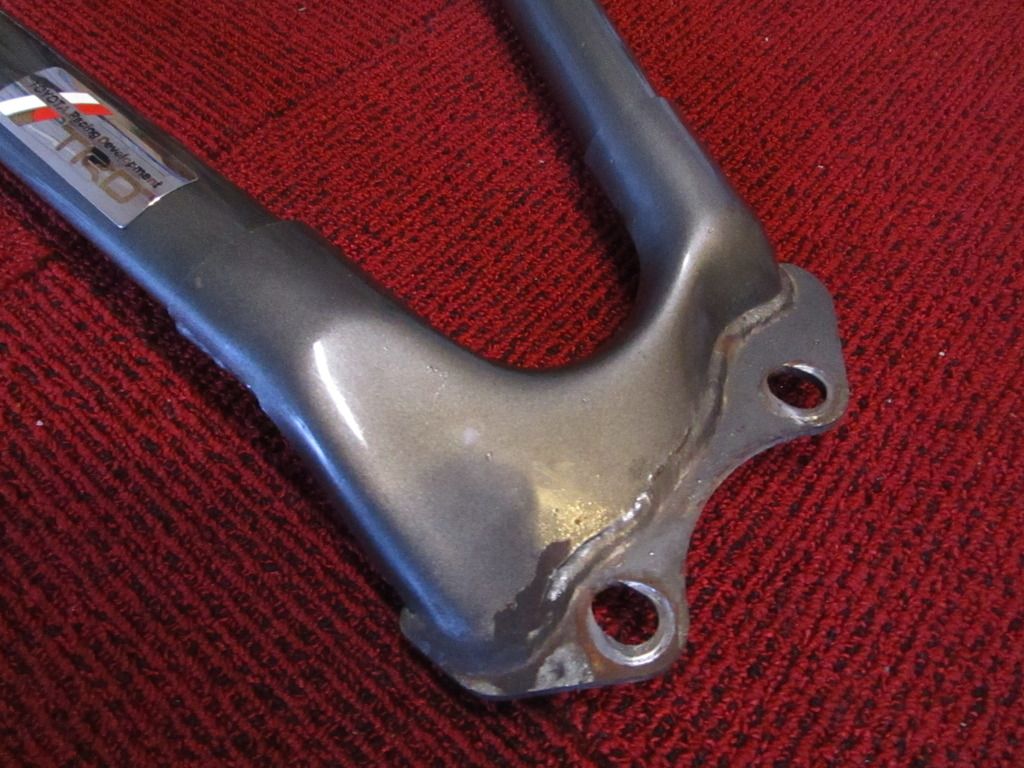
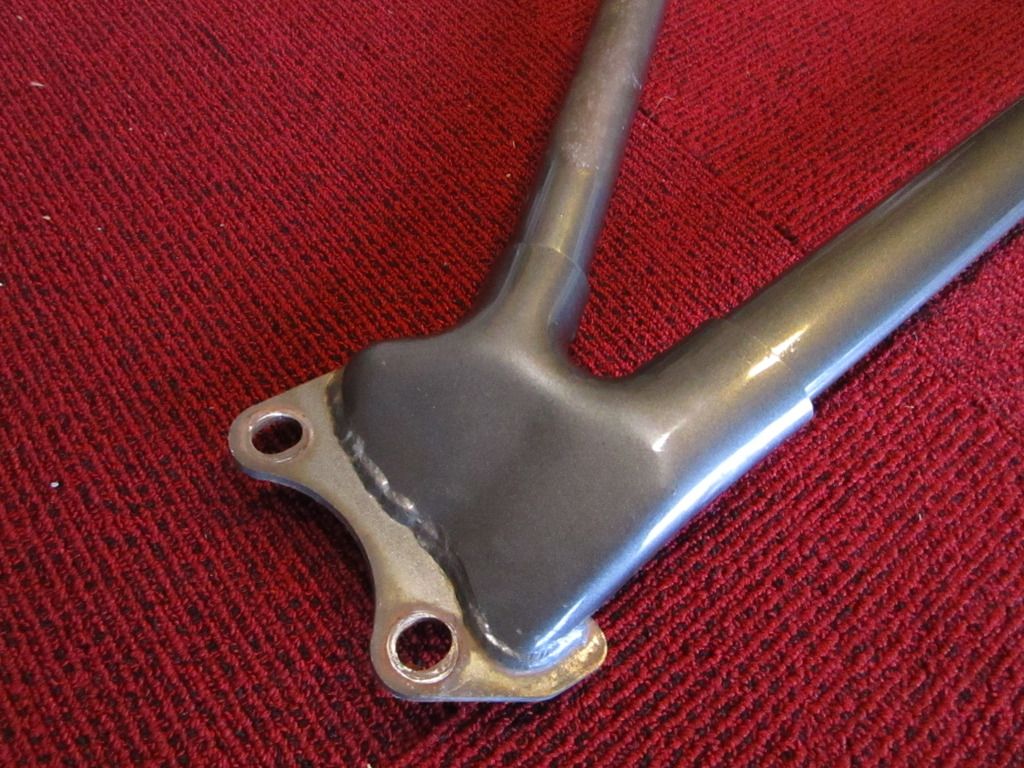
Damage from the hole in the engine lid.

TRD supplied long centre bolts
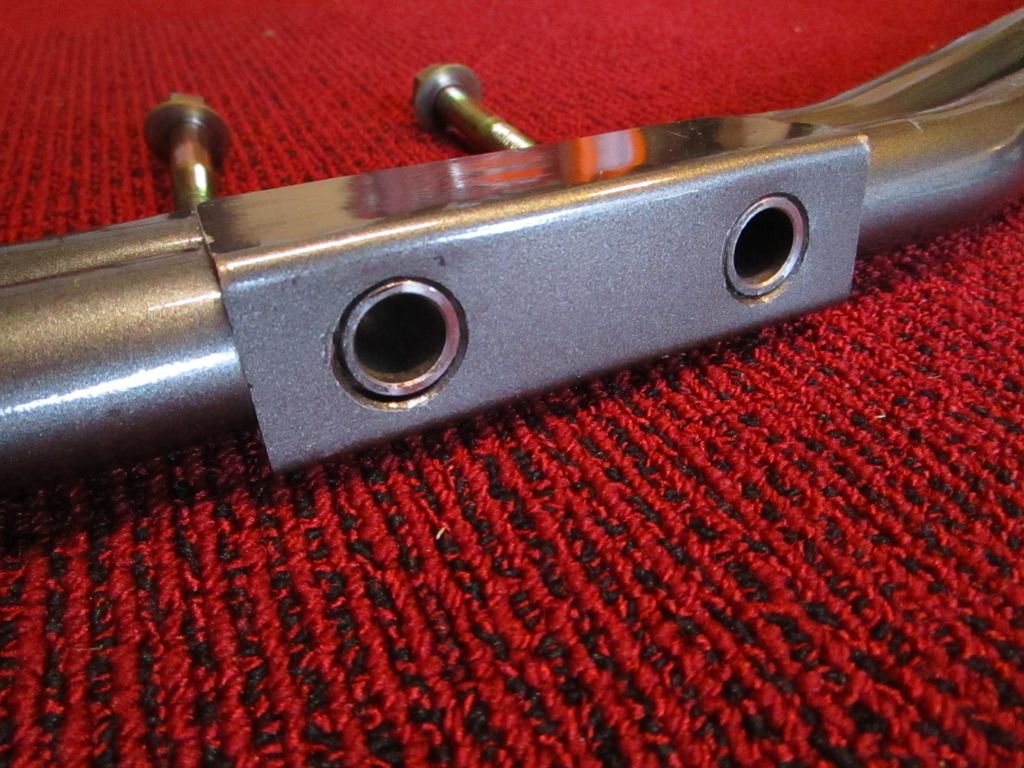
Fitted the front bar.
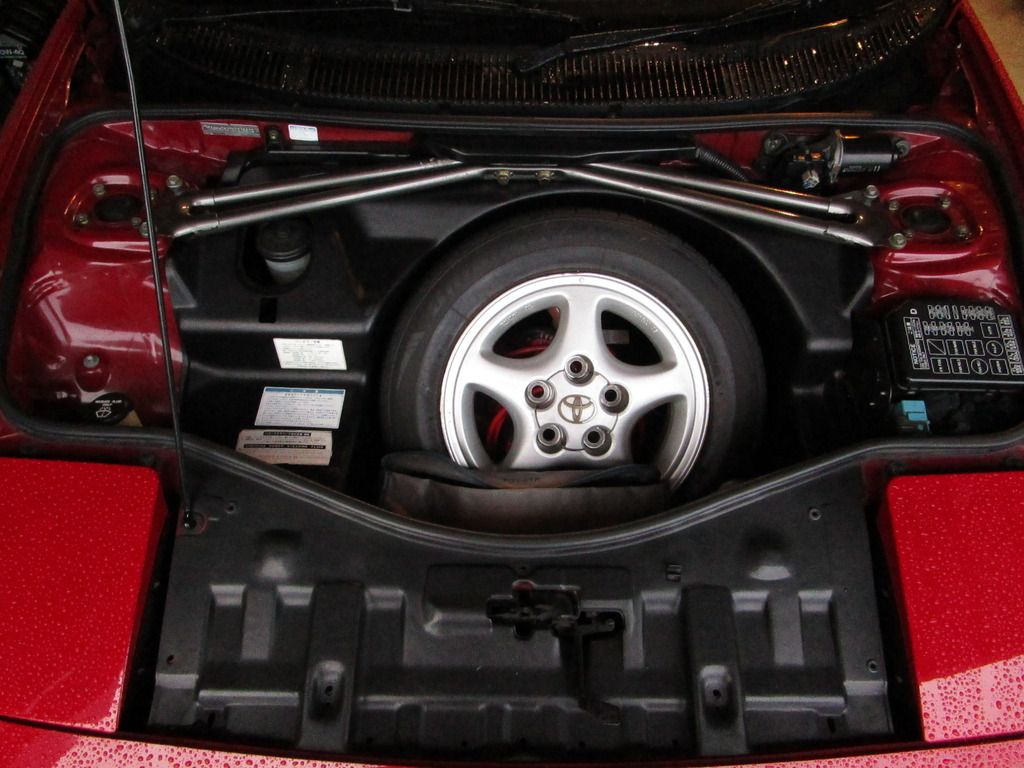
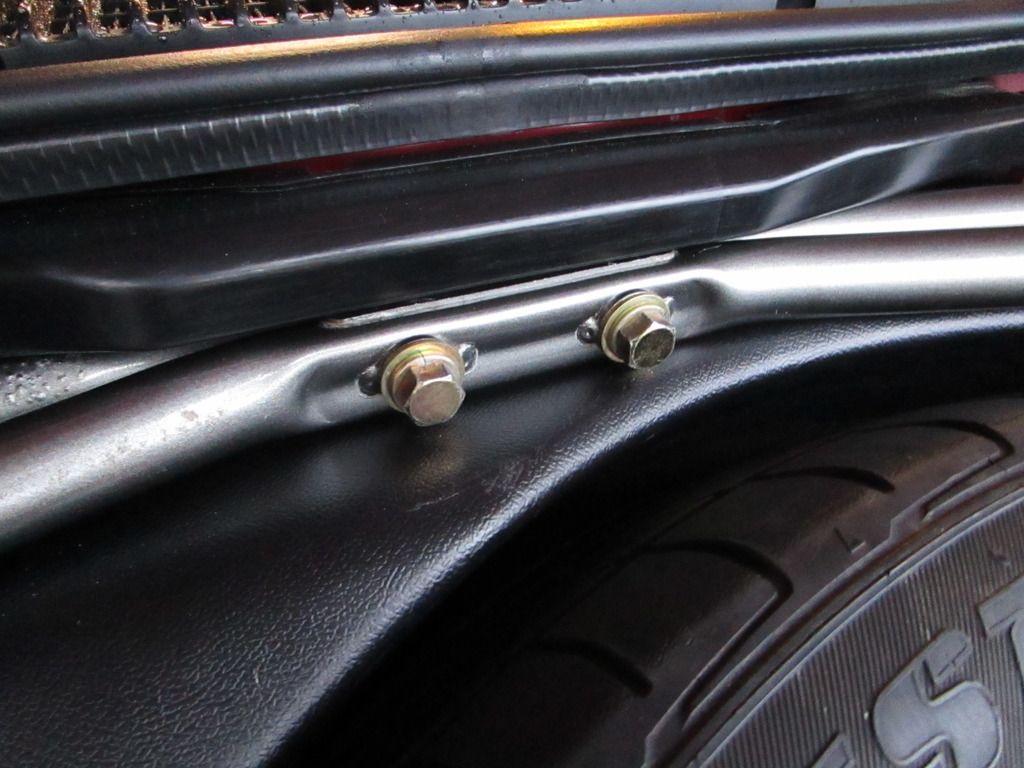
Fitted the rear bar.
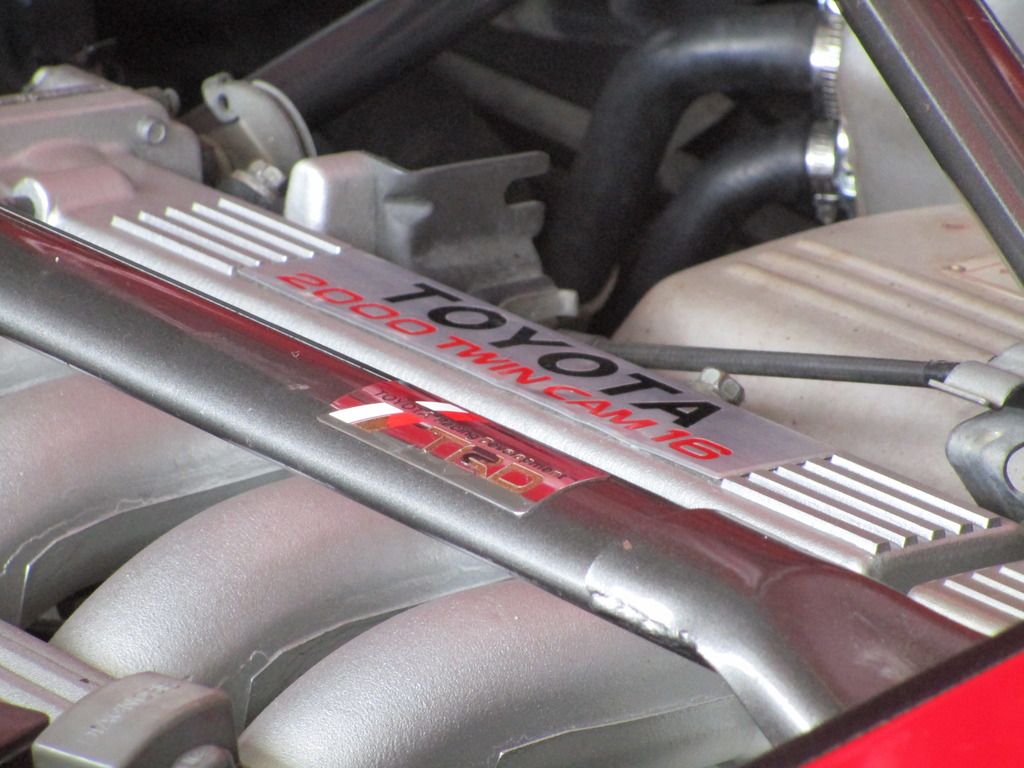
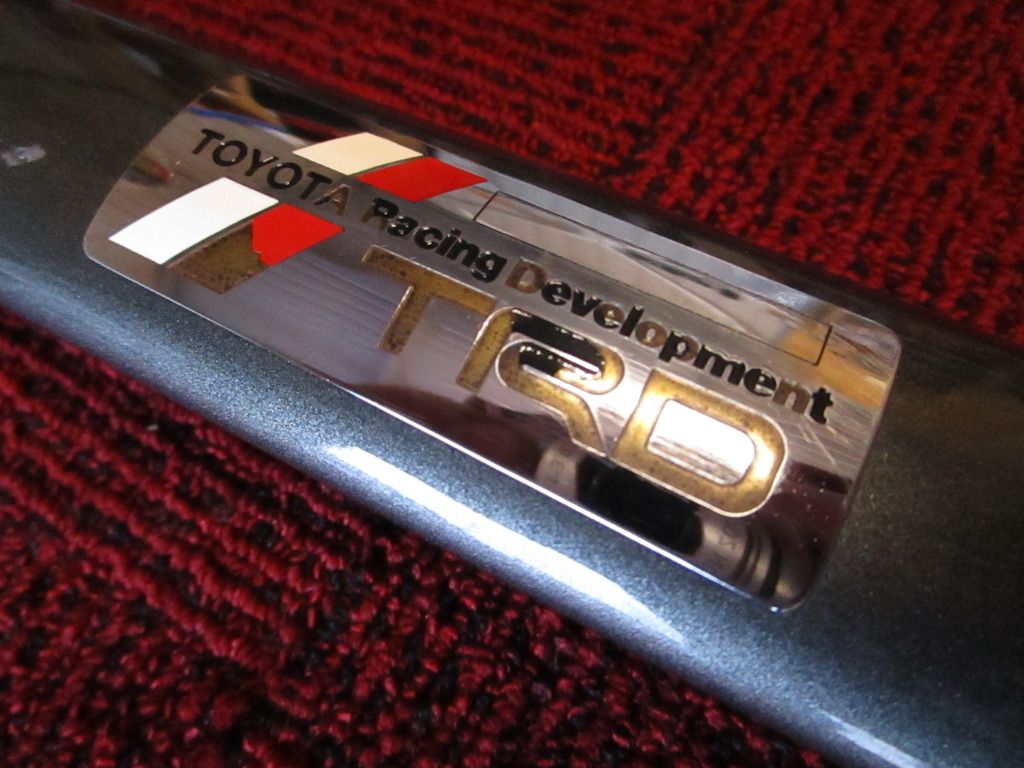
When I first got the braces the TRD badge looked pretty worn out but most of the 'damage' was the protective sticker going yellow and flaking off. Once I had removed it the only damage was the missing red and black paint which I can fix up easily.
Before
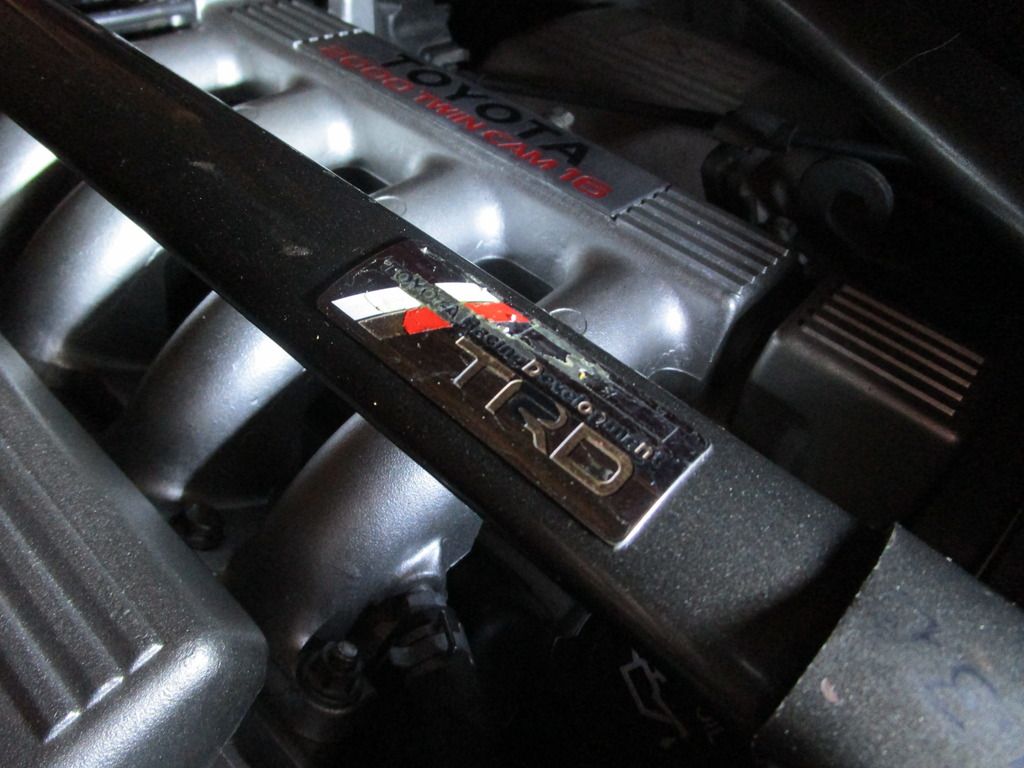
After


Damage from the hole in the engine lid.


TRD supplied long centre bolts


Fitted the front bar.


Fitted the rear bar.


When I first got the braces the TRD badge looked pretty worn out but most of the 'damage' was the protective sticker going yellow and flaking off. Once I had removed it the only damage was the missing red and black paint which I can fix up easily.
Before

After

1990 SW20 MR2 G-Limited (GEN4 3SGTE Installed)
2000 AE111R Corolla Wagon NZ New Daily
1996 AE101R Corolla Sprint NZ New Selling Soon
1990 EP81 Starlet XL (Sold)
1990 EE90 Corolla XL (Sold)
Instagram https://www.instagram.com/sw20glimited/
2000 AE111R Corolla Wagon NZ New Daily
1996 AE101R Corolla Sprint NZ New Selling Soon
1990 EP81 Starlet XL (Sold)
1990 EE90 Corolla XL (Sold)
Instagram https://www.instagram.com/sw20glimited/
-
ToyMonsta

- Club Member - MR2OCNZ
- Posts: 198
- Joined: Thu Jun 04, 2015 10:23 pm
- Stomping Ground: Christchurch
- Prime Mover: SW20
- First name: Hugh
Re: GDII's 1990 G-Limited
I would paint the metal pieces that hold the light in black again as they are starting to rust.GDII wrote:Where do you think I need more paint*84vvt wrote:I like the carbon
BUT you need to splash a bit more paint around
1990 MR2 GT Rev 1 (Garaged Gem) 191,000 KMs (Rebuilding Engine Now)