**HOW TO - Re-condition your Gear Selector

An area for topics concerning SW20's

Moderator: Moderators

Forum rules
This area is dedicated to technical discussions concerning SW20's. Please try to spell correctly because this will help people find information later if they are using search functionality. If you need assistance with your car and want to host a spanner day, please use the appropriate section of the forum: http://mr2.org.nz/phpbb3/viewforum.php?f=35 Thank you.
User avatar
CJ
Club Member - MR2OCNZ
Posts: 1400
Joined: Wed Aug 17, 2005 6:55 pm
Stomping Ground: Waikato
Prime Mover: SW20
First name: CJ

**HOW TO - Re-condition your Gear Selector

Post by CJ »

Some of you know I was complaining about the quality of my gear lever. I am reasonably sure its not the second syncro. If all else fails then I will have to look at that.
First step was checking the gear selector arm on the engine. I found that the small steel square bushing was actually missing. So, that wasn’t going to help. I got that replaced and still wasn’t fully happy so this writeup ensued.

First up is to remove the gear knob. If you have a standard gear knob it will simply screw off. If you have an aftermarket one it may be held on with allen screws or similar. Mine has an aftermarket one so im unscrewing the base cover, undoing the allen screws, then it just pulls off.
Image

Next i remove the leather gaitor. That just pulls straight up. Next is to remove the gaitor surround. This needs to lift up from the BACK EDGE FIRST! (furthest from the ashtray)
Image

Now to remove the centre console from the car. Start with the rear storage compartment. There are 4 screws holding this on. The first 2 are in the top lift up compartment.
Image

Next the other 2 are in the lower fold down compartment.
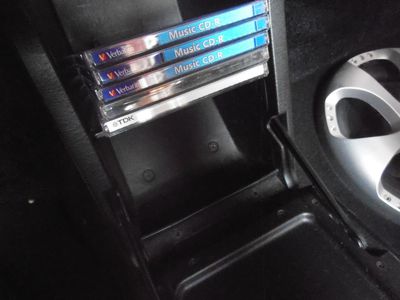
Image

Then you need to remove the main centre console. There are 6 screws holding this on. First 2 are at the back below the compartment i just took off.
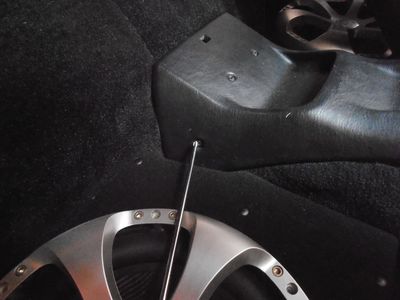
Image
Second set are about 1/2 way up behind the seats. You will have to shift them both forward to get to them
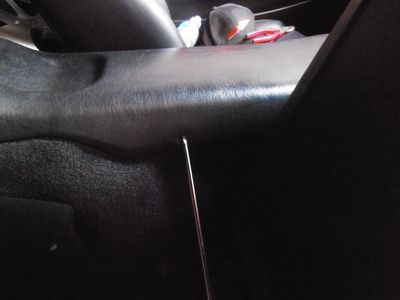
Image
The third set of screws is under the gaitar surround that i removed earlier
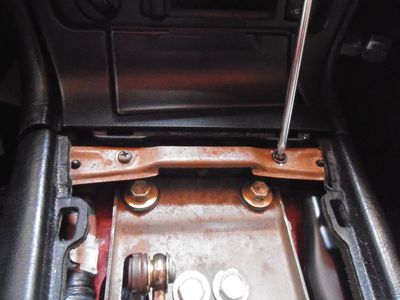
Image

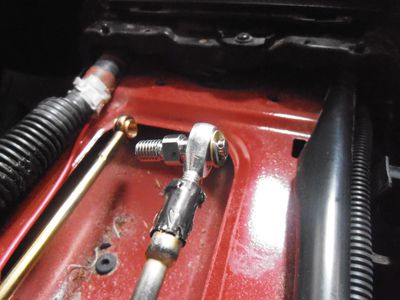
Next you can see there is a rose joint holding the gearstick to the forward/back gearlink cable. This undoes with a 12mm socket.
Also, on the side/side selector arm is a small clip holding the arm to the side/side selector cable. Use a flat head screwdriver to pull off the clip. Keep this and the washer to the side.
Next is to remove the large clips that are holding the gearlink cables to the main support plate. Seen at the bottom of the pic. These were pretty tight for me and i had to get hold of them with a set of short nose pliers and pull them off pretty hard.
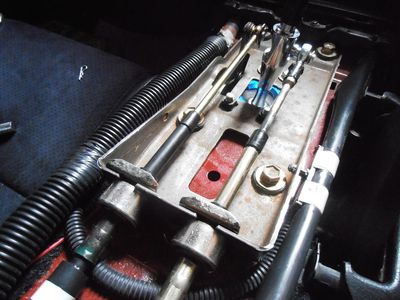
Image

You can see there are 4 12mm bolts holding the support plate down onto the chassis. Remove these and now the whole assembly should start to come away from the car.
Now youve got it out, its pretty straight forward to check all the bushes. Simply check each moving part in turn. Check for the ball of the gear stick sitting in the nylon seat. Has it got excess play. Check the spring on the side/side selector arm is firm, not bent. Check each of the other bushes for movement. There shouldnt be any.
Im going to be replacing all of them so i dont have to be doing this again.

Finally all my bushes have arrived, so next is to rebuild the gear selector components replacing the bushes.
My gear lever might look different to yours as ive got a JONO short shifter and drop plate. Apart from this, the rest of the assembly will work the same for you.

Ive pulled my gear stick out of the nylon seat and replaced it with the new one. These seem to be same for all gens. Part no. 33556-17010. Mine had a little up and down movement but this new one is in there tight! Ive put a LITTLE BIT of high quality grease into the seat. This is just to prevent the ball of the gearstick wearing away too much of the nylon seat over time. I found the allen screw on my short shifter a little loose so tightened that up. Also replaced the bushing that goes onto the side/side selector arm. These also seem to be the same for all gens. Part no. 33548-12021. Now I thought mine a little slack but wasn’t that bad I thought, until I put the new one on. I had to use a small hammer as it was real tight. All these “not too bads” are adding up to a whole lot of slack.
Ive used the same retaining ring around the nylon seat as these don’t tend to stretch at all.
Next ive replaced the little rubber seat bushing that goes in the bottom of the steel housing. This is also a generic item. Part no. 90385-24001 Put this in with REBATE UP.
Image

Then you can put the nylon seat with the gear lever all into the housing.
Next is the side/side selector arm. This bushing is made up of two parts. Again I thought its not that bad. But only removing them found the plastic very brittle and actually just shattered with a screwdriver… This bushing is different for the 94+. You will have to check part no. for yours if you have a gen 3. For 1 and 2 part no. is 90386-12034
These are sold separately and you will need 2 of them!
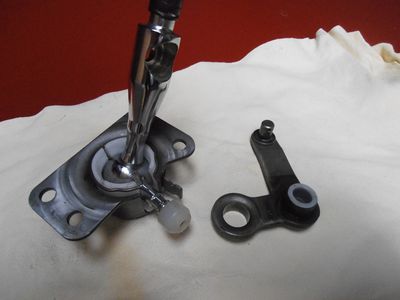
Image

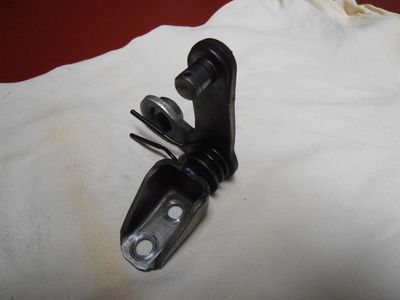
Next is the pivoting bracket. This just has a spring on it that returns your gear lever to centre when moving side/side. Again, didn’t think my spring seemed bad till I got the new one. You can clearly see the difference in the size of it. Its been stretched out quite a bit really. Old one is at the back in the picture. Not only are the spring coils further apart, the arms are wider too.
Image

So, the spring slides over the selector arm with the bushing I just did,
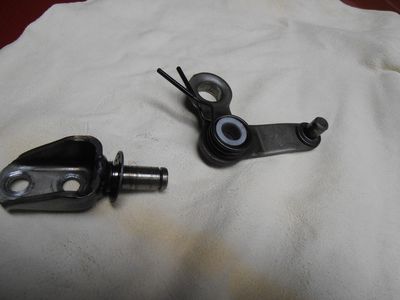
Image

then this whole assembly goes onto the pivoting bracket. (make sure the washer is on the pivoting bracket) This gives the spring something firm to press against when you finish the assembly off with the second washer and “C” clip.
Image
Image

That’s both of the assemblies done. Time to put them all back together
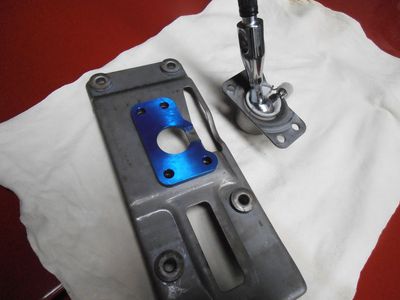
Ive got here, the main plate support. The 4 main mounting points that you screw this down with onto the car chassis have 4 little metal bushes that are supported with rubber shown here. These are also replaceable. I haven’t done this, you can. Alternatively DeltaV sell brass bushings if you like. My reassembly goes…Main support plate, drop plate underneath, then the gear seat housing under that. You may not have the drop plate.
Image
Screw these together with the 14mm bolts. (Further apart bolts, with the thread welded in the plate) I haven’t done the bolts up tight, to allow for assembly of the side/side arm.
Image

Now I had to slide in the side/side selector. Youll need to get the spring into position as well as slide the arm over the bushing all at the same time. A little fiddly but do-able by yourself.
Image

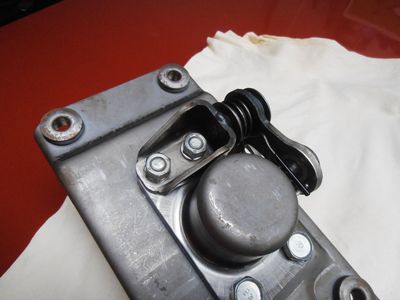
Put the other two bolts in..Remember, these bolt down, with the nuts on the underside of the support plate.
Tighten all four bolts up well.
Image

The whole lot together with no slack in any of the bushes.
Image

Its amazing how much difference each of those “tiny bit loose” things felt.
Into the car.


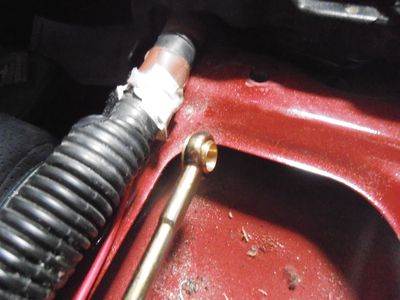
Ive taken out the plastic bushing that goes in the side/side selector cable. Ive replaced it with a solid brass one.
Image

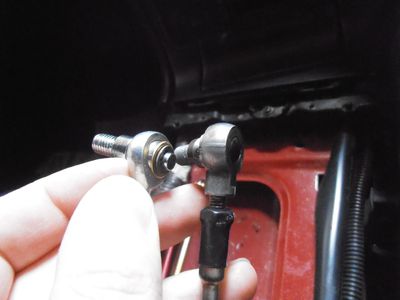
This kit I got from DeltaV. It has this bushing along with a new brass rose joint for the forward/back selector cable.
Image

Rose joint replaced.
Image

Brass washer seems not quite thick enough. We’ll see if this slack makes a difference.
Time to drop the gear lever assembly/support plate all in. Put the side/side selector cable on (with washer and clip) and also the rose joint in place (12mm nut) before securing everything down with the 4 main bolts.
Also replace the two clips holding the selector cables in place onto the main support plate.
Image

All done.
Put your centre console back on using the 2 screws up the front of the console. Two on each side. At half way down (by seats) and also two at the rear under centre compartment. Total 6 screws. Don’t forget the little screw cover caps. These always go missing otherwise.
Replace the 4 screws in the centre compartment. 2 in the upper lift up compartment and 2 in the lower fold down compartment.
Put your Gear gaitor surround back on. THE FRONT CLIPS CLOSEST TO ASHTRAY FIRST!
Replace the gaitor and screw your gear knob back on.
Done!


Conclusion: I had to wait nearly a month for all the pieces to arrive from Australia and Japan. Toyota had to actually make one of the bushings new. NST tells me that its because these parts rarely fail that they don’t stock them much. I think its more likely that most peoples cars will have at least a couple of these bushings failing but they tend to look at other things like trans fluid or selector cables or syncros. Once one of these bushings loosens. It puts that bit more stress on each of the others. Domino effect, compounding as they all fail.

User avatar
Benckj
Forum Moderator - MR2OCNZ
Posts: 7149
Joined: Thu Nov 24, 2005 12:44 pm
Stomping Ground: Otago
Prime Mover: More than one MR2
First name: Jim

Re: **HOW TO - Re-condition your Gear Selector

Post by Benckj »

Good write-up CJ. Something to put on my to do list.
Jim Benck
90 rev 1 parts car
98 rev 5 GT- all the mods

User avatar
ClanFever
Executive Officer - MR2OCNZ
Posts: 2197
Joined: Tue Sep 11, 2012 11:25 pm
Stomping Ground: Wellington
Prime Mover: SW20
First name: Olaf
Contact:

Re: **HOW TO - Re-condition your Gear Selector

Post by ClanFever »

Short shift install video which may help if you want to see it actually happening, just add the steps CJ has put in where applicable

https://www.youtube.com/watch?v=nYlvZ95KmGI
Ex-President & Wellington Area Coordinator & Lower North MR2 Leader
Current: 1992 Toyota MR2 G-Limited with Gen 4 3S-GTE + CT20B (APEXED), 2005 Toyota IST, 2008 Toyota Vanguard - 2GR!
Past: 1990 Toyota MR2 G-Limited, "Semi Parts Car" 1991 Toyota MR2 G-Limited, '91 G-Limited, '89 G-Limited, '91 NZ New MR2, '91 G-Limited, '91 GT (Parts Car), '99 Altezza 3SGE, '98 Altezza 1GFE, '88 Corolla, '96 Curren, '94 Ceres Corolla, '94 Levin, '90 Hiace Super Custom 4x4, '91 Mirage, '93 MX-6 J-Spec, '91 Familia, '91 Galant, '90 Navara, '96 Commodore, '94 Pajero, '89 Lancer, '93 Pajero, '92 Pajero, '89 Mirage, '92 Terrano, '87 Familia, '03 Colt, '91 Pajero, '91 Pajero, '97 Carib, '96 Carina, '02 Turbo Forester

User avatar
CJ
Club Member - MR2OCNZ
Posts: 1400
Joined: Wed Aug 17, 2005 6:55 pm
Stomping Ground: Waikato
Prime Mover: SW20
First name: CJ

Re: **HOW TO - Re-condition your Gear Selector

Post by CJ »

If there are still issues with gear selection. There are a couple of bushes in the selecting bellcrank. I havent replaced them this time as they were done when i had my engine built.

Mike n Rochelle
Club Member - MR2OCNZ
Posts: 1017
Joined: Sat Jan 02, 2010 10:49 pm
Stomping Ground: Otago
Prime Mover: More than one MR2
First name: mike

Re: **HOW TO - Re-condition your Gear Selector

Post by Mike n Rochelle »

Thanks for the write up I will be checking the condition of both our sw shifters as soon as the garage is finally done.

Mike n Rochelle
Club Member - MR2OCNZ
Posts: 1017
Joined: Sat Jan 02, 2010 10:49 pm
Stomping Ground: Otago
Prime Mover: More than one MR2
First name: mike

Re: **HOW TO - Re-condition your Gear Selector

Post by Mike n Rochelle »

Did replacing the rose joint make a difference?

User avatar
CJ
Club Member - MR2OCNZ
Posts: 1400
Joined: Wed Aug 17, 2005 6:55 pm
Stomping Ground: Waikato
Prime Mover: SW20
First name: CJ

Re: **HOW TO - Re-condition your Gear Selector

Post by CJ »

a little hard to tell. The better rose joint prevents the stick from swivelling in a circle motion if you get what i mean. To really judge i would have to swap each bush one by one testing in between.
Certainly doing the whole lot has made a huge difference. It feels very solid and precise movements. Actually i would say it requires more pressure on my hand to shift gear, but it locates itself with more accuracy. A shorter throw now, less distance to travel from third to fourth for example.

flyingbrick
Guest of the Club.
Posts: 16
Joined: Tue Dec 28, 2010 9:26 pm
Stomping Ground: Waikato
Prime Mover: Looking for an MR2
First name: nathan

Re: **HOW TO - Re-condition your Gear Selector

Post by flyingbrick »

Hi all.

Just to add my 2c into things... Because I am cheap.

The main plastic bush or cup can be tightened by wrapping in metal shim plate ( just thin sheet metal) before putting it back into its metal holder ( to squeeze the cup tighter)

You may be able to squeeze and hold the main cup tighter to the ball by throwing a hose clamp around it and tightening it until it feels good ( but muuuum, it feels good)

Get creative- quality zip ties also work for stuff like this.

You may be able to tighten the shift cables rose joint by squeezing the outer onto the ball with a vice... Or a vice and a hammer ;-)

Just my experience but most slop seems to come from the rubber and bronze bushed cable ends on the gearbox. cheap skateboard / rollerblade bearings (can get bearing code for you all if req) fit in place of this worn bush perfectly.

These bearings improve feel 100% but are not perfect as they limit movement potentially too much.... However I urge you all to try it for yourself and if not happy take a bearing to autolign and say " hey I'd like a nolithane bush the same size as this bearing please".

I'm VERY surprised that Toyota made a bush just for you CJ! Usually parts are produced in runs of hundreds or thousands to keep setup costs to a minimum per part.

Good writeup

-Nathan

User avatar
CJ
Club Member - MR2OCNZ
Posts: 1400
Joined: Wed Aug 17, 2005 6:55 pm
Stomping Ground: Waikato
Prime Mover: SW20
First name: CJ

Re: **HOW TO - Re-condition your Gear Selector

Post by CJ »

i would be surprised too. The response i got was, "they sold the one that was left before my order reached the line. So we'll make a new one for you." I know they are slowly discontinuing lines for the mr2 but if it is used in other cars too, then id expect they would have run a few hundred.

JoshTR
Guest of the Club.
Posts: 5
Joined: Fri Jun 07, 2013 1:07 am
Stomping Ground: Auckland
Prime Mover: SW20
First name: Josh

Re: **HOW TO - Re-condition your Gear Selector

Post by JoshTR »

I'm keen to do this but when i called toyota they said its something like $150 to get the nylon parts from Japan???, is there anywhere else i can get these parts from? thanks.

Grrrrrrr!
Guest of the Club.
Posts: 1735
Joined: Tue Jul 26, 2011 10:38 pm
Stomping Ground: Auckland
Prime Mover: SW20
First name: Lee

Re: **HOW TO - Re-condition your Gear Selector

Post by Grrrrrrr! »

JoshTR wrote:I'm keen to do this but when i called toyota they said its something like $150 to get the nylon parts from Japan???, is there anywhere else i can get these parts from? thanks.
If toyota NZs prices are stupid, lithiatoyotaparts.com (USA toyota dealer) is usually worth a look.

Just checked, for the 4 parts that I saw CJ mention part numbers for the total parts cost is

Code: Select all

SEAT, TRANSMISSION SHIFT LEVER BALL( 33556-17010)                                       US$30.88
BUSH (FOR TRANSMISSION SHIFT LEVER BALL SEAT) (90385-24001)	                            $ 1.76
BUSH, NO.1, SHIFT LEVER (FOR FLOOR SHIFT) (33548-12021)                                   $ 2.41
BUSH (FOR SELECTING BELLCRANK NO.1) (90386-12034)                                  2 @    $ 1.39

Total is < USD$40, but then they want $49 for estimated shipping (seems to be their new minimum international shipping charge) which brings it up  to just under us$90 or at current exchange rates  NZ$113.
Not a huge amount cheaper on those parts, I'd stick with toyota NZ unless you have friends in the US that can buy for you then forward them on.

None of these parts are particularly common, they were used on AW,SW and a couple of vans, the latest production of which was in 2000, so I cant see Toyota bothering to make more of them anytime soon. Might pay to order now while stock exists.
Gen 2 GT trackcar: Used and Abused, now getting some TLC.
CL7 Euro R, the fun begins at 6000 rpm

User avatar
CJ
Club Member - MR2OCNZ
Posts: 1400
Joined: Wed Aug 17, 2005 6:55 pm
Stomping Ground: Waikato
Prime Mover: SW20
First name: CJ

Re: **HOW TO - Re-condition your Gear Selector

Post by CJ »

JoshTR wrote:I'm keen to do this but when i called toyota they said its something like $150 to get the nylon parts from Japan???, is there anywhere else i can get these parts from? thanks.
One of the many reasons to become a member mate... Less than half that for members. They will be ex japan though as Toyota isnt stocking a lot of parts for us now.

User avatar
BBY4RE
Club Member - MR2OCNZ
Posts: 93
Joined: Mon Nov 29, 2004 2:35 pm
Stomping Ground: Auckland
Prime Mover: SW20
First name: Melvin

Re: **HOW TO - Re-condition your Gear Selector

Post by BBY4RE »

Does anyone have the part number for the spring?
Mines tired and weak.
I’ve got it apart at the moment, so I may as we’ll deal to it.
I’d imagine it’s probsbly a spring that’s used on more than one vehicle type.
402.6 r/w kw @ 7,700 rpm
540 r/w nm @ 6673 rpm @23psi

User avatar
GDII
Forum Moderator - MR2OCNZ
Posts: 5739
Joined: Sun Jul 10, 2011 5:13 pm
Stomping Ground: Wellington
Prime Mover: SW20
First name: Phill

Re: **HOW TO - Re-condition your Gear Selector

Post by GDII »

It's 90508-22001 but it's unique to SW and AW. Maybe try bending the spring the other way to tighten it up?
1990 SW20 MR2 G-Limited (GEN4 3SGTE Installed)
2000 AE111R Corolla Wagon NZ New Daily
1996 AE101R Corolla Sprint NZ New Selling Soon
1990 EP81 Starlet XL (Sold)
1990 EE90 Corolla XL (Sold)
Instagram https://www.instagram.com/sw20glimited/

User avatar
tw2
Area Coordinator - MR2OCNZ
Posts: 1349
Joined: Wed Jun 24, 2009 9:32 am
Stomping Ground: Waikato
Prime Mover: SW20
First name: Thomas

Re: **HOW TO - Re-condition your Gear Selector

Post by tw2 »

They are not expensive but I think it had to come from Japan, 2-3 weeks wait.
Thomas, 91 G, 05 E55
Area Coordinator Waikato

Post Reply